Subaru Crosstrek Owners Manual: Multi information display (models with type B combination meter)
WARNING
Always pay adequate attention to safe driving when operating the multi information display while the vehicle is in motion. When operation of the multi information display interferes with your ability to concentrate on driving, stop the vehicle before performing operations on the screen. Also, do not concentrate on the display while driving. Doing so may cause you to look away from the road and could result in an accident.
Various information will be shown on the multi information display. Also, a warning message will appear on the display if a malfunction, etc. is detected. In addition, several settings for the displayed content can be performed.
Multi information display
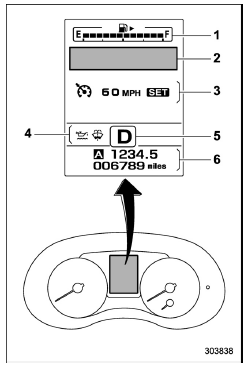
- Fuel gauge (refer to "Fuel gauge" 3- 12.)
- Warning screen (refer to "Warning screen" 3-39.)/Basic screen (refer to "Basic screens" 3-39.)
- Cruise control information display
- Warning indicator
- Select lever/gear position indicator (refer to "Select lever/gear position indicator (CVT models)"
- Odometer (refer to "Odometer" 3-10.)/ double trip meter (refer to "Double trip meter"
Control switch
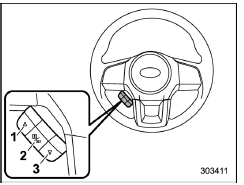
- Up (select)
- Set (enter)
- Down (select)
 Clock
Clock
To adjust the time shown by the clock,
press the "+" button or "−" button. If you
press the "+" button, the indicated time will
change in one-minute increments. If you
press the "− ...
 Basic operation
By operating "
" or "
" of the control
switch, the screens and selection items
can be switched. When the "
/SET"
switch is pulled toward you, the item can
be selected and set.
...
Other materials:
Remote engine start system Wiring diagram
WIRING SYSTEM > Remote Engine Start SystemWIRING DIAGRAM ...
Installation
EXTERIOR BODY PANELS > Front Sealing CoverINSTALLATIONCAUTION:• If the sealing cover - front door gets broken, replace it with a new part.• Apply a uniform bead of butyl tape.• Attach the sealing cover - front door, keeping it from becoming wrinkled.• Breaks in the bead wi ...
Dtc p1530 battery current sensor circuit low
ENGINE (DIAGNOSTICS)(H4DO) > Diagnostic Procedure with Diagnostic Trouble Code (DTC)DTC P1530 BATTERY CURRENT SENSOR CIRCUIT LOWDTC detecting condition:Immediately at fault recognitionCAUTION:After servicing or replacing faulty parts, perform Clear Memory Mode Clear Memory Mode > OPERATION&qu ...
