Subaru Crosstrek Owners Manual: To arm the system using access key/remote transmitter
1. Close all windows and the moonroof (if equipped).
2. Remove the key from the ignition switch (models without "keyless access with push-button start system")/turn the push-button ignition switch to the "OFF" position (models with "keyless access with push-button start system").
3. Open the doors and get out of the vehicle.
4. Make sure that the engine hood is locked.
5. Close all doors (and the rear gate).
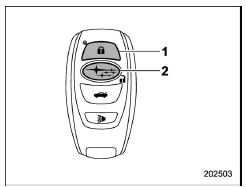
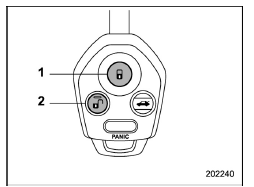
Access key
- Arm button: Press to arm the system
- Disarm button: Press to disarm the system
Transmitter
- Arm button: Press to arm the system
- Disarm button: Press to disarm the system
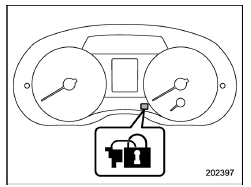
Security indicator light (type A)
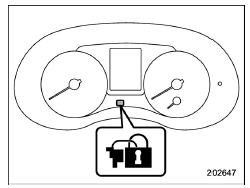
Security indicator light (type B)
6. Briefly press the "  " button
(for less
than 2 seconds). All doors (and the rear
gate) will lock, an electronic chirp will
sound once, the hazard warning flashers
will flash once, and the security indicator
light will start flashing rapidly. After rapid
flashing for 30 seconds (standby time), the
indicator lights will then flash slowly (twice
approximately every 2 seconds), indicating
that the system has been armed for
surveillance.
" button
(for less
than 2 seconds). All doors (and the rear
gate) will lock, an electronic chirp will
sound once, the hazard warning flashers
will flash once, and the security indicator
light will start flashing rapidly. After rapid
flashing for 30 seconds (standby time), the
indicator lights will then flash slowly (twice
approximately every 2 seconds), indicating
that the system has been armed for
surveillance.
If any of the doors, including the rear gate, is not fully closed, an electronic chirp sounds five times, the hazard warning flashers flash five times to alert you that the doors (or the rear gate) are not properly closed. When you close the door, the system will automatically arm and doors will automatically lock.
 Tips
Tips
The system can be armed even if the
engine hood, windows and/or moonroof
are open. Always make sure that they are
fully closed before arming the system.
The 30-second standby time can be
...
 To arm the system using power door locking switches
1. Close all windows.
2. Remove the key from the ignition
switch (models without "keyless access
with push-button start system")/turn the
push-button ignition switch to the "OFF"
position (mode ...
Other materials:
Outside temperature indicator
U.S.-spec. models
Except U.S.-spec. models
The outside temperature indicator shows
the outside temperature in a range from
−40 to 1228F (−40 to 508C).
The indicator can give a false reading
under any of the following conditions.
When there is too much sun.
During ...
Unit settings
Sound quality adjustment, screen adjustment,
and information of the audio unit are
displayed.
1. Press the HOME button on the audio
panel.
2. Touch the "SETTINGS" key.
3. Select the items to be set.
Available setting:
General settings: Select the
tab to
check the system ...
Inspection
FUEL INJECTION (FUEL SYSTEMS)(H4DO) > Knock SensorINSPECTION1. Check that the knock sensor has no deformation, cracks or other damages.2. Measure the resistance between knock sensor terminals.Terminal No.Standard1 and 2560±28 k? ...
