Subaru Crosstrek Service Manual: Removal
VEHICLE DYNAMICS CONTROL (VDC) > VDC Control Module and Hydraulic Control Unit (VDCCM&H/U)
REMOVAL
1. MODELS WITHOUT EyeSight
1. Disconnect the ground cable from battery. NOTE">
2. Remove the air intake boot. Air Intake Boot > REMOVAL">
CAUTION:
Move aside the intake boot to perform the operation without disconnecting the PCV hose.
3. Remove the VDC control module & hydraulic control unit (VDCCM&H/U).
(1) Remove any dirt from around the VDCCM&H/U.
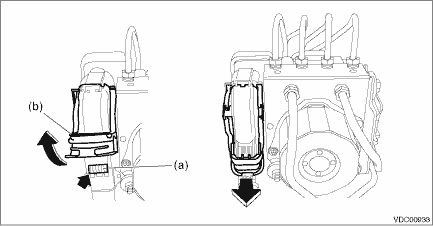
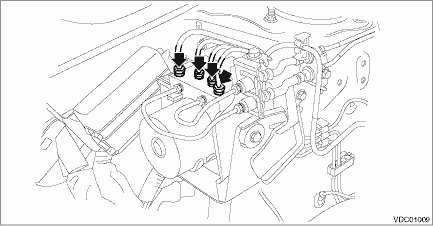
(2) Pull up the lock lever (b) while pressing the lock button (a) and disconnect the VDCCM&H/U connector.
CAUTION:
Do not pull on the harness when disconnecting the connector.
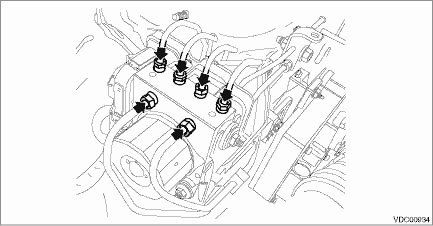
(3) Using a flare nut wrench, disconnect each brake pipe from VDCCM&H/U.
CAUTION:
• Wrap the brake pipe with a vinyl bag so as not to spill the brake fluid on the painted surface of the vehicle body.
• If brake fluid is spilled on the painted surface of the vehicle body, wash it off immediately with water and wipe clean.
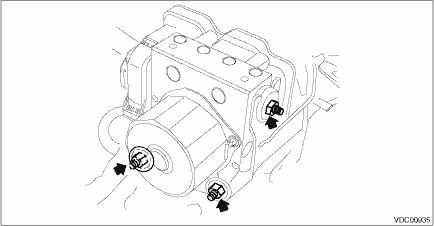
(4) Remove the nuts and remove the VDCCM&H/U from the bracket - hydraulic unit.
CAUTION:
• Do not drop or bump the VDCCM&H/U.
• Do not turn the VDCCM&H/U upside down or place it sideways for storage.
• Be careful not to let foreign matter enter the VDCCM&H/U.
• Be careful that no water and fluid enter the connectors.
2. MODELS WITH EyeSight
CAUTION:
• Avoid unnecessary removal of parts in order to prevent fluid leakage.
• When the VDCCM&H/U components are removed, be sure to perform the installation according to the installation procedures. VDC Control Module and Hydraulic Control Unit (VDCCM&H/U) > INSTALLATION">
1. Disconnect the ground cable from battery. NOTE">
2. Remove the air intake boot. Air Intake Boot > REMOVAL">
3. Remove the VDC control module & hydraulic control unit (VDCCM&H/U).
(1) Remove any dirt from around the VDCCM&H/U.
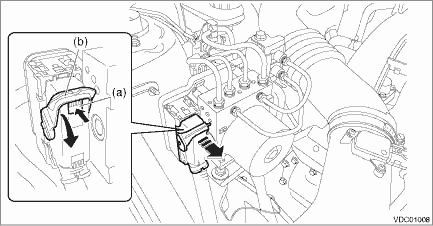
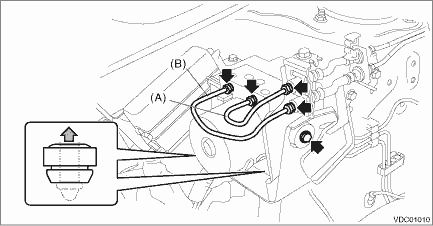
(2) Push the lock button (a), pull down the lock lever (b) and disconnect the VDCCM&H/U connector.
CAUTION:
Do not pull on the harness when disconnecting the connector.
(3) Using a flare nut wrench, disconnect each brake pipe from VDCCM&H/U.
CAUTION:
• Wrap the brake pipe with a vinyl bag so as not to spill the brake fluid on the painted surface of the vehicle body.
• If brake fluid is spilled on the painted surface of the vehicle body, wash it off immediately with water and wipe clean.
(4) Using a flare nut wrench, disconnect pipes (A) and (B) from VDCCM&H/U.
(5) Remove the bolt, and remove the VDCCM&H/U from the bracket - hydraulic unit.
CAUTION:
• Do not drop or bump the VDCCM&H/U.
• Do not turn the VDCCM&H/U upside down or place it sideways for storage.
• Be careful not to let foreign matter enter the VDCCM&H/U.
• Be careful that no water and fluid enter the connectors.
 Installation
VEHICLE DYNAMICS CONTROL (VDC) > VDC Control Module and Hydraulic Control Unit (VDCCM&H/U)INSTALLATION1. MODELS WITHOUT EyeSightCAUTION:• When installing the VDCCM&H/U to the bracket ...
 Vdc off switch
...
Other materials:
Double trip meter
Type A
Trip knob
Type B
Trip knob (U.S.-spec. models)
Trip knob (except U.S.-spec. models)
This meter displays the two trip meters
when the ignition switch is in the "ON"
position.
The trip meter shows the distance that the
vehicle has been driven since you last set
it to ...
Removal
ENTERTAINMENT > Front Accessory Power Supply SocketREMOVALCAUTION:Before handling the airbag system components, always refer to “CAUTION” of “General Description” in “AIRBAG SYSTEM”.1. Disconnect the ground cable from battery and wait for at least 60 seconds be ...
Component
COOLING(H4DO) > General DescriptionCOMPONENT1. WATER PUMP(1)Water pump pulley(13)Clip(25)Gasket(2)Water pump ASSY(14)Water pipe hose RH(26)Engine coolant temperature sensor(3)Gasket(15)Water pipe ASSY (CVT model)(27)EGR control valve(4)Thermostat (engine side)(16)Preheater hose A(28)O-ring(5)Gask ...
