Subaru Crosstrek Service Manual: Removal
SECURITY AND LOCKS > Front Door Latch and Door Lock Actuator Assembly
REMOVAL
1. Raise the glass assembly - front door to the top position.
2. Disconnect the ground cable from battery and wait for at least 60 seconds before starting work. NOTE">
3. Remove the trim panel - front door. Door Trim > REMOVAL">
4. Remove the sealing cover - front door. Front Sealing Cover > REMOVAL">
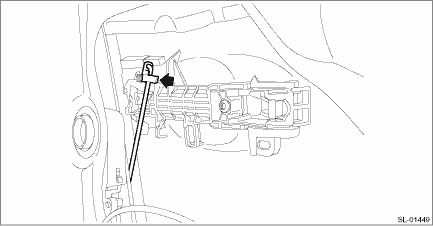
5. Remove the rod from the rod clamp of the frame assembly - front door outer.
6. Remove the cover - handle front outer. Key Lock Cylinders > REPLACEMENT">
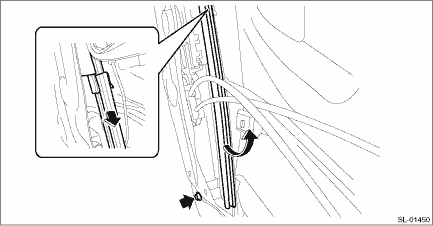
7. Remove the sash COMPL - lower.
(1) Remove the lower side of the running channel - front door.
(2) Remove the bolts, and remove the sash COMPL - lower.
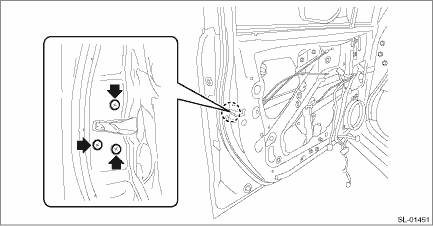
8. Remove the screws to remove the latch & actuator assembly - front.
CAUTION:
Do not re-use the screws. Always replace with a new part.
 Inspection
SECURITY AND LOCKS > Front Door Latch and Door Lock Actuator AssemblyINSPECTION1. LATCHCheck if the latch operates normally.If the cable or rod is faulty, replace the latch & actuator assembly ...
 Installation
SECURITY AND LOCKS > Front Door Latch and Door Lock Actuator AssemblyINSTALLATION1. Before installation, check the following items.• Rod is free from deformation.• Grease is applied suf ...
Other materials:
Removal
WIPER AND WASHER SYSTEMS > Front Wiper Motor and LinkREMOVAL1. Disconnect the ground cable from battery. NOTE">2. Remove the arm assembly - windshield wiper. Front Wiper Arm > REMOVAL">3. Remove the cowl panel assembly. Cowl Panel > REMOVAL">CAUTION:Before removin ...
Warning and indicator lights
The Subaru Ascent is equipped with a comprehensive range of warning and indicator
lights designed to keep the driver fully informed about vehicle status, safety systems,
and potential issues. Understanding these indicators in your Subaru Ascent ensures
safer driving, своевременное ...
Dtc p0301 cylinder 1 misfire detected
ENGINE (DIAGNOSTICS)(H4DO) > Diagnostic Procedure with Diagnostic Trouble Code (DTC)DTC P0301 CYLINDER 1 MISFIRE DETECTEDNOTE:For the diagnostic procedure, refer to DTC P0304. Diagnostic Procedure with Diagnostic Trouble Code (DTC) > DTC P0304 CYLINDER 4 MISFIRE DETECTED">1. OUTLINE O ...
