Subaru Crosstrek Service Manual: Removal
EXTERIOR/INTERIOR TRIM > Door Trim
REMOVAL
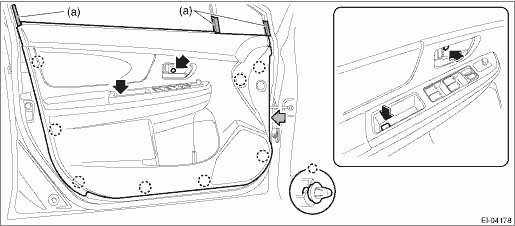
1. FRONT DOOR
1. Disconnect the ground cable from battery. NOTE">
2. Remove the trim panel - front door.
(1) Attach the protective tape (a).
(2) Open the cover and remove the screw.
(3) Remove the clips, and remove the trim panel - front door from the panel assembly - front door.
NOTE:
It is easier to remove the door trim if the removal is performed from the gray arrow section.
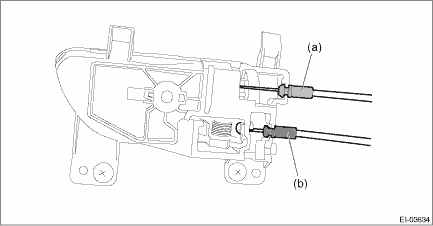
(4) Detach the door lock cable (a) and door open cable (b) from the remote assembly - door.
(5) Disconnect the harness connector and remove the trim panel - front door.
3. Remove each part as required.
• Remote assembly - door: Front Inner Remote > REMOVAL">
• Switch - power window main: Power Window Control Switch > REMOVAL">
• Weather strip - door INN: Door Trim > DISASSEMBLY">
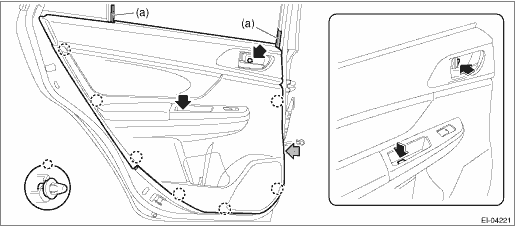
2. REAR DOOR
1. Disconnect the ground cable from battery. NOTE">
2. Remove the trim panel - rear door.
(1) Attach the protective tape (a).
(2) Open the cover and remove the screw.
(3) Remove the clips, and remove the trim panel - rear door from the panel assembly - rear door.
NOTE:
It is easier to remove the door trim if the removal is performed from the gray arrow section.
(4) Detach the door lock cable (a) and door open cable (b) from the remote assembly - door.
(5) Disconnect the harness connector and remove the trim panel - rear door.
3. Remove each part as required.
• Remote assembly - door: Rear Inner Remote > REMOVAL">
• Switch - power window sub: Power Window Control Switch > REMOVAL">
• Weather strip - door INN: Door Trim > DISASSEMBLY">
 Assembly
EXTERIOR/INTERIOR TRIM > Door TrimASSEMBLY1. Bend the claws while pushing the weather strip - door INN against the door trim so that there is no gap.CAUTION:Beware of the direction of folding the c ...
 Disassembly
EXTERIOR/INTERIOR TRIM > Door TrimDISASSEMBLY1. Remove the door trim.2. Remove the rivets and claws, and remove the weather strip - door INN from the door trim.(a)Rivet(b)Claw(c)ClawNOTE:Remove the ...
Other materials:
APPS main screen
Select to go to the Music APPS
screen.
Select to go to the News APPS
screen.
Select to go to the Calender APPS
screen.
Select to go to the iHeartRadio
APPS screen.
Select to go to the Weather APPS
screen.
NOTE
The error screen will be displayed
while using SUBARU STARLI ...
Removal
SECURITY AND LOCKS > Keyless Access Indoor AntennaREMOVAL1. FRONT ANTENNA1. Disconnect the ground cable from battery. NOTE">2. Remove the cover - shift lever. Console Box > REMOVAL">3. Disconnect the connector and remove the front antenna assembly - interior.2. REAR ANTENNA1. ...
Removal
DRIVE SHAFT SYSTEM > Propeller ShaftREMOVALCAUTION:• Before removing propeller shaft, wrap metal parts with a cloth or rubber material.• Do not disassemble the center EDJ of the propeller shaft.• Before removing propeller shaft, wrap the metal parts attached to the rubber boot o ...
