Subaru Crosstrek Service Manual: Assembly
EXTERIOR/INTERIOR TRIM > Door Trim
ASSEMBLY
1. Bend the claws while pushing the weather strip - door INN against the door trim so that there is no gap.
CAUTION:
Beware of the direction of folding the claws.
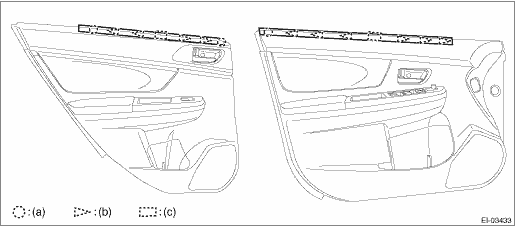
(a) | Rivet | (b) | Direction of folding claws | (c) | Claw bending direction: bend forward for LH side, backward for RH side. |
2. Install the rivet.
CAUTION:
• Set the height of rivet crimped section as 3 mm (0.12 in). If the crimp is not sufficient, press it with pliers, etc. in order not to interfere the trim panel - door.
• Apply unwoven cloth tape so that the rivet crimped section is covered. If unwoven cloth tape is not applied, a knocking noise may occur when the door panel contacts the rivet crimped section.
Preparation tool and item:
Hand riveter (corresponding to φ3.2 mm (0.13 in))
Rivet
Tape: 94029FG000/TAPE or unwoven cloth
3. After installing the weather strip - door INN, perform the following checks.
• Make sure there are no gaps between the weather strip - door INN and the door trim.
• Make sure there are no looseness when pulling the weather strip - door INN lightly.
 Door trim
...
 Removal
EXTERIOR/INTERIOR TRIM > Door TrimREMOVAL1. FRONT DOOR1. Disconnect the ground cable from battery. NOTE">2. Remove the trim panel - front door.(1) Attach the protective tape (a).(2) Open t ...
Other materials:
Cooling and dehumidifying in high humidity and low temperature weather
conditions
Under certain weather conditions (high
relative humidity, low temperatures, etc.) a
small amount of water vapor emission
from the air outlets may be noticed. This
condition is normal and does not indicate
any problem with the air conditioning
system.
Air conditioner compressor shut-off when e ...
Check adaptive cruise control indicator light/constant speed cruise control indicator light and cruise set indicator light
EyeSight (DIAGNOSTICS) > Diagnostics with PhenomenonCHECK ADAPTIVE CRUISE CONTROL INDICATOR LIGHT/CONSTANT SPEED CRUISE CONTROL INDICATOR LIGHT AND CRUISE SET INDICATOR LIGHTTROUBLE SYMPTOM:Adaptive cruise control or conventional cruise control can be set, but adaptive cruise control indicator li ...
Dtc u0151 lost communication with restraints control module
INSTRUMENTATION/DRIVER INFO (DIAGNOSTICS) > Diagnostic Procedure with Diagnostic Trouble Code (DTC)DTC U0151 LOST COMMUNICATION WITH RESTRAINTS CONTROL MODULEDetected when CAN data is not received from airbag CM.NOTE:Perform the diagnosis for LAN system. Basic Diagnostic Procedure > PROCEDURE ...
