Subaru Crosstrek Owners Manual: Installing forward facing child restraint
WARNING
Before installing a child restraint system, be sure to confirm that the seatback is securely locked into place. Otherwise, in an accident, serious injury or death could result.
1. Shake the seatback slightly to confirm that it is securely locked into place.
- It is possible to check whether the seatback is locked visually. If the seatback is locked into place, the red colored unlocking marker which is attached to the bottom of the lock release knob is invisible. For details, refer to "Folding down the rear seatback" 1-10.
2. Prepare the rear seat head restraint where a child restraint system is intended to be installed in the following way.
- When a child restraint system is
installed on the window-side seating
position, remove the rear seat head
restraint. For details, refer to "Head
restraint adjustment" 1-8.
Store the head restraint in the cargo area. Avoid placing the head restraint in the passenger compartment to prevent it from being thrown around in the passenger compartment in a sudden stop or a sharp turn.
- When a child restraint system is installed on the rear center seating position, raise the rear seat head restraint to the extended position. Do not remove the head restraint. For details, refer to "Rear center seating position" 1-9.
3. Place the child restraint system in the rear seating position.
WARNING
When you intend to install a child restraint system on the rear center seating position, if the child restraint system does not fit snugly against the contours of the rear center seat cushion, install the child restraint system on the window-side seating position to be safe. For details, refer to "Where to place a child restraint system" 1-25.
4. Run the lap and shoulder belt through or around the child restraint system following the instructions provided by its manufacturer.
- When a child restraint system is installed on the rear center seating position, pass the rear center seatbelt through the belt guide properly. For details, refer to "Rear center seatbelt" 1-16.
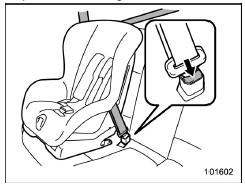
5. Insert the tongue plate into the buckle until you hear a click.
6. Take up the slack in the lap belt.
7. Pull out the seatbelt fully from the retractor to change the retractor over from the Emergency Locking Retractor (ELR) to the Automatic Locking Retractor (ALR) function. Then, allow the belt to rewind into the retractor. As the belt is rewinding, clicks will be heard which indicate the retractor functions as ALR.
8. Before having a child sit in the child restraint system, try to move it back and forth and right and left to check if it is firmly secured. Sometimes a child restraint system can be more firmly secured by pushing it down into the seat cushion and then tightening the seatbelt.
9. Pull at the shoulder portion of the belt to confirm that it cannot be pulled out (ALR properly functioning).
10. Latch the top tether hook onto the tether anchorage that is located behind the rear seat and tighten the top tether firmly. For additional instructions, refer to "Top tether anchorages" 1-36.
11. To remove the child restraint system, press the release button on the seatbelt buckle and allow the belt to retract completely. The belt will return to the ELR mode.
If you have installed a child restraint system for the rear center seating position, when you remove the child restraint system, the seatbelt may not be restored to the ELR mode even if the seatbelt is retracted. In this case, lower the head restraint to the retracted position to allow the seatbelt to retract moreover. The seatbelt will return to the ELR mode.
Remember that the head restraint is not intended to be used at the lowest position (retracted position). Therefore, when the rear center seat is occupied (including when a child restraint system is installed) next time, be sure to raise the head restraint to the extended position.
NOTE
When the child restraint system is no longer in use, remove it and restore the ELR function of the retractor. That function is restored by allowing the seatbelt to retract fully.
 Installing a rearward facing child restraint
1. Place the child restraint system in the
rear seating position.
2. Run the lap and shoulder belt through
or around the child restraint system
following the instructions provided by its
ma ...
 Installing a booster seat
WARNING
Child restraint systems and seatbelts
can become hot in a vehicle
that has been closed up in sunny
weather; they could burn a small
child. Check the child restraint
system before ...
Other materials:
Removal
BRAKE > Brake HoseREMOVAL1. FRONT BRAKE HOSE1. Disconnect the brake pipe (b) from the brake hose (a).Preparation tool:Flare nut wrench2. Remove the clamp, strut mounting bolt and union bolt, and remove the front brake hose.2. REAR BRAKE HOSE1. Remove the brake hose bracket bolt and union bolt.2. ...
Dtc p2746 intermediate shaft speed sensor "b" circuit range/performance
CONTINUOUSLY VARIABLE TRANSMISSION (DIAGNOSTICS) > Diagnostic Procedure with Diagnostic Trouble Code (DTC)DTC P2746 INTERMEDIATE SHAFT SPEED SENSOR "B" CIRCUIT RANGE/PERFORMANCEDTC detecting condition:Immediately at fault recognitionTrouble symptom:• Standing start problems• ...
Installation
HVAC SYSTEM (HEATER, VENTILATOR AND A/C) > Heater and Cooling UnitINSTALLATIONCAUTION:• Replace O-rings with new parts and install securely.• Before handling the airbag system components, refer to “CAUTION” of “General Description” in “AIRBAG SYSTEM&rdquo ...
