
Subaru Crosstrek Service Manual: Installation
CONTROL SYSTEMS > MT Gear Shift Lever
INSTALLATION
1. Insert the gear shift lever from the room side.
NOTE:
Insert the rod and the stay, and then temporarily set them onto the transmission mount.
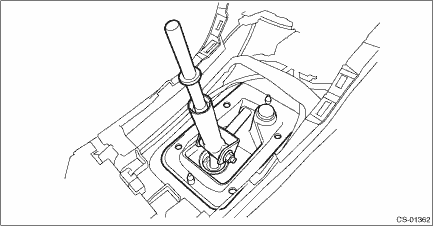
2. Lift up the vehicle.
3. Install the joint to the transmission and secure with a spring pin.
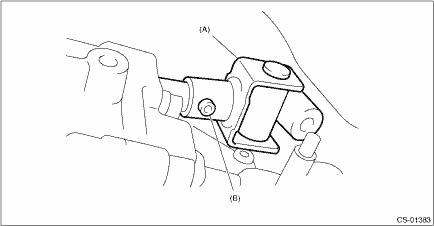
(A) | Joint |
(B) | Spring pin |
4. Mount the cushion rubber on the vehicle body.
Tightening torque:
18 N·m (1.8 kgf-m, 13.3 ft-lb)
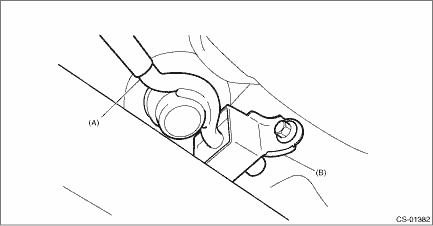
(A) | Stay |
(B) | Cushion rubber |
5. Connect the rod to the joint.
NOTE:
Use a new self-locking nut.
Tightening torque:
12 N·m (1.2 kgf-m, 8.9 ft-lb)
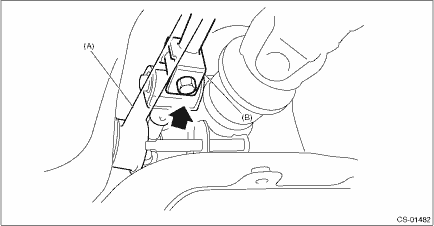
(A) | Stay |
(B) | Rod |
6. Connect the stay to the shift bracket, and tighten the self-locking nut.
NOTE:
Use a new self-locking nut.
Tightening torque:
18 N·m (1.8 kgf-m, 13.3 ft-lb)
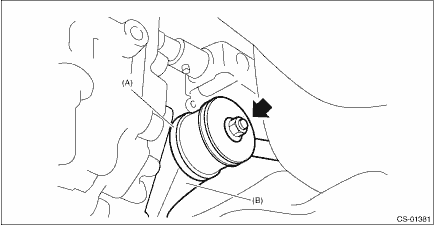
(A) | Stay |
(B) | Shift bracket |
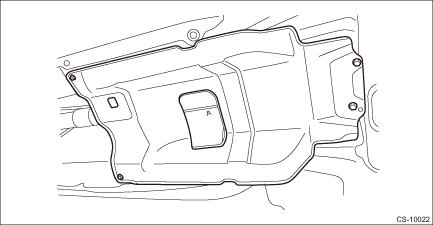
7. Install the center exhaust cover.
Tightening torque:
18 N·m (1.8 kgf-m, 13.3 ft-lb)
8. Install the center exhaust pipe. Center Exhaust Pipe > INSTALLATION">
9. Lower the vehicle.
10. Install the plate COMPL to the body.
Tightening torque:
18 N·m (1.8 kgf-m, 13.3 ft-lb)
(1) Set the plate COMPL to the vehicle.
(2) Temporarily tighten the bolt (A).
(3) Tighten the bolt (B).
(4) Tighten the bolt (A).
(5) Tighten the bolts (C) and (D).
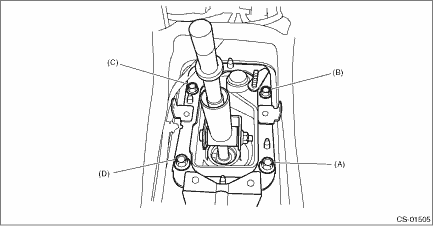
11. Install the harness clamp to the plate.
12. Install the boot and insulator assembly, and secure with a clamp.
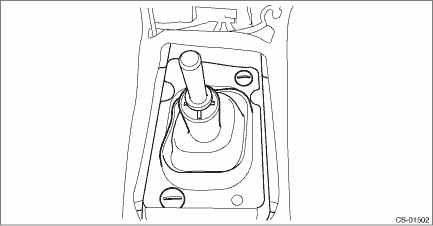
13. Install the panel center LWR LH and RH. Console Box > INSTALLATION">
14. Install the cover - shift lever, and install the gear shift knob.
15. Install the console box. Console Box > INSTALLATION">
16. Make sure the gears can be shifted accurately into each gear.
17. Connect the battery ground terminal.
 Inspection
CONTROL SYSTEMS > MT Gear Shift LeverINSPECTION1. Check the parts (bushing, cushion rubber, spacer, boot, stay and rod, etc.) for deformation, damage and wear. If necessary, correct or replace faul ...
 Select cable
...
Other materials:
Accessory power outlets
Power outlet below the climate control dials
Power outlet in the center console
Accessory power outlets are provided
below the climate control dials and in the
center console. Electrical power (12V DC)
from the battery is available at any of the
outlets when the ignition switch is in e ...
Read diagnostic trouble code (dtc) Operation
INSTRUMENTATION/DRIVER INFO (DIAGNOSTICS) > Read Diagnostic Trouble Code (DTC)OPERATION1. COMBINATION METER1. On «Start» display, select «Diagnosis».2. On «Vehicle selection» display, input the target vehicle information and select «Confirmed».3. On «Main Menu» display, select «Each Sy ...
General diagnostic table Inspection
REAR SUSPENSION > General Diagnostic TableINSPECTION1. IMPROPER VEHICLE POSTURE OR IMPROPER WHEEL ARCH HEIGHTPossible causeCorrective action(1) Permanent distortion or damaged coil springReplace.(2) Rough operation of shock absorberReplace.(3) Installation of the wrong shock absorberReplace with ...
