
Subaru Crosstrek Owners Manual: Bulb chart
NOTE
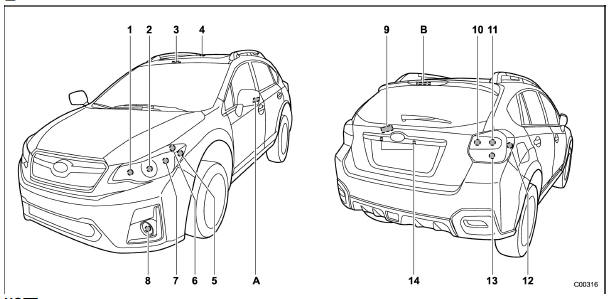
Lights A and B are the LED (Light Emitting Diode) type. Consult your SUBARU dealer for replacement.
| Wattage | Bulb No. | |
| 1) High beam headlight | 12V-60W | HB3 |
2) Low beam headlight
|
|
|
| 3) Map light | 12V-8W | - |
| 4) Dome light | 12V-8W | - |
| 5) Front side marker light | 12V-5W | W5W |
| 6) Parking light | 12V-5W | W5W |
| 7) Front turn signal light | 12V-21W | WY21W |
8) Front fog light
|
|
|
| 9) Cargo area light | 12V-5W | - |
| 10) Backup light | 12V-16W | W16W |
| 11) Rear turn signal light | 12V-21W | WY21W |
| 12) Rear side marker light | 12V-5W | W5W |
| 13) Stop light/Tail light | 12V-21/5W | W21/5W |
| 14) License plate light | 12V-5W | W5W |
| A) Side turn signal light (if equipped) | - | - |
| B) High-mounted stop light | - | - |
 Safety precautions
WARNING
Bulbs may become very hot while
illuminated. Before replacing
bulbs, turn off the lights and wait
until the bulbs cool down. Otherwise,
there is a risk of sustaining
a burn injury.
For ...
 Vehicle identification
1) Vehicle identification number (under the
floor carpet of the right-hand front seat)
2) Emission control label
3) Tire inflation pressure label
4) Certification label
5) Vehicle identificat ...
Other materials:
Inspection
CLUTCH SYSTEM > Release Bearing and LeverINSPECTION1. RELEASE BEARINGCAUTION:Since this bearing is grease-sealed and is a non-lubrication type, do not wash with gasoline or any other solvent when servicing the clutch.1. Check the bearing for smooth movement by applying force to the bearing in the ...
Real-time diagnosis Operation
CRUISE CONTROL SYSTEM (DIAGNOSTICS) > Real-time DiagnosisOPERATION1. On «Start» display, select «Diagnosis».2. On «Vehicle selection» display, input the target vehicle information and select «Confirmed».3. On «Main Menu» display, select «Each System».4. On «Select System» display, s ...
Removal
GLASS/WINDOWS/MIRRORS > Power Window Control SwitchREMOVAL1. MAIN SWITCH1. Disconnect the ground cable from battery and wait for at least 60 seconds before starting work. NOTE">2. Remove the trim panel - front door. Door Trim > REMOVAL">3. Remove the panel - power window main ...
