Subaru Crosstrek Owners Manual: Tire pressures and wear
Maintaining the correct tire pressures helps to maximize the tires' service lives and is essential for good running performance.
Check and, if necessary, adjust the pressure of each tire (including the spare - if equipped) at least once a month (for example, during a fuel stop) and before any long journey.
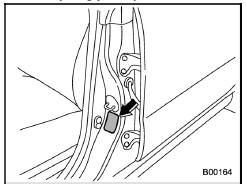
Tire placard
Check the tire pressures when the tires are cold. Use a pressure gauge to adjust the tire pressures to the values shown on the tire placard. The tire placard is located on the door pillar on the driver's side.
Driving even a short distance warms up the tires and increases the tire pressures.
Also, the tire pressures are affected by the outside temperature. It is best to check tire pressure outdoors before driving the vehicle.
When a tire becomes warm, the air inside it expands, causing the tire pressure to increase. Be careful not to mistakenly release air from a warm tire to reduce its pressure.
NOTE
- The air pressure in a tire increases by approximately 4.3 psi (30 kPa, 0.3 kgf/cm2) when the tire becomes warm.
- The tires are considered cold when the vehicle has been parked for at least three hours or has been driven less than one mile (1.6 km).
WARNING
Do not let air out of warm tires to adjust pressure. Doing so will result in low tire pressure.
Incorrect tire pressures detract from controllability and ride comfort, and they cause the tires to wear abnormally.
- Correct tire pressure (tread worn evenly)
Roadholding is good, and steering is responsive. Rolling resistance is low, so fuel consumption is also lower.
- Abnormally low tire pressure (tread worn at shoulders)
Rolling resistance is high, so fuel consumption is also higher.
- Abnormally high tire pressure (tread worn in center)
Ride comfort is poor. Also, the tire magnifies the effects of road-surface bumps and dips, possibly resulting in vehicle damage.
If the tire placard shows tire pressures for the vehicle when fully loaded, adjust the tire pressures to the values that match current loading conditions.
WARNING
Driving at high speeds with excessively low tire pressures can cause the tires to deform severely and to rapidly become hot. A sharp increase in temperature could cause tread separation, and destruction of the tires. The resulting loss of vehicle control could lead to an accident.
 Tire inspection
Check on a daily basis that the tires are
free from serious damage, nails, and
stones. At the same time, check the tires
for abnormal wear.
Contact your SUBARU dealer immediately
if you find an ...
 Wheel balance
Each wheel was correctly balanced when
your vehicle was new, but the wheels will
become unbalanced as the tires become
worn during use. Wheel imbalance causes
the steering wheel to vibrate slightl ...
Other materials:
Removal
CONTINUOUSLY VARIABLE TRANSMISSION(TR580) > Reduction Driven GearREMOVAL1. Remove the transmission assembly from the vehicle. Automatic Transmission Assembly > REMOVAL">2. Remove the extension case. Extension Case > REMOVAL">3. Remove the transfer clutch assembly. Transfe ...
Dtc p2109 throttle/pedal position sensor "a" minimum stop performance
ENGINE (DIAGNOSTICS)(H4DO) > Diagnostic Procedure with Diagnostic Trouble Code (DTC)DTC P2109 THROTTLE/PEDAL POSITION SENSOR "A" MINIMUM STOP PERFORMANCENOTE:For the diagnostic procedure, refer to DTC P2101. Diagnostic Procedure with Diagnostic Trouble Code (DTC) > DTC P2101 THROTTL ...
Antenna cord Location
WIRING SYSTEM > Antenna CordLOCATION1. WITHOUT TELEMATICSConnectorConnecting toNo.PoleColorAreaNo.DescriptionAN13B-2 Audio3B-2 Navigation unitAN21B-2 Audio1B-2 Navigation unitAN31B-2AN4Antenna cordAN41B-2AN3AN51B-1AN6AN61B-1AN5AN73C-3AN9AN93C-4AN7AN101C-4R97AN113B-4AN15AntennaAN153B-4AN11Antenna ...
