Subaru Crosstrek Owners Manual: Sound settings
Touch the tab to set the
sound quality.
tab to set the
sound quality.
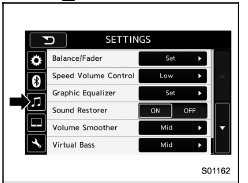
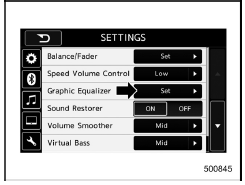
| Item | Function |
| Balance/ Fader | Select to adjust speaker volume balance (right/left and front/rear). |
| Speed Volume Control | Select to adjust speaker volume coupled to vehicle speed. |
| Graphic Equalizer | Select to adjust sound quality in each frequency band. |
| Sound Restorer | Select to add high-pitched tone to the compressed audio file. |
| Volume Smoother | Select to adjust volume difference between audio sources. |
| Virtual Bass | Select to add harmonic tone so that low-pitched tone is strengthened. |
| Vocal Image Control | Select to pick-up vocal sound signal from the sound data, and adjust it to right/left or front/rear. |
Refer to the following table for the adjustment range of each audio setting item and default value.
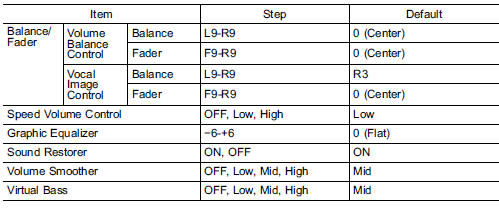
"Balance/Fader"
A good balance of the left and right stereo channels and of the front and rear sound levels is important for good quality audio program listening.
Keep in mind that when listening to a stereo recording or broadcast, changing the right/left balance will increase the volume of 1 group of sounds while decreasing the volume of another.
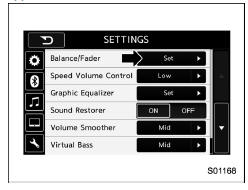
Touch the "Set" key of the "Balance/Fader" key. The "Balance/Fader" screen will appear.
- Volume Balance setting
1. Select the "Volume Balance Control" key.
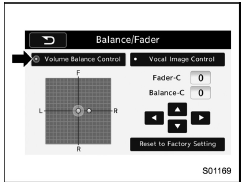
2. Adjust the balance by pressing " " or
"
" or
"  " key.
3. Adjust the fader by pressing " "
or
"
"
or
" " key.
- Vocal image setting
1. Select the "Vocal Image Control" key.

2. Adjust the balance by pressing "
 " or
"
" or
" " key.
3. Adjust the fader by pressing " "
or
"
"
or
"  " key.
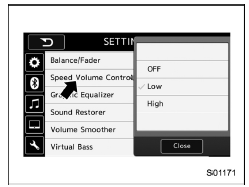
"Speed Volume Control"
The system adjusts to the optimum volume and tone quality according to vehicle speed to compensate for increased vehicle noise.
1. Touch the right side key of the "Speed Volume Control" key.
2. Select the desired item. The "High" key comes to have a bigger effect. When the "OFF" key is selected, speed volume control function is canceled.
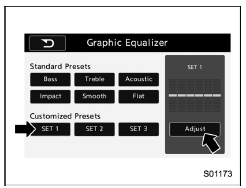
"Graphic Equalizer"
You can adjust the sound quality by increasing/decreasing the gain for each frequency range.
1. Touch the "Set" key of the "Graphic Equalizer" key.
2. In this mode, 6 preset equalizer patterns (the "Bass", "Treble", "Acoustic", "Impact", "Smooth" and "Flat" key) and 3 customized patterns (the "SET 1" - "SET 3" key) are available.
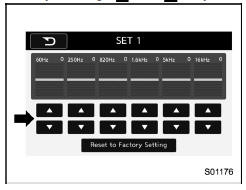
3. When customizing the equalizer pattern, touch among "SET 1", "SET 2" or "SET 3" and then touch the "Adjust" key.
4. Adjust the level of each frequency
band by touching " " or "
 " key.
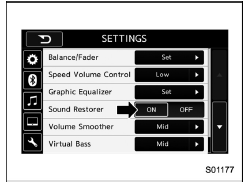
"Sound Restorer"
You can play compressed audio data with a sound quality that is close to the original sound.
Select the "ON" or "OFF" key by the right side key of the "Sound Restorer" key.
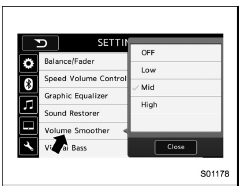
"Volume Smoother"
This function reduces the difference in volume among the sound sources to be played.
1. Touch the right side key of the "Volume Smoother" key.
2. Select the "OFF", "Low", "Mid" or "High" key. The "High" key comes to have a bigger effect. When the "OFF" key is selected, the volume smoother function is canceled.
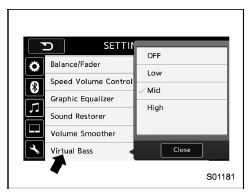
"Virtual Bass"
This function enables you to adjust the bass tone.
1. Touch the right side key of the "Virtual Bass" key.
2. Select the "OFF", "Low", "Mid" or "High" key. The "High" key comes to have a bigger effect. When the "OFF" key is selected, the virtual bass function is canceled.
"Vocal Image Control"
Refer to ""Balance/Fader""
 Bluetooth settings
Touch the tab to set Bluetooth.
Item
Function
BT Devices
Connection
Select to pair/connect the Bluetooth
devices.
In-Car-Device
setting
Select to enter ...
 Display settings
Touch the tab to set display.
Item
Function
Day/Night
Mode
The "Auto", "Day" or "Night" key
can be selected on the pop-up
screen.
When the "Auto" key is selec ...
Other materials:
Malfunction indicator light does not come on
ENGINE (DIAGNOSTICS)(H4DO) > Malfunction Indicator LightMALFUNCTION INDICATOR LIGHT DOES NOT COME ONTROUBLE SYMPTOM:When the ignition switch is turned to ON (engine OFF), malfunction indicator light does not illuminate.NOTE:Refer to IDI section for diagnostic procedure. Basic Diagnostic Procedur ...
Dtc b1610 front sub sensor rh failure
AIRBAG SYSTEM (DIAGNOSTICS) > Diagnostic Chart with Trouble CodeDTC B1610 FRONT SUB SENSOR RH FAILUREDIAGNOSIS START CONDITION:Ignition voltage is 10 V to 16 V.DTC DETECTING CONDITION:Front sub sensor (RH) is faulty.If DTC B1610 is displayed, the circuit within the front sub sensor (RH) is faulty ...
Installation
EXTERIOR BODY PANELS > Front Sealing CoverINSTALLATIONCAUTION:• If the sealing cover - front door gets broken, replace it with a new part.• Apply a uniform bead of butyl tape.• Attach the sealing cover - front door, keeping it from becoming wrinkled.• Breaks in the bead wi ...
