Subaru Crosstrek Service Manual: Removal
SUNROOF/T-TOP/CONVERTIBLE TOP (SUNROOF) > Sunroof Assembly
REMOVAL
CAUTION:
• Before handling the airbag system components, refer to “CAUTION” of “General Description” in “AIRBAG SYSTEM”. General Description > CAUTION">
• When removing the clip, use great care not to damage the trim panel - roof assembly.
1. Disconnect the ground cable from battery and wait for at least 60 seconds before starting work. NOTE">
2. Remove the lid assembly - sunroof.
(1) Completely close the lid assembly - sunroof, and open the sunshade assembly.
(2) Remove the TORX® bolt, and then remove the lid assembly - sunroof.
CAUTION:
Be careful not to damage the lid assembly - sunroof.
Preparation tool:
TORX® T25
3. Remove the trim panel - roof assembly. Roof Trim > REMOVAL">
4. Disconnect the harness connector of the motor assembly.
5. Remove the drain tube - sunroof.
NOTE:
When removing the drain tube - sunroof completely, perform the step 8).
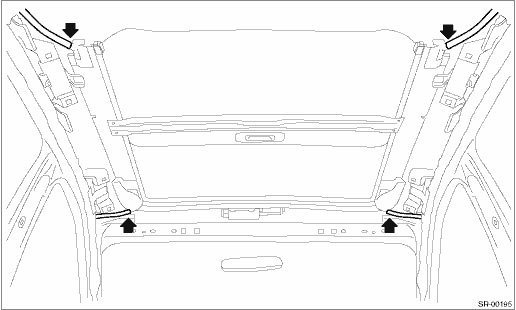
6. Remove the rail assembly.
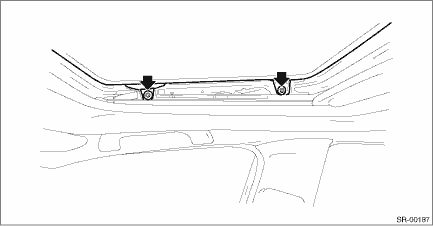
(1) Remove the curtain airbag module. Curtain Airbag Module > REMOVAL">
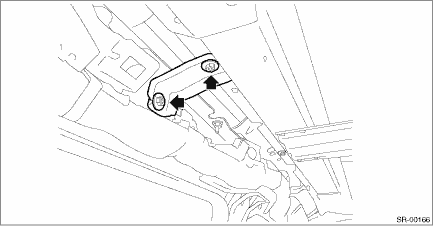
(2) Remove the bolts, and then remove the bracket - assist rail.
(3) Remove the bolts and then remove the sunroof bracket.
(4) Remove the bolts, then remove the rail assembly.
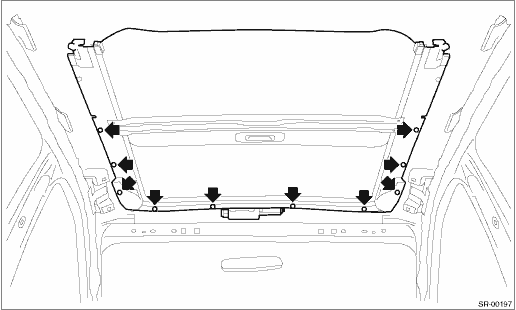
7. Remove the drain tube - sunroof.
NOTE:
For easy replacement work, attach a string when pulling the drain tube - sunroof.
(1) Remove the cover side sill - front INN and cover side sill - front. Lower Inner Trim > REMOVAL">
(2) Disconnect each connector, bolt and clip, then remove the connector holder.
(3) Remove the front side of drain tube - sunroof.
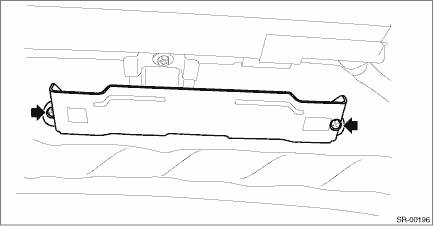
(4) Remove the mat - rear floor and the spacer - rear floor.
(5) Remove the rear side of drain tube - sunroof.
 Assembly
SUNROOF/T-TOP/CONVERTIBLE TOP (SUNROOF) > Sunroof AssemblyASSEMBLYInstall each part in the reverse order of removal. ...
 Disassembly
SUNROOF/T-TOP/CONVERTIBLE TOP (SUNROOF) > Sunroof AssemblyDISASSEMBLY1. Remove the screw and remove the sunroof motor.2. Remove the stopper rubber and pull out the sunshade assembly from the rail a ...
Other materials:
Base display audio set (if equipped)
Power/VOLUME knob
Eject button
AUDIO/TUNE knob
HOME button
APPS button
Display
SEEK/TRACK buttons
The audio set will operate only when the
ignition switch is in the "ACC" or "ON"
position.
Power and audio controls: refer to
"Basic operation"
SUBARU STARLINK (if equipp ...
Cargo tie-down hooks (if equipped)
The cargo area is equipped with two or
four tie-down hooks so that cargo can be
secured with a cargo net or ropes.
When using the front tie-down hooks, turn
them down out of the storing recesses.
CAUTION
The cargo tie-down hooks are designed
only for securing light cargo.
Never try t ...
Removal
LIGHTING SYSTEM > Light Control SensorREMOVAL1. Disconnect the ground cable from battery. NOTE">2. Remove the sensor - automatic light.CAUTION:Be careful not to damage the sensors and interior trims when removing.(1) Release the connectors and claws, and remove the grille front defroster ...
