Subaru Crosstrek Service Manual: Removal
SECURITY AND LOCKS > Rear Gate Opener Button
REMOVAL
NOTE:
• The button - opener rear gate is integrated with the rear lock button. (Model with keyless access with push button start)
• Open the panel - rear gate before disconnecting the ground terminal from the battery.
1. Disconnect the ground cable from battery. NOTE">
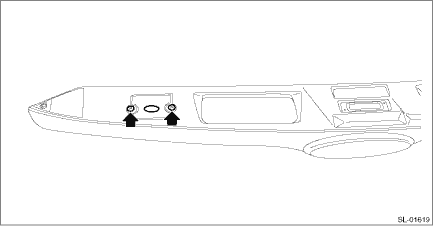
2. Remove the garnish assembly - rear gate. Rear Gate Garnish > REMOVAL">
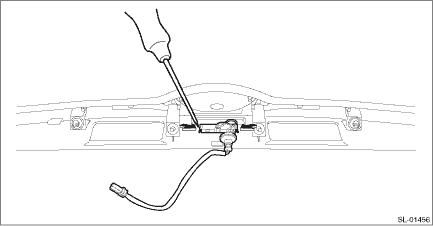
3. Release the locks at both ends of the button - opener rear gate by pushing them with a flat tip screwdriver, and remove the button - opener rear gate.
4. Remove the screws, and remove the rear lock button, and remove the integrated harness. (Model with keyless access with push button start)
 Inspection
SECURITY AND LOCKS > Rear Gate Opener ButtonINSPECTIONPreparation tool:Circuit tester1. Check the resistance between switch terminals.Terminal No.Inspection conditionsStandardConnection diagram1 †...
 Installation
SECURITY AND LOCKS > Rear Gate Opener ButtonINSTALLATIONCAUTION:Make sure that the harness grommet is securely installed.If not properly installed, this may cause leaks.Install each part in the rev ...
Other materials:
CD player and disc
This CD player is intended for use with
4.7 in. (12 cm) discs only.
Extremely high temperatures can keep
the CD player from working. On hot days,
use the air conditioning system to cool the
inside of the vehicle before using the
player.
Bumpy roads or other vibrations may
make the ...
Inspection
ENTERTAINMENT > Switches and HarnessINSPECTION1. SATELLITE SWITCH ASSEMBLY1. Measure the resistance between connector terminals.Preparation tool:Circuit testerTerminal No.Inspection conditionsStandard6 — 2VOL (+)VOL (−)SEEK (›)SEEK (‹)LISTRETURNA circuit is all OFF.Approx. 1 ...
Removal
POWER ASSISTED SYSTEM (POWER STEERING) > Electric Power Steering GearboxREMOVALCAUTION:• The power steering control module continues to operate after the engine stops and calculate the temperature in the control module. Therefore, before starting service of the power steering system which r ...
