Subaru Crosstrek Service Manual: Removal
EXTERIOR BODY PANELS > Rear Gate
REMOVAL
CAUTION:
The panel - rear gate is heavy. When removing and installing it, always work in a team of two or more persons.
1. REAR GATE PANEL
1. Disconnect the ground cable from battery. NOTE">
2. Remove the trim panel - rear gate. Rear Gate Trim > REMOVAL">
3. Remove the garnish assembly - rear gate. Rear Gate Garnish > REMOVAL">
4. Remove the license plate light. License Plate Light > REMOVAL">
5. Remove the arm assembly - rear wiper and the motor assembly - rear wiper. Rear Wiper Motor > REMOVAL">
6. Remove the roof spoiler. Roof Spoiler > REMOVAL">
7. Remove the light assembly - high-mounted. High-mounted Stop Light > REMOVAL">
8. Remove the rear gate latch and actuator - rear gate. Rear Gate Latch and Actuator Assembly > REMOVAL">
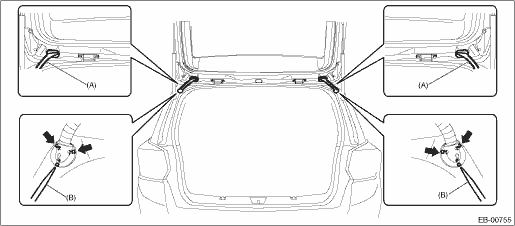
9. Remove the clips, and remove the drip - rear gate.
10. Remove the nozzle - rear washer. Rear Washer > REMOVAL">
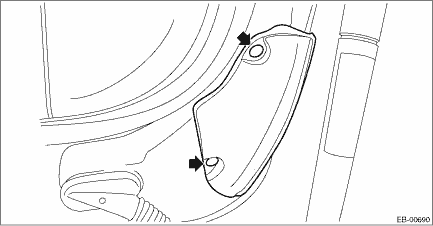
11. Remove the rubber duct (A).
(1) Pull out the claw while pushing it using a flat tip screwdriver (B) or similar tools.
(2) Remove the rubber duct (A) connection.
12. Pull out the harness and the hose assembly - rear washer from the panel - rear gate.
13. Remove harness clip of each harness from the panel - rear gate.
14. Before removing the stay assembly - rear gate, prevent the panel - rear gate from closing by using a prop or the like.
CAUTION:
If the prop comes off, operators may get injured and vehicle may get damaged. Make sure to support the panel - rear gate with secure material to prevent injury or damage.
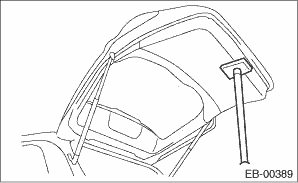
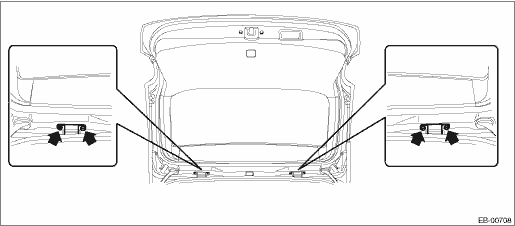
15. Remove the mounting bolts from the stay assembly - rear gate.
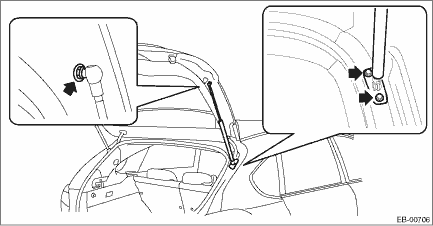
16. Remove the bolts of the hinge - rear gate, and remove the panel - rear gate.
CAUTION:
The panel - rear gate is heavy. When removing and installing it, always work in a team of two or more persons.
17. Remove the hinge - rear gate from the vehicle.
2. REAR GATE DAMPER STAY
CAUTION:
• Do not damage piston rods and oil seals.
• Never disassemble cylinders: They contain gas.
• The panel - rear gate is heavy. When removing and installing it, always work in a team of two or more persons.
1. Before removing the stay assembly - rear gate, prevent the panel - rear gate from closing by using a prop or the like.
CAUTION:
If the prop comes off, operators may get injured and vehicle may get damaged. Make sure to support the panel - rear gate with secure material to prevent injury or damage.
2. Remove the mounting bolts and remove the stay assembly - rear gate.
 Adjustment
EXTERIOR BODY PANELS > Rear GateADJUSTMENTAdjust the clearance around the panel - rear gate as follows.PartStandardAPanel - rear gate to Roof panel6.0+1.0, −0.5 mm (0.24+0.04, −0.02 in) ...
 Disposal
EXTERIOR BODY PANELS > Rear GateDISPOSAL1. REAR GATE DAMPER STAYCAUTION:Gas is colorless, odorless, and harmless. However, gas pressure may spray cutting powder or oil. Be sure to wear dust-resista ...
Other materials:
Disassembly
FUEL INJECTION (FUEL SYSTEMS)(H4DO) > Intake ManifoldDISASSEMBLY1. Remove the throttle body. Throttle Body > REMOVAL">2. Remove the purge control solenoid valve. Purge Control Solenoid Valve > REMOVAL">3. Remove the manifold absolute pressure sensor. Manifold Absolute Pre ...
Adjustment
SUNROOF/T-TOP/CONVERTIBLE TOP (SUNROOF) > Glass LidADJUSTMENT1. Adjust the height of the lid assembly - sunroof and the roof panel.2. Loosen the lid assembly - sunroof mounting bolts (A), and then adjust the height by moving the lid assembly - sunroof side.Lid assembly - sunroof height difference ...
Dtc c0025 rear right abs sensor circuit open or short
VEHICLE DYNAMICS CONTROL (VDC) (DIAGNOSTICS) > Diagnostic Procedure with Diagnostic Trouble Code (DTC)DTC C0025 REAR RIGHT ABS SENSOR CIRCUIT OPEN OR SHORTNOTE:For the diagnostic procedure, refer to “DTC C0027 REAR LEFT ABS SENSOR CIRCUIT OPEN OR SHORT”. Diagnostic Procedure with Dia ...
