
Subaru Crosstrek Service Manual: Installation
BRAKE > Rear Brake Pad
INSTALLATION
NOTE:
Before installation, remove mud and foreign matter from the caliper body assembly and support - rear disc brake.
1. Before installation, check the brake pad. Rear Brake Pad > INSPECTION">
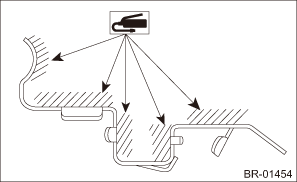
2. Apply a thin coat of grease to the pad clip.
Preparation items:
Grease: An item contained in the pad kit or equivalent
3. Apply a thin coat of grease to the shim - disc brake rear inner (a) and the shim - disc brake rear outer (b).
Preparation items:
Grease: Those contained in the pad kit or WAKO grease V160
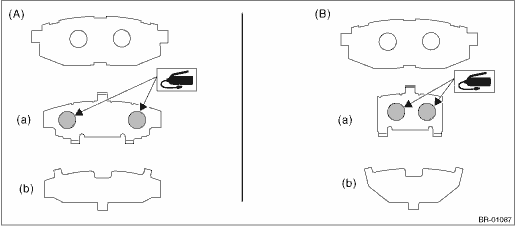
(A) | Pad - disc brake rear outer | (B) | Pad - disc brake rear inner |
4. Install the brake pad to the support - rear disc brake.
5. Install the caliper body assembly to the support - rear disc brake.
Tightening torque:
Caliper bolt: 27 N·m (2.75 kgf-m, 19.9 ft-lb)
6. Install the brake hose bracket.
Tightening torque:
Brake hose bracket: 33 N·m (3.36 kgf-m, 24.3 ft-lb)
7. Install the rear wheels.
Tightening torque:
Except for C4 model: 120 N·m (12.24 kgf-m, 88.5 ft-lb)
C4 model: 100 N·m (10.20 kgf-m, 73.8 ft-lb)
 Removal
BRAKE > Rear Brake PadREMOVAL1. Lift up the vehicle, and then remove the rear wheels.2. Remove the rear brake pad.(1) Remove the bolts and remove the brake hose bracket.(2) Remove the caliper bolt, ...

Other materials:
Dtc b1805 short in passenger s airbag
AIRBAG SYSTEM (DIAGNOSTICS) > Diagnostic Chart with Trouble CodeDTC B1805 SHORT IN PASSENGER’S AIRBAGDiagnosis start condition:Ignition voltage is 10 V to 16 V.DTC detecting condition:• Airbag main harness circuit is shorted.• Airbag module harness circuit (passenger’s sid ...
Adjustment
MANUAL TRANSMISSION AND DIFFERENTIAL(5MT) > Drive Pinion Shaft AssemblyADJUSTMENT1. THRUST BEARING PRELOAD1. Select a suitable adjusting washer No. 1 so that dimension (H) will be zero in a visual check. Position the washer (18.3 ? 30 ? t) and lock washer (18 ? 30 ? 2) and attach the lock nut.2. ...
Installation
FUEL INJECTION (FUEL SYSTEMS)(H4DO) > Fuel Tank ProtectorINSTALLATIONInstall in the reverse order of removal.NOTE:Use a new self-locking nut.Tightening torque:T1: 9 N·m (0.9 kgf-m, 6.6 ft-lb) T2: 18 N·m (1.8 kgf-m, 13.3 ft-lb)(A)Self-locking nut ...
