Subaru Crosstrek Service Manual: Removal
EXTERIOR BODY PANELS > Front Hood
REMOVAL
1. FRONT HOOD PANEL
CAUTION:
The hood COMPL - front is heavy. When removing or installing the hinge COMPL - front hood, be sure to work in a group of two or more.
1. Open the hood COMPL - front.
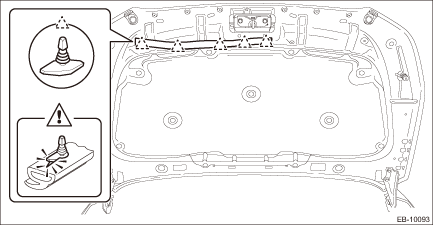
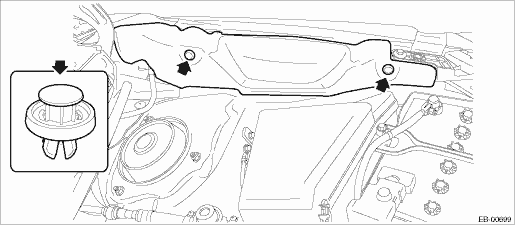
2. Remove the clips, and remove the insulator - front hood.
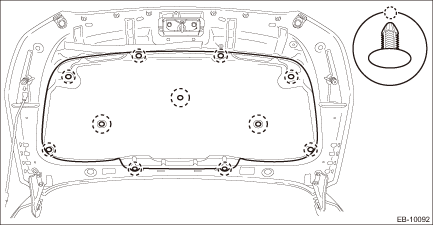
3. Remove the clip, and remove the seal - front duct.
CAUTION:
If the weather strip clip is removed with excessive force, the seal - front duct may be damaged. Be sure to use clip remover, etc. to remove.
4. Using a marker pen, make alignment marks (A) on the hood COMPL - front and the striker - front hood.
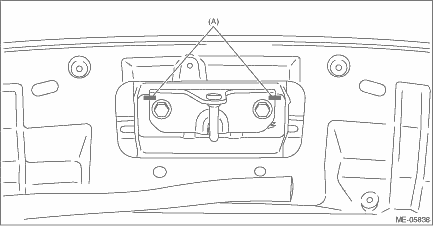
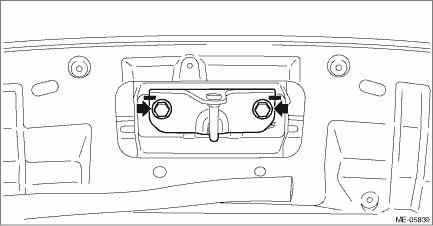
5. Remove the striker - front hood from the hood COMPL - front.
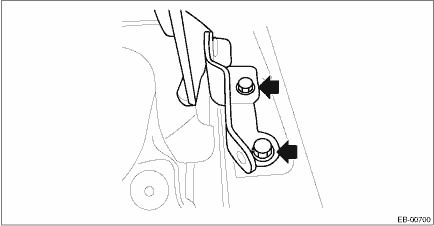
6. Remove the nut on the hood COMPL - front side, and remove the hood COMPL - front.
2. FRONT HOOD HINGE
CAUTION:
The hood COMPL - front is heavy. When removing or installing the hinge COMPL - front hood, be sure to work in a group of two or more.
1. Remove the cover - front fender.
(1) Remove the clip.
(2) Release the claws by pulling them forward, and remove the cover - front fender.
2. Remove the fender COMPL - front. Front Fender > REMOVAL">
3. Remove the hood COMPL - front.
(1) Remove the nuts on the hood panel side, and remove the hood COMPL - front.
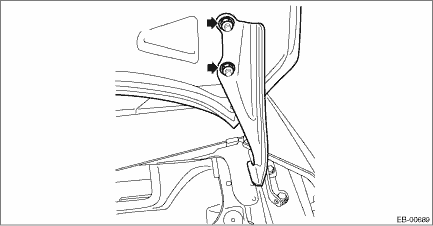
4. Remove the bolts, and remove the hinge COMPL - front hood.
 Adjustment
EXTERIOR BODY PANELS > Front HoodADJUSTMENTAdjust the clearance around the hood COMPL - front as follows.PartStandardAHood COMPL - front to Front grille7.5±1.0 mm (0.30±0.04 in)BHood COMPL - fron ...
 Installation
EXTERIOR BODY PANELS > Front HoodINSTALLATIONCAUTION:The hood COMPL - front is heavy. When removing or installing the hinge COMPL - front hood, be sure to work in a group of two or more.1. To insta ...
Other materials:
Inspection
FUEL INJECTION (FUEL SYSTEMS)(H4DO) > Fuel Sub Level SensorINSPECTION1. Check that the fuel sub level sensor has no damage.2. Measure the fuel sub level sensor float position.(1)FULL(2)EMPTY(3)Datum pointsFloat positionStandardFULL to Datum point (A)5.31±3.5 mm (0.209±0.138 in)EMPTY to Datum po ...
Dtc p015b a/f / o2 sensor delayed response - lean to rich bank 1 sensor 1
ENGINE (DIAGNOSTICS)(H4DO) > Diagnostic Procedure with Diagnostic Trouble Code (DTC)DTC P015B A/F / O2 SENSOR DELAYED RESPONSE - LEAN TO RICH BANK 1 SENSOR 1NOTE:For the diagnostic procedure, refer to DTC P014C. Diagnostic Procedure with Diagnostic Trouble Code (DTC) > DTC P014C A/F / O2 SENS ...
Headlight flasher
CAUTION
Do not hold the lever in the flashing
position for more than just a few
seconds.
To flash the headlights, pull the lever
toward you and then release it. The high
beam will stay on for as long as you hold
the lever. The headlight flasher works
even though the lighting switch is in ...
