Subaru Crosstrek Service Manual: Adjustment
EXTERIOR BODY PANELS > Front Hood
ADJUSTMENT
Adjust the clearance around the hood COMPL - front as follows.
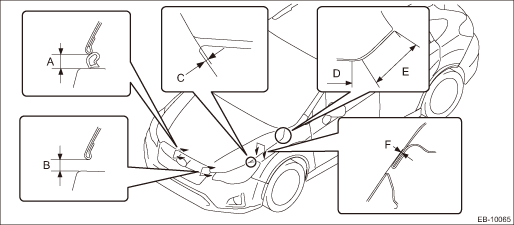
Part | Standard | |
A | Hood COMPL - front to Front grille | 7.5±1.0 mm (0.30±0.04 in) |
B | Hood COMPL - front to Bumper face - front | 6.0+2.0, −1.0 mm (0.24+0.08, −0.04 in) |
C | Offset value: Hood COMPL - front to Front end of fender COMPL - front | 0+0.5, −1.0 mm (0+0.02, −0.04 in) |
D | Hood COMPL - front to Fender COMPL - front (from front end to just before curved portion) | 3.5±1.0 mm (0.14±0.04 in) |
E | Hood COMPL - front to Fender COMPL - front (from rear end to just before curved portion) | 4.5±1.0 mm (0.18±0.04 in) |
F | Surface level gap: Hood COMPL - front to Fender COMPL - front | 0.5+0.5, −1.0 mm (0.02+0.02, −0.04 in) |
1. Adjust the horizontal position of the hood COMPL - front.
(1) Loosen the attaching nuts of the hinge COMPL - front hood on the left and right sides.
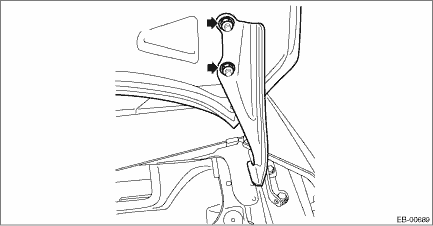
(2) Adjust the horizontal clearance of the hood COMPL - front, and tighten the attaching nuts of the hinge COMPL - front hood.
Tightening torque:
25 N·m (2.55 kgf-m, 18.4 ft-lb)
2. Adjust the front end height of the hood COMPL - front.
(1) Loosen the bolts on the lock assembly - front hood.
(2) Adjust the lock assembly - front hood by moving it up and down.
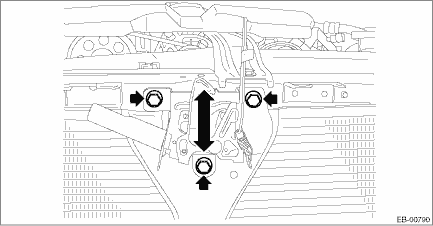
Tightening torque:
33 N·m (3.36 kgf-m, 24.3 ft-lb)
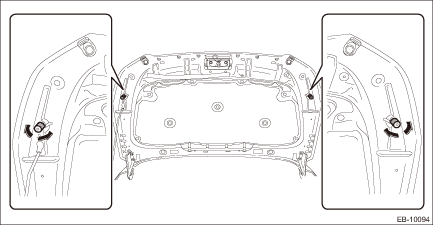
3. Rotate the buffer - front hood of the hood COMPL - front to adjust the height.
 Front hood
...
 Removal
EXTERIOR BODY PANELS > Front HoodREMOVAL1. FRONT HOOD PANELCAUTION:The hood COMPL - front is heavy. When removing or installing the hinge COMPL - front hood, be sure to work in a group of two or mo ...
Other materials:
Removal
SUNROOF/T-TOP/CONVERTIBLE TOP (SUNROOF) > SunshadeREMOVAL1. Disconnect the ground cable from battery and wait for at least 60 seconds before starting work. NOTE">2. Remove the lid assembly - sunroof. Glass Lid > REMOVAL">3. Remove the trim panel - roof assembly. Roof Trim &g ...
Wear indicators
New tread
Worn tread
Tread wear indicator
Each tire installed on your Subaru Ascent is equipped with built-in tread wear
indicators. These indicators become visible once the tread depth has worn down to
approximately 0.063 in (1.6 mm). When this happens, the indicator appears as a ...
Dtc p1530 battery current sensor circuit low
ENGINE (DIAGNOSTICS)(H4DO) > Diagnostic Procedure with Diagnostic Trouble Code (DTC)DTC P1530 BATTERY CURRENT SENSOR CIRCUIT LOWDTC detecting condition:Immediately at fault recognitionCAUTION:After servicing or replacing faulty parts, perform Clear Memory Mode Clear Memory Mode > OPERATION&qu ...
