Subaru Crosstrek Service Manual: Removal
EXTERIOR BODY PANELS > Front Door
REMOVAL
1. FRONT DOOR PANEL
1. Disconnect the ground cable from battery and wait for at least 60 seconds before starting work. NOTE">
2. Remove the trim panel - front door. Door Trim > REMOVAL">
3. Remove the sealing cover - front door. Front Sealing Cover > REMOVAL">
4. Remove the outer mirror assembly. Outer Mirror Assembly > REMOVAL">
5. Remove the front door speaker assembly. Front Speaker > REMOVAL">
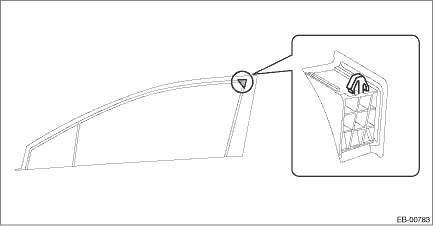
6. Remove the cover B pillar - front door INN.
CAUTION:
• Always replace with a new part, because engagement of the claw weakens.
• Do not damage the sash while removing.
7. Remove the front door impact sensor assembly. Front Door Impact Sensor > REMOVAL">
8. Remove the glass assembly - front door and the glass - front door partition. Front Door Glass > REMOVAL">
9. Remove the regulator & motor assembly - front of the front door. Front Regulator and Motor Assembly > REMOVAL">
10. Remove the latch and actuator assembly - front. Front Door Latch and Door Lock Actuator Assembly > REMOVAL">
11. Remove the handle - door outer and the cover - handle front outer. Front Outer Handle > REMOVAL">
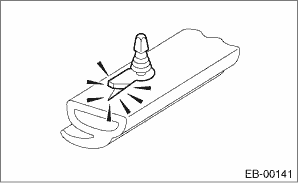
12. Remove the weather strip - front door.
CAUTION:
If the weather strip clip is removed with excessive force, the weather strip may be damaged. Be sure to use clip remover to remove.
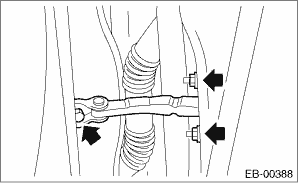
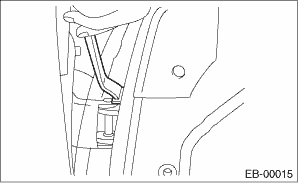
13. Remove the bolts and nuts, and then detach the checker assembly - front door.
14. Remove the cover side sill - front INN and cover side sill - front. Lower Inner Trim > REMOVAL">
15. Disconnect the front door impact sensor harness connector. Airbag Connector > PROCEDURE">
CAUTION:
Before handling the airbag system components, refer to “CAUTION” of “General Description” in “AIRBAG SYSTEM”. General Description > CAUTION">
16. Disconnect the front door harness connectors.
(1) Disconnect the connector of door harness from body harness.
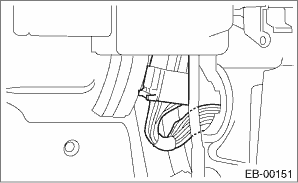
(2) Push in the claws to remove the grommet, and pull out the door harness connector.
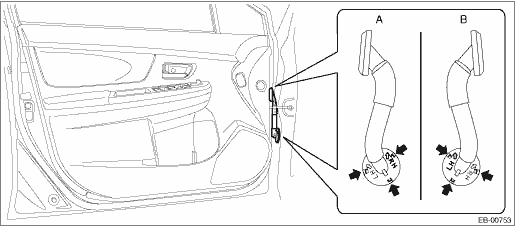
A | Driver’s side |
B | Passenger’s side |
17. Before removing the panel assembly - front door, make the following preparations.
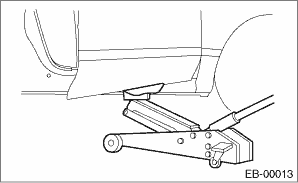
(1) Put a wooden block on a floor jack and place the jack under the panel assembly - front door.
(2) Support the panel assembly - front door with the jack to protect it from damage.
CAUTION:
Do not excessively lift the panel assembly - front door with the floor jack. The door hinges may be damaged.
18. Remove the door-side bolts for the upper hinge - front door and the lower hinge - front door to remove the panel assembly - front door.
CAUTION:
The panel assembly - front door is heavy. When removing and installing it, always work in a team of two or more persons.
19. Remove the door hinge from vehicle.
2. FRONT DOOR HINGE
1. Remove the bolts from the vehicle side to disconnect the checker assembly - front door.
2. Before removing the door hinge, make the following preparations.
(1) Put a wooden block on a floor jack and place the jack under the panel assembly - front door.
(2) Support the panel assembly - front door with the jack to protect it from damage.
CAUTION:
Do not excessively lift the panel assembly - front door with the floor jack. The door hinges may be damaged.
3. Remove the bolts of the upper hinge - front door or the lower hinge - front door.
CAUTION:
Do not remove the upper hinge - front door and the lower hinge - front door at the same time.
4. Remove the hinge - front door from the vehicle.
 Adjustment
EXTERIOR BODY PANELS > Front DoorADJUSTMENTAdjust the clearance around the panel assembly - front door as follows.PartStandardAFender COMPL - front to Panel assembly - front door4.5±1.0 mm (0.18± ...
 Installation
EXTERIOR BODY PANELS > Front DoorINSTALLATION1. FRONT DOOR PANEL1. Put a wooden block on a jack and place the panel assembly - front door on it.2. Apply grease to the sliding area of door hinges, a ...
Other materials:
Where to place a child restraint system
The following guidelines represent SUBARU recommendations for correctly positioning
child restraint systems in the Subaru Ascent. Proper placement is essential to ensure
maximum safety and effectiveness of all restraint systems.
WARNING
In the Subaru Ascent, certain child restraint syst ...
Main screen
To access the main screen in the Subaru Ascent, simply touch
(HOME). This action instantly brings up the central interface, where all primary
vehicle systems and settings are organized for quick and intuitive access.
Within this Owner's Manual, only selected configuration sections are ...
Specification
REAR SUSPENSION > General DescriptionSPECIFICATIONRefer to “SPECIFICATIONS” in “FRONT SUSPENSION” section for rear suspension specifications. General Description > SPECIFICATION">NOTE:• Front toe-in, rear toe-in and front camber can be adjusted. Adjust if ...
