Subaru Crosstrek Service Manual: Installation
MECHANICAL(H4DO) > Cam Sprocket
INSTALLATION
1. CAM SPROCKET RH
• Intake cam sprocket RH
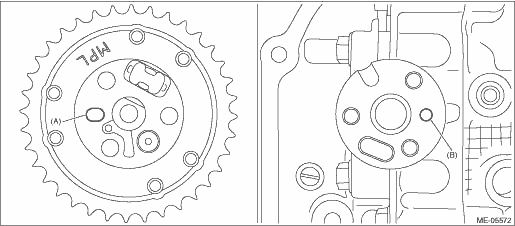
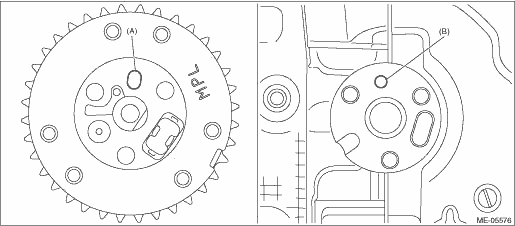
1. Install the intake cam sprocket RH by aligning the knock hole (A) of intake cam sprocket RH and the knock pin (B) of intake camshaft RH.
NOTE:
Before installation, check that there is no foreign matter on the intake cam sprocket RH and intake camshaft RH.
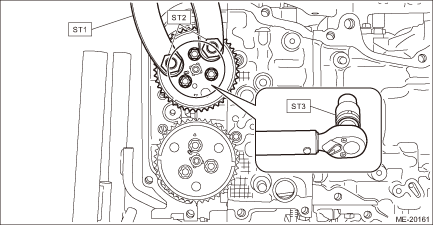
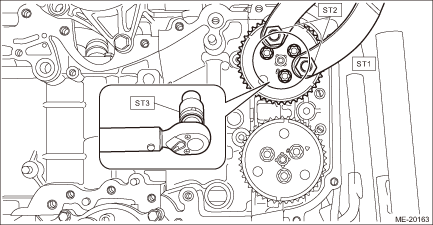
2. Hold the intake cam sprocket RH using the ST1 and ST2, and install the bolts using the ST3.
CAUTION:
Perform the operation carefully since the ST comes off easily.
| ST1 18355AA000 | PULLEY WRENCH |
| ST2 18334AA020 | PULLEY WRENCH PIN SET |
| ST3 18270KA010 | SOCKET |
Tightening torque:
18 N·m (1.8 kgf-m, 13.3 ft-lb)
3. Install the timing chain RH. Timing Chain Assembly > INSTALLATION">
4. Install the chain cover. Chain Cover > INSTALLATION">
• Exhaust cam sprocket RH
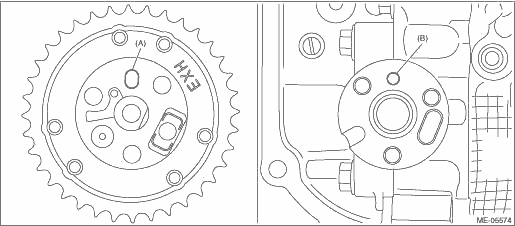
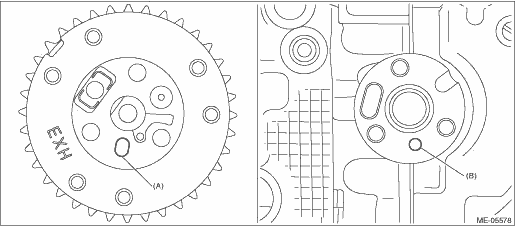
1. Install the exhaust cam sprocket RH by aligning the knock hole (A) of exhaust cam sprocket RH and the knock pin (B) of exhaust camshaft RH.
NOTE:
Before installation, check that there is no foreign matter on the exhaust cam sprocket RH and exhaust camshaft RH.
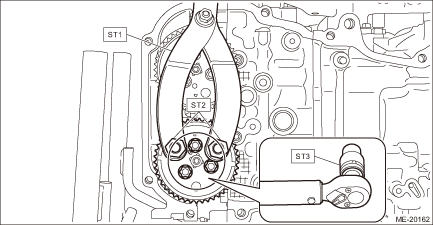
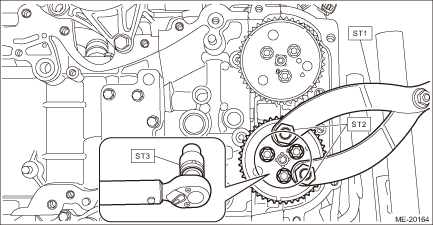
2. Hold the exhaust cam sprocket RH using ST1 and ST2, and install the bolts using ST3.
CAUTION:
Perform the operation carefully since the ST comes off easily.
| ST1 18355AA000 | PULLEY WRENCH |
| ST2 18334AA020 | PULLEY WRENCH PIN SET |
| ST3 18270KA010 | SOCKET |
Tightening torque:
18 N·m (1.8 kgf-m, 13.3 ft-lb)
3. Install the timing chain RH. Timing Chain Assembly > INSTALLATION">
4. Install the chain cover. Chain Cover > INSTALLATION">
2. CAM SPROCKET LH
• Intake cam sprocket LH
1. Install the intake cam sprocket LH by aligning the knock hole (A) of intake cam sprocket LH and the knock pin (B) of intake camshaft LH.
NOTE:
Before installation, check that there is no foreign matter on the intake cam sprocket LH and intake camshaft LH.
2. Hold the intake cam sprocket LH using the ST1 and ST2, and install the bolts using the ST3.
CAUTION:
Perform the operation carefully since the ST comes off easily.
| ST1 18355AA000 | PULLEY WRENCH |
| ST2 18334AA020 | PULLEY WRENCH PIN SET |
| ST3 18270KA010 | SOCKET |
Tightening torque:
18 N·m (1.8 kgf-m, 13.3 ft-lb)
3. Install timing chain LH. Timing Chain Assembly > INSTALLATION">
4. Install the chain cover. Chain Cover > INSTALLATION">
• Exhaust cam sprocket LH
1. Install the exhaust cam sprocket LH by aligning the knock hole (A) of exhaust cam sprocket LH and the knock pin (B) of exhaust camshaft LH.
NOTE:
Before installation, check that there is no foreign matter on the exhaust cam sprocket LH and exhaust camshaft LH.
2. Hold the exhaust cam sprocket LH using the ST1 and ST2, and install the bolts using the ST3.
CAUTION:
Perform the operation carefully since the ST comes off easily.
| ST1 18355AA000 | PULLEY WRENCH |
| ST2 18334AA020 | PULLEY WRENCH PIN SET |
| ST3 18270KA010 | SOCKET |
Tightening torque:
18 N·m (1.8 kgf-m, 13.3 ft-lb)
3. Install timing chain LH. Timing Chain Assembly > INSTALLATION">
4. Install the chain cover. Chain Cover > INSTALLATION">
 Removal
MECHANICAL(H4DO) > Cam SprocketREMOVAL1. CAM SPROCKET RHNOTE:When replacing a single part, perform the work with the engine assembly installed to body.• Intake cam sprocket RH1. Remove the ch ...
 Camshaft
...
Other materials:
Removal
ENTERTAINMENT > Front Accessory Power Supply SocketREMOVALCAUTION:Before handling the airbag system components, always refer to “CAUTION” of “General Description” in “AIRBAG SYSTEM”.1. Disconnect the ground cable from battery and wait for at least 60 seconds be ...
Dtc b1837 short in curtain airbag lh squib circuit (to ground)
AIRBAG SYSTEM (DIAGNOSTICS) > Diagnostic Chart with Trouble CodeDTC B1837 SHORT IN CURTAIN AIRBAG LH SQUIB CIRCUIT (TO GROUND)Diagnosis start condition:Ignition voltage is 10 V to 16 V.DTC detecting condition:• Curtain airbag harness (LH) circuit is shorted to ground.• Curtain airbag ...
Inspection
GLASS/WINDOWS/MIRRORS > Rear Regulator and Motor AssemblyINSPECTION1. Disconnect the connector of the motor - rear.2. Check the motor operation when battery voltage is applied between terminals of the motor - rear connector.• LH sideTerminal No.Inspection conditionsStandard4 (+) — 1 (&min ...
