Subaru Crosstrek Service Manual: Installation
COOLING(H4DO) > Thermostat
INSTALLATION
1. ENGINE SIDE
1. Install a gasket to thermostat.
NOTE:
Use a new gasket.
2. Install the thermostat and thermostat cover.
Tightening torque:
6.4 N·m (0.7 kgf-m, 4.7 ft-lb)
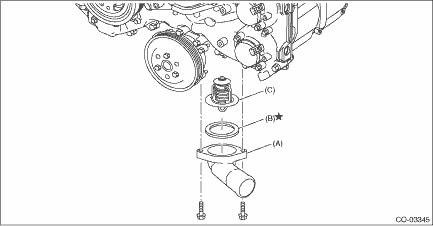
(A) | Thermostat cover | (B) | Gasket | (C) | Thermostat |
3. Connect the radiator outlet hose to thermostat cover.
4. Install the front exhaust pipe. Front Exhaust Pipe > INSTALLATION">
5. Install the under cover. Front Under Cover > INSTALLATION">
6. Lower the vehicle.
7. Connect the battery ground terminal. NOTE">
8. Fill engine coolant. Engine Coolant > REPLACEMENT">
2. CVTF COOLER (WITH WARMER FEATURE) SIDE
1. Install a gasket to thermostat.
NOTE:
Use a new gasket.
2. Install the thermostat and thermostat cover.
NOTE:
Install the parts with the air vent hole facing upward.
Tightening torque:
6.4 N·m (0.7 kgf-m, 4.7 ft-lb)
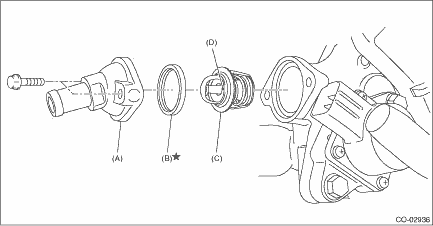
(A) | Thermostat cover | (B) | Gasket | (C) | Thermostat |
(D) | Air vent hole |
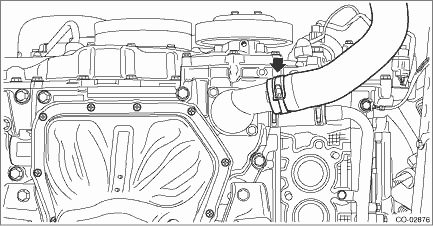
3. Connect the engine coolant hose to the thermostat cover.
4. Install the engine hanger to the cylinder block RH.
Tightening torque:
21 N·m (2.1 kgf-m, 15.5 ft-lb)
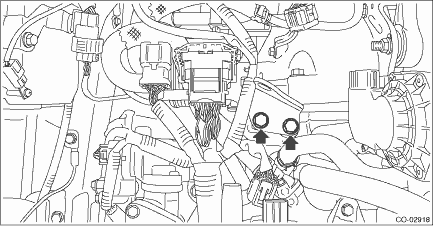
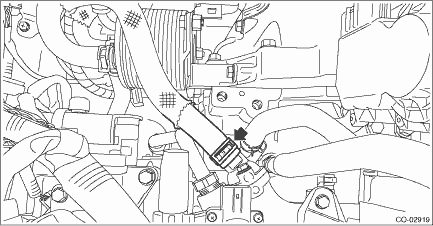
5. Connect the connector (A) to the manifold absolute pressure sensor.
6. Connect the connector (B) to the throttle position sensor.
7. Connect the connector (C) to the EGR control valve.

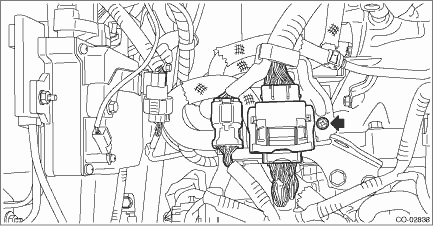
8. Connect the engine harness connector.
(1) Connect the bulkhead harness connector to the engine harness connector (black) and engine harness connector (brown).
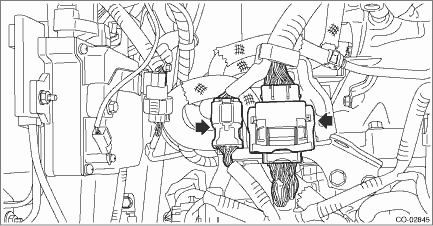
(2) Install the bolt which secures the bulkhead harness connector bracket.
Tightening torque:
7.5 N·m (0.8 kgf-m, 5.5 ft-lb)
9. Install the air intake boot. Air Intake Boot > INSTALLATION">
10. Lift up the vehicle.
11. Install the under cover. Front Under Cover > INSTALLATION">
12. Lower the vehicle.
13. Connect the battery ground terminal. NOTE">
14. Fill engine coolant. Engine Coolant > REPLACEMENT">
 Removal
COOLING(H4DO) > ThermostatREMOVAL1. ENGINE SIDE1. Disconnect the ground cable from battery. NOTE">2. Lift up the vehicle.3. Remove the under cover. Front Under Cover > REMOVAL"> ...

Other materials:
Operation
ENTERTAINMENT > Navigation SystemOPERATION1. SUBARU STARLINK CONNECTION ID DISPLAY1. Turn the ignition switch to ACC.2. Press the AUDIO/TUNE knob (b) five times with the HOME button (a) pressed to display the {Service Menu} screen.3. Touch the {Product Information} (c) to display the {Product Inf ...
Electrical specification
VEHICLE DYNAMICS CONTROL (VDC) (DIAGNOSTICS) > Control Module I/O SignalELECTRICAL SPECIFICATION• Models without EyeSightNOTE:• Terminal numbers in VDCCM&H/U connector (on the control module side) are shown in the figure.• When the connector is removed from the VDCCM&H/U ...
Dtc u1235 lost communication with eyesight
LAN SYSTEM (DIAGNOSTICS) > Diagnostic Procedure with Diagnostic Trouble Code (DTC)DTC U1235 LOST COMMUNICATION WITH EyeSightDTC DETECTING CONDITION:No data from stereo camera is received.TROUBLE SYMPTOM:Cooperation control of EyeSight does not operate properly.STEPCHECKYESNO1.CHECK PERFORMING OF ...
