Subaru Crosstrek Service Manual: Removal
COOLING(H4DO) > Thermostat
REMOVAL
1. ENGINE SIDE
1. Disconnect the ground cable from battery. NOTE">
2. Lift up the vehicle.
3. Remove the under cover. Front Under Cover > REMOVAL">
4. Drain engine coolant. Engine Coolant > REPLACEMENT">
5. Remove the front exhaust pipe. Front Exhaust Pipe > REMOVAL">
6. Disconnect the radiator outlet hose from thermostat cover.

7. Remove the thermostat cover, and then remove the thermostat.

(A) | Thermostat cover | (B) | Gasket | (C) | Thermostat |
8. Remove the gasket from thermostat.
2. CVTF COOLER (WITH WARMER FEATURE) SIDE
1. Disconnect the ground cable from battery. NOTE">
2. Lift up the vehicle.
3. Remove the under cover. Front Under Cover > REMOVAL">
4. Drain engine coolant. Engine Coolant > REPLACEMENT">
5. Lower the vehicle.
6. Remove the clip (A) from the air intake boot.
7. Loosen the clamp (B) securing the air cleaner case (rear) to the air intake boot.
8. Loosen the clamp (C) which secures the throttle body to the air intake boot.

9. Remove the air intake boot from the throttle body, and place the air intake boot aside so that it does not interfere with the work.

10. Disconnect the engine harness connector.
(1) Remove the bolt securing the bulkhead harness connector bracket.

(2) Disconnect the bulkhead harness connector from the engine harness connector (black) and engine harness connector (brown).

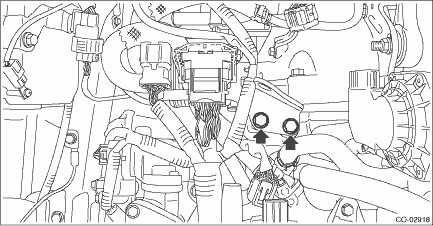
11. Disconnect the connector (A) from manifold absolute pressure sensor.
12. Disconnect the connector (B) from the throttle position sensor.
13. Disconnect the connector (C) from the EGR control valve.

14. Remove the bolt securing the engine hanger from the cylinder block RH, and place it aside so that it does not interfere with the work.
15. Disconnect the engine coolant hose from the thermostat cover.

16. Remove the thermostat cover, and then remove the thermostat.

(A) | Thermostat cover | (B) | Gasket | (C) | Thermostat |
17. Remove the gasket from thermostat.
 Inspection
COOLING(H4DO) > ThermostatINSPECTION1. Check that the thermostat does not have deformation, cracks or damage.2. Check that the thermostat valve closes completely at an ambient temperature.3. Immers ...
 Installation
COOLING(H4DO) > ThermostatINSTALLATION1. ENGINE SIDE1. Install a gasket to thermostat.NOTE:Use a new gasket.2. Install the thermostat and thermostat cover.Tightening torque:6.4 N·m (0.7 kgf- ...
Other materials:
Inspection
VEHICLE DYNAMICS CONTROL (VDC) > Rear ABS Wheel Speed SensorINSPECTION1. CHECK WITH SUBARU SELECT MONITOR1. Connect the Subaru Select Monitor.NOTE:For detailed operation procedures, refer to “Application help”.(1) On «Start» display, select «Diagnosis».(2) On «Vehicle selection» ...
Removal
CLUTCH SYSTEM > Operating CylinderREMOVALCAUTION:Brake fluid spilled on the vehicle body will harm the paint surface; therefore, wash it off with water and wipe clean quickly if spilled.1. Disconnect the ground cable from battery.2. Remove the clip (A) from the air intake boot.3. Loosen the clamp ...
Most common causes of corrosion
The most common causes of corrosion
are:
The accumulation of moisture retaining
dirt and debris in body panel sections,
cavities, and other areas.
Damage to paint and other protective
coatings caused by gravel and stone
chips or minor accidents.
Corrosion is accelerated on the vehic ...
