Subaru Crosstrek Owners Manual: Vehicle activation status screen

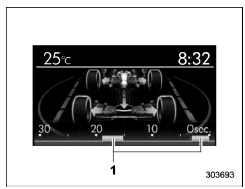
When the vehicle stops
1) Steering axle
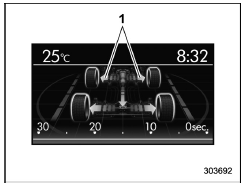
When the vehicle is being driven regularly
1) Power train (illuminated in blue)
When the Vehicle Dynamics Control system is being activated: the tires
illuminate in yellow.
1) History of Vehicle Dynamics Control system activation
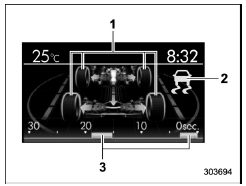
When the Vehicle Dynamics Control system has been activated: the tires remain
illuminated in yellow while the Vehicle Dynamics Control System is activated.
1) Activation status of the ABS (Anti-lock Brake System) 2) Vehicle Dynamics Control system operating indicator (flashing in yellow) 3) History of Vehicle Dynamics Control system activation
This screen displays the following vehicle information
- steering angle and driving wheel status
- activation status of the ABS (Anti-lock Brake System)
- activation status of the Vehicle Dynamics Control system
While driving, the vehicle wheels are illuminated in blue and the driving direction is represented using an animation of the traffic lane.
If the ABS is activated, all of the vehicle's wheels will be illuminated in yellow and the length of operation in seconds and the number of activations will be displayed in the bar indicator, located on the lowermost part of the display.
If the Vehicle Dynamics Control system is
activated, the activated vehicle wheels will
be illuminated in yellow and the operating
indicator " " will appear on the upper right
part of the display. Also, the length of
operation in seconds and the number of
activations will be displayed in the bar
indicator.
" will appear on the upper right
part of the display. Also, the length of
operation in seconds and the number of
activations will be displayed in the bar
indicator.
 ECO history screen
Average fuel consumption per unit time
(bar graph)
Average fuel consumption corresponding
to the driving distance of each trip meter
(red line)
This screen displays the fuel economy
...
 EyeSight screen (models with EyeSight system)
Current vehicle speed
Set vehicle speed
Preceding vehicle
Your vehicle
This screen displays the status of the
EyeSight system. For details, refer to the
Owner's Manual supplement for ...
Other materials:
Entering letters and numbers/list screen operation
Entering letters and numbers
When entering the Bluetooth device name
or PIN-code, or the phone number, letters
and numbers can be entered via the
screen.
Enter letters (example: In-Car-Device
setting)
Enter the desired characters (alphabet
key mode).
Switch to the screen for charac ...
Assembly
FRONT SUSPENSION > Front StrutASSEMBLY1. Before assembly, check each part. Front Strut > INSPECTION">2. Using a coil spring compressor, compress the coil spring - front.CAUTION:When installing the coil spring compressor to the coil spring, follow the operation manual accompanied with ...
Hill start assist warning light/Hill start assist OFF indicator light
Hill
start assist warning light
While the engine is running, if there are
any malfunctions in the Hill start assist
system, the warning light will illuminate.
WARNING
When the Hill start assist warning
light illuminates, have the vehicle
inspected at an authorized SUBARU
dealer.
Hill st ...
