Subaru Crosstrek Owners Manual: ECO history screen
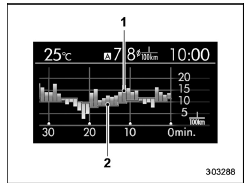
- Average fuel consumption per unit time (bar graph)
- Average fuel consumption corresponding to the driving distance of each trip meter (red line)
This screen displays the fuel economy history for the vehicle using a bar graph.
The horizontal scale represents the past time range and the vertical scale represents the fuel consumption. The green bars show driving with good fuel economy and the yellow bars show driving with poor fuel economy.
The time range of the history can be set.
The width of the bar graph is adjusted as follows depending on the set time range.
| Time range | Width of bar graph |
| 30 minutes | 1 minute |
| 60 minutes | 2 minutes |
| 120 minutes | 4 minutes |
For details about the setting, refer to "Economy history setting"
 ECO gauge screen (if equipped)
Average fuel consumption corresponding
to the driving distance of each trip meter
ECO gauge
The gauge pointer shows the difference
between the current fuel consumption and
the average ...
 Vehicle activation status screen
When the vehicle stops
1) Steering axle
When the vehicle is being driven regularly
1) Power train (illuminated in blue)
When the Vehicle Dynamics Control system is being activated: the ...
Other materials:
Key lock cylinders Replacement
SECURITY AND LOCKS > Key Lock CylindersREPLACEMENT1. STEERING LOCK1. Disconnect the ground cable from battery. NOTE">2. Remove the cover assembly - column.(1) Remove the screws by turning the steering wheel to right and left.(2) Release the claw, and remove the cover assembly - column UP ...
Component
IGNITION(H4DO) > General DescriptionCOMPONENT(1)Spark plug(2)Ignition coilTightening torque: N·m (kgf-m, ft-lb) T1:8.5 (0.9, 6.3) T2:17.5 (1.8, 12.9) ...
Operation
SECURITY AND LOCKS > Impact SensorOPERATION1. IMPACT SENSOR SETTING USING SUBARU SELECT MONITOR1. Make an impact sensor setting.(1) Connect the Subaru Select Monitor.NOTE:For detailed operation procedures, refer to “Application help”.(2) Turn the ignition switch to ON.(3) On «Start» ...
