Subaru Crosstrek Service Manual: Removal
BRAKE > Rear Disc Brake Assembly
REMOVAL
CAUTION:
Do not allow brake fluid to come in contact with the painted surface of the vehicle body. If it does, wash off with water and wipe away completely.
1. Lift up the vehicle, and then remove the rear wheels.
2. Remove the caliper body assembly from the support - rear disc brake.
(1) Remove the brake hose bracket and union bolt.
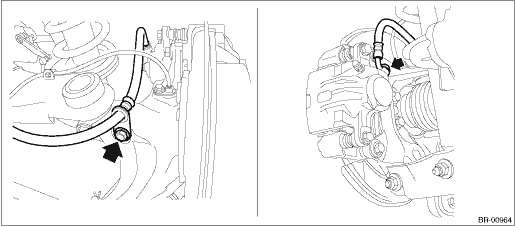
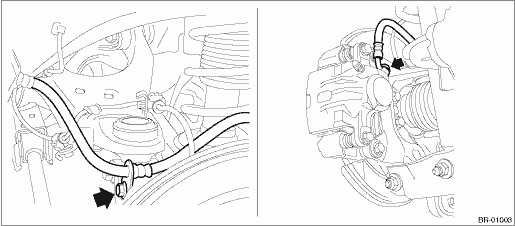
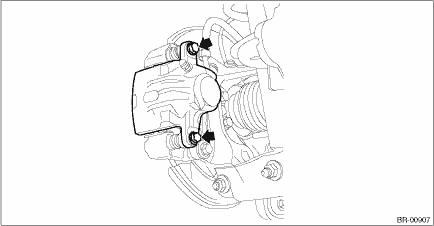
(2) Remove the caliper bolt, and remove the caliper body assembly.
3. Remove the support - rear disc brake.
NOTE:
Remove the support - rear disc brake only when replacing the disc rotor or the support - rear disc brake. It is not necessary to remove it when servicing the caliper body assembly.
(1) Remove the brake pad from support - rear disc brake.
(2) Remove the mounting bolts, and then remove the support - rear disc brake from the housing assembly - rear axle.
 Assembly
BRAKE > Rear Disc Brake AssemblyASSEMBLY1. Before installation, check each part. Rear Disc Brake Assembly > INSPECTION">2. Clean the inside of the caliper body cylinder using brake flui ...
 Disassembly
BRAKE > Rear Disc Brake AssemblyDISASSEMBLYCAUTION:Be careful not to allow foreign matter to enter the brake hose connector.1. Remove mud and foreign matter from the caliper body assembly.2. Remove ...
Other materials:
Dtc p0604 internal control module random access memory (ram) error
CONTINUOUSLY VARIABLE TRANSMISSION (DIAGNOSTICS) > Diagnostic Procedure with Diagnostic Trouble Code (DTC)DTC P0604 INTERNAL CONTROL MODULE RANDOM ACCESS MEMORY (RAM) ERRORDTC DETECTING CONDITION:Detected when two consecutive driving cycles with fault occur.TROUBLE SYMPTOM:TCM RAM malfunctionSTEP ...
Warning and indicator lights
The Subaru Ascent is equipped with a comprehensive range of warning and indicator
lights designed to keep the driver fully informed about vehicle status, safety systems,
and potential issues. Understanding these indicators in your Subaru Ascent ensures
safer driving, своевременное ...
Summer tires
Summer tires are high-speed capability
tires best suited for highway driving under
dry conditions.
Summer tires are inadequate for driving
on slippery roads such as on snowcovered
or icy roads.
If you drive your vehicle on snow-covered
or icy roads, we strongly recommend the
use of winte ...
