Subaru Crosstrek Service Manual: Disassembly
BRAKE > Rear Disc Brake Assembly
DISASSEMBLY
CAUTION:
Be careful not to allow foreign matter to enter the brake hose connector.
1. Remove mud and foreign matter from the caliper body assembly.
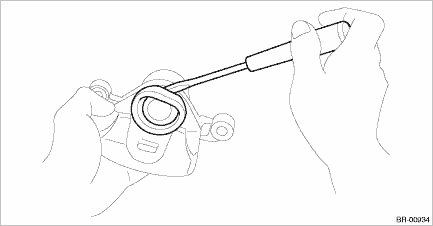
2. Remove the piston boot from caliper body cylinder.
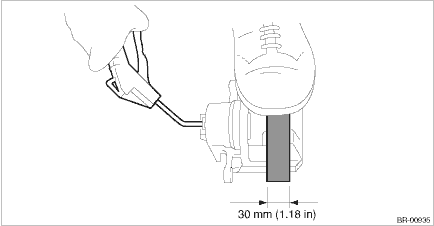
3. Remove the piston - disc brake.
(1) Place a wooden block in the caliper body assembly as shown in the figure to prevent the piston - disc brake from jumping out and being damaged.
(2) Using an air gun, gradually apply compressed air via the brake hose installation hole to push out the piston - disc brake.
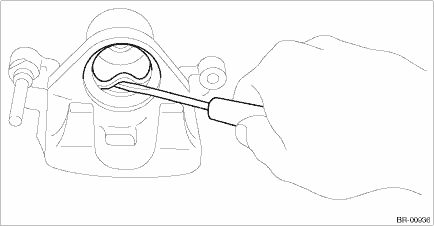
4. Remove the piston seal from caliper body cylinder.
CAUTION:
Do not damage the cylinder and piston seal groove.
5. Remove the guide pin - rear brake, lock pin - rear brake, lock pin - sleeve, and pin boot from the support - rear disc brake.
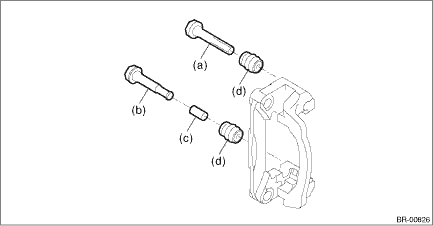
(a) | Guide pin - rear brake (black) | (c) | Lock pin - sleeve | (d) | Pin boot |
(b) | Lock pin - rear brake (silver) |
 Removal
BRAKE > Rear Disc Brake AssemblyREMOVALCAUTION:Do not allow brake fluid to come in contact with the painted surface of the vehicle body. If it does, wash off with water and wipe away completely.1. ...
 Inspection
BRAKE > Rear Disc Brake AssemblyINSPECTION1. Check the caliper body cylinder and piston - disc brake for uneven wear, damage or rust.2. Check the rubber parts for damage or deterioration.3. If faul ...
Other materials:
Rear seat reminder
The Subaru Ascent is equipped with a rear seat reminder system designed to help
drivers check for passengers or items left in the rear seats before exiting the
vehicle.
This feature is activated when the rear doors of the Subaru Ascent are opened
and closed prior to driving.
When the ignitio ...
Disassembly
MANUAL TRANSMISSION AND DIFFERENTIAL(5MT) > Reverse Check SleeveDISASSEMBLY1. Cover the reverse check sleeve with cloth, and remove the snap ring by using screwdriver.NOTE:If the snap ring is deformed or the spring repulsive force is not enough, replace with a new snap ring.(A)Snap ring2. Remove ...
Installation
FUEL INJECTION (FUEL SYSTEMS)(H4DO) > Knock SensorINSTALLATION1. Install the knock sensor to the cylinder block.NOTE:The knock sensor should be installed so that the center of the connector is positioned at a 76.5 — 91.5° angle relative to the front of engine.Tightening torque:24 N&m ...
