Subaru Crosstrek Owners Manual: Fuel gauge
Fuel gauge (type A)
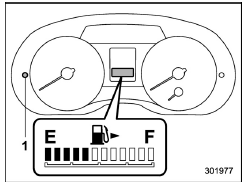
- Trip knob
Fuel gauge (type B)
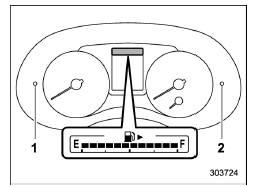
- Trip knob (U.S.-spec. models)
- Trip knob (except U.S.-spec. models)
The fuel gauge is displayed when the ignition is in the "ON" position, and it shows the approximate amount of fuel remaining in the tank.
The gauge indication may change slightly during braking, turning or acceleration due to fuel level movement in the tank.
If you press the trip knob while the ignition switch is in the "LOCK"/"OFF" or "ACC" position, the fuel gauge will light up and indicate the amount of fuel remaining in the tank. If, while the fuel gauge is indicating the amount of fuel remaining in the tank, you (a) do not press the trip knob for 10 seconds or (b) open and close the driver's door, the fuel gauge indication will turn off.
NOTE
You will see the "  " sign in
the fuel
gauge. This indicates that the fuel filler
door (lid) is located on the right side of
the vehicle.
" sign in
the fuel
gauge. This indicates that the fuel filler
door (lid) is located on the right side of
the vehicle.
 Tachometer
The tachometer shows the engine speed
in thousands of revolutions per minute.
CAUTION
Do not operate the engine with the
pointer of the tachometer in the red
zone. In this range, fuel injection w ...
 ECO gauge (if equipped)
U.S.-spec. models
Except U.S.-spec. models
The ECO gauge shows the difference
between the current rate of fuel consumption
and the average rate of fuel consumption
since the trip meter ...
Other materials:
Cruise control system Wiring diagram
WIRING SYSTEM > Cruise Control SystemWIRING DIAGRAM ...
Removal
DRIVE SHAFT SYSTEM > Rear AxleREMOVAL1. Disconnect the ground cable from battery. NOTE">2. Lift up the vehicle, and then remove the rear wheels.3. Remove the axle nut.CAUTION:Do not loosen the axle nut while the rear axle is loaded. Doing so may damage the hub unit bearing.(1) Lift the c ...
Automatic headlight beam leveler warning light (models with HID headlights)
This
light illuminates when the automatic
headlight beam leveler does not operate
normally.
If this light illuminates while driving or does
not turn off approximately 3 seconds after
turning the ignition switch to the "ON"
position, have your vehicle inspected at
your SUBARU dealer.
Fr ...
