
Subaru Crosstrek Service Manual: Dtc b1832 short in curtain airbag rh squib circuit (to ground)
AIRBAG SYSTEM (DIAGNOSTICS) > Diagnostic Chart with Trouble Code
DTC B1832 SHORT IN CURTAIN AIRBAG RH SQUIB CIRCUIT (TO GROUND)
Diagnosis start condition:
Ignition voltage is 10 V to 16 V.
DTC detecting condition:
• Curtain airbag harness (RH) circuit is shorted to ground.
• Curtain airbag module (RH) is faulty.
• Airbag control module is faulty.
CAUTION:
Before performing diagnosis, refer to “CAUTION” in “General Description”. General Description > CAUTION">
Wiring diagram:
Airbag system Airbag System > WIRING DIAGRAM">
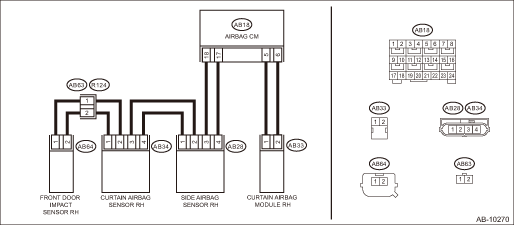
| STEP | CHECK | YES | NO |
1.CHECK POOR CONTACT OF CONNECTORS.
Check for poor contact of the connectors between the airbag control module, curtain airbag module RH and the curtain airbag sensor RH.
Is there poor contact?
Replace the airbag rear harness along with body harness.
Diagnostic Chart with Trouble Code > DTC B1832 SHORT IN CURTAIN AIRBAG RH SQUIB CIRCUIT (TO GROUND)">Go to Step 2.
2.CHECK CURTAIN AIRBAG MODULE.
1) Turn the ignition switch to OFF, disconnect the battery ground cable, and wait for 60 seconds or more.
2) Disconnect the connector (AB33), and connect the connector (1N) in test harness N to connector (AB33).
3) Connect the airbag resistor to the connector (2N) of test harness N.
4) Connect the battery ground terminal and turn the ignition switch to ON.
Does the airbag warning light illuminate for six seconds and go off?
Replace the curtain airbag module (RH). Curtain Airbag Module">
Diagnostic Chart with Trouble Code > DTC B1832 SHORT IN CURTAIN AIRBAG RH SQUIB CIRCUIT (TO GROUND)">Go to Step 3.
3.CHECK AIRBAG REAR HARNESS (CURTAIN AIRBAG MODULE HARNESS RH).
1) Turn the ignition switch to OFF, disconnect the battery ground cable, and wait for 60 seconds or more.
2) Disconnect the connector (AB26) from seat belt pretensioner (RH).
3) Disconnect connector (AB24) from side airbag module (RH).
4) Disconnect the airbag resistor from test harness N.
5) Disconnect the connectors (AB6, AB17, AB18) from airbag control module.
6) Connect the connector (1AG) in the test harness AG to the connectors (AB6, AB17, AB18).
7) Measure the resistance between connector (6AG) in the test harness AG and chassis ground.
Connector & terminal
(6AG) No. 6 — Chassis ground:
(6AG) No. 8 — Chassis ground:
Is the resistance 1 M? or more?
Diagnostic Chart with Trouble Code > DTC B1832 SHORT IN CURTAIN AIRBAG RH SQUIB CIRCUIT (TO GROUND)">Go to Step 4.
Replace the airbag rear harness along with body harness.
4.CHECK AIRBAG CONTROL MODULE.
1) Connect all connectors.
2) Clear the memory. Clear Memory Mode">
3) Perform the Inspection Mode. Inspection Mode">
4) Read the DTC. (Current malfunction) Read Diagnostic Trouble Code (DTC)">
Is DTC B1832 displayed?
Replace the airbag control module. Airbag Control Module">
Diagnostic Chart with Trouble Code > DTC B1832 SHORT IN CURTAIN AIRBAG RH SQUIB CIRCUIT (TO GROUND)">Go to Step 5.
5.CHECK FOR ANY OTHER DTC ON DISPLAY.
Is any other DTC displayed?
Check DTC using “List of Diagnostic Trouble Code (DTC)”. List of Diagnostic Trouble Code (DTC)">
Finish the diagnosis.
 Dtc b1831 open in curtain airbag rh squib circuit
AIRBAG SYSTEM (DIAGNOSTICS) > Diagnostic Chart with Trouble CodeDTC B1831 OPEN IN CURTAIN AIRBAG RH SQUIB CIRCUITDiagnosis start condition:Ignition voltage is 10 V to 16 V.DTC detecting condition:& ...
 Dtc b1833 short in curtain shield airbag rh squib circuit (to +b)
AIRBAG SYSTEM (DIAGNOSTICS) > Diagnostic Chart with Trouble CodeDTC B1833 SHORT IN CURTAIN SHIELD AIRBAG RH SQUIB CIRCUIT (TO +B)Diagnosis start condition:Ignition voltage is 10 V to 16 V.DTC detec ...
Other materials:
Preparation for overhaul Procedure
MANUAL TRANSMISSION AND DIFFERENTIAL(5MT) > Preparation for OverhaulPROCEDURE1. Clean oil, grease, dirt and dust from the transmission.2. When transmission gear oil remains in the transmission, using the TORX® bit T70, remove the drain plug, and drain the gear oil completely.3. Attach the drain ...
Inspection
WIPER AND WASHER SYSTEMS > Combination Switch (Wiper)INSPECTION1. INSPECTION OF SWITCH UNIT1. Operate the switches to check the continuity between terminals. Switch positionTerminal No.StandardFrontOFFA1 and A3Less than 1 ?INTA1 and A3Less than 1 ?LOA2 and A3Less than 1 ?HIA2 and A4Less than 1 ?W ...
Screen Settings
After entering the "Screen Settings" menu,
select one of the following menus.
Welcome Good-bye Screen
The welcome screen/good-bye screens
can be activated or deactivated. Select
"On" to activate the screens. Select "Off"
to deactivate the screens.
Gauge Initial Movement
The movement of the m ...
