Subaru Crosstrek Service Manual: Dtc b1833 short in curtain shield airbag rh squib circuit (to +b)
AIRBAG SYSTEM (DIAGNOSTICS) > Diagnostic Chart with Trouble Code
DTC B1833 SHORT IN CURTAIN SHIELD AIRBAG RH SQUIB CIRCUIT (TO +B)
Diagnosis start condition:
Ignition voltage is 10 V to 16 V.
DTC detecting condition:
• Curtain airbag harness (RH) is shorted to power supply.
• Curtain airbag module (RH) is faulty.
• Airbag control module is faulty.
CAUTION:
Before performing diagnosis, refer to “CAUTION” in “General Description”. General Description > CAUTION">
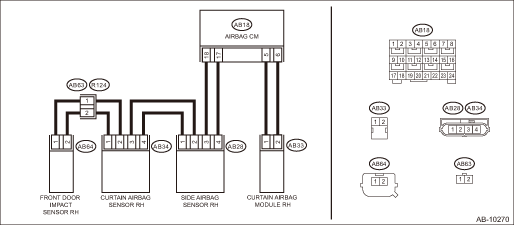
Wiring diagram:
Airbag system Airbag System > WIRING DIAGRAM">
| STEP | CHECK | YES | NO |
1.CHECK POOR CONTACT OF CONNECTORS.
Check for poor contact of the connectors between the airbag control module, curtain airbag module RH and the curtain airbag sensor RH.
Is there poor contact?
Replace the airbag rear harness along with body harness.
Diagnostic Chart with Trouble Code > DTC B1833 SHORT IN CURTAIN SHIELD AIRBAG RH SQUIB CIRCUIT (TO +B)">Go to Step 2.
2.CHECK CURTAIN AIRBAG MODULE.
1) Turn the ignition switch to OFF, disconnect the battery ground cable, and wait for 60 seconds or more.
2) Disconnect the connector (AB33), and connect the connector (1N) in test harness N to connector (AB33).
3) Connect the airbag resistor to the connector (2N) of test harness N.
4) Connect the battery ground terminal and turn the ignition switch to ON.
Does the airbag warning light illuminate for six seconds and go off?
Replace the curtain airbag module (RH). Curtain Airbag Module">
Diagnostic Chart with Trouble Code > DTC B1833 SHORT IN CURTAIN SHIELD AIRBAG RH SQUIB CIRCUIT (TO +B)">Go to Step 3.
3.CHECK AIRBAG REAR HARNESS (CURTAIN AIRBAG MODULE HARNESS RH).
1) Turn the ignition switch to OFF, disconnect the battery ground cable, and wait for 60 seconds or more.
2) Disconnect the connector (AB26) from seat belt pretensioner (RH).
3) Disconnect connector (AB24) from side airbag module (RH).
4) Disconnect the airbag resistor from test harness N.
5) Disconnect the connectors (AB6, AB17, AB18) from airbag control module.
6) Connect the connector (1AG) in the test harness AG to the connectors (AB6, AB17, AB18).
7) Connect the battery ground terminal and turn the ignition switch to ON.
8) Measure the voltage between connector (6AG) in the test harness AG and chassis ground.
Connector & terminal
(6AG) No. 6 (+) — Chassis ground (−):
(6AG) No. 8 (+) — Chassis ground (−):
Is the voltage less than 1 V?
Diagnostic Chart with Trouble Code > DTC B1833 SHORT IN CURTAIN SHIELD AIRBAG RH SQUIB CIRCUIT (TO +B)">Go to Step 4.
Replace the airbag rear harness along with body harness.
4.CHECK AIRBAG CONTROL MODULE.
1) Connect all connectors.
2) Clear the memory. Clear Memory Mode">
3) Perform the Inspection Mode. Inspection Mode">
4) Read the DTC. (Current malfunction) Read Diagnostic Trouble Code (DTC)">
Is DTC B1833 displayed?
Replace the airbag control module. Airbag Control Module">
Diagnostic Chart with Trouble Code > DTC B1833 SHORT IN CURTAIN SHIELD AIRBAG RH SQUIB CIRCUIT (TO +B)">Go to Step 5.
5.CHECK FOR ANY OTHER DTC ON DISPLAY.
Is any other DTC displayed?
Check DTC using “List of Diagnostic Trouble Code (DTC)”. List of Diagnostic Trouble Code (DTC)">
Finish the diagnosis.
 Dtc b1832 short in curtain airbag rh squib circuit (to ground)
AIRBAG SYSTEM (DIAGNOSTICS) > Diagnostic Chart with Trouble CodeDTC B1832 SHORT IN CURTAIN AIRBAG RH SQUIB CIRCUIT (TO GROUND)Diagnosis start condition:Ignition voltage is 10 V to 16 V.DTC detectin ...
 Dtc b1835 short in curtain airbag lh squib circuit
AIRBAG SYSTEM (DIAGNOSTICS) > Diagnostic Chart with Trouble CodeDTC B1835 SHORT IN CURTAIN AIRBAG LH SQUIB CIRCUITDiagnosis start condition:Ignition voltage is 10 V to 16 V.DTC detecting condition: ...
Other materials:
Engine overheating
WARNING
Never remove the radiator cap of your Subaru Ascent until the engine has been
completely switched off and allowed to cool down fully. When the engine is hot,
the cooling system remains under high pressure.
Opening the cap prematurely may cause a sudden release of pressurized, boiling ...
Inspection
MANUAL TRANSMISSION AND DIFFERENTIAL(5MT) > Front Differential AssemblyINSPECTIONRepair or replace the differential gear in the following cases:• When the hypoid driven gear and drive pinion shaft tooth surfaces are damaged, excessively worn, or seized.• When the roller bearing on the ...
Specification
INSTRUMENTATION/DRIVER INFO > General DescriptionSPECIFICATION1. COMBINATION METER ASSEMBLYNOTE:Specifications of the combination meter vary depending on the market and the grade.• Model with normal meterMeter, displayOperation method, display methodDrive controlWhen checking the indicator ...
