Subaru Crosstrek Service Manual: Dtc b1835 short in curtain airbag lh squib circuit
AIRBAG SYSTEM (DIAGNOSTICS) > Diagnostic Chart with Trouble Code
DTC B1835 SHORT IN CURTAIN AIRBAG LH SQUIB CIRCUIT
Diagnosis start condition:
Ignition voltage is 10 V to 16 V.
DTC detecting condition:
• Curtain airbag harness (LH) circuit is shorted.
• Curtain airbag module (LH) is faulty.
• Airbag control module is faulty.
CAUTION:
Before performing diagnosis, refer to “CAUTION” in “General Description”. General Description > CAUTION">
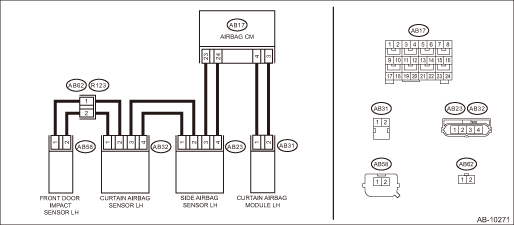
Wiring diagram:
Airbag system Airbag System > WIRING DIAGRAM">

| STEP | CHECK | YES | NO |
1.CHECK POOR CONTACT OF CONNECTORS.
Check for poor contact of the connectors between the airbag control module, curtain airbag module LH and the curtain airbag sensor LH.
Is there poor contact?
Replace the airbag rear harness along with body harness.
Diagnostic Chart with Trouble Code > DTC B1835 SHORT IN CURTAIN AIRBAG LH SQUIB CIRCUIT">Go to Step 2.
2.CHECK CURTAIN AIRBAG MODULE.
1) Turn the ignition switch to OFF, disconnect the battery ground cable, and wait for 60 seconds or more.
2) Disconnect the connector (AB31) from curtain airbag module (LH).
3) Connect the connector (1N) in the test harness N to the connector (AB31).
4) Connect the airbag resistor to the connector (2N) of test harness N.
5) Connect the battery ground terminal and turn the ignition switch to ON.
Does the airbag warning light illuminate for 6 seconds and go off?
Replace the curtain airbag module (LH). Curtain Airbag Module">
Diagnostic Chart with Trouble Code > DTC B1835 SHORT IN CURTAIN AIRBAG LH SQUIB CIRCUIT">Go to Step 3.
3.CHECK AIRBAG REAR HARNESS (CURTAIN AIRBAG MODULE HARNESS LH).
1) Turn the ignition switch to OFF, disconnect the battery ground cable, and wait for 60 seconds or more.
2) Disconnect the connector (AB21) from seat belt pretensioner (LH).
3) Disconnect connector (AB19) from side airbag module (LH).
4) Disconnect the airbag resistor from test harness N.
5) Disconnect the connectors (AB6, AB17, AB18) from airbag control module.
6) Connect the connector (1AG) in the test harness AG to the connectors (AB6, AB17, AB18).
7) Measure the resistance between connector (6AG) terminals in test harness AG.
Connector & terminal
(6AG) No. 1 — (6AG) No. 3:
Is the resistance 1 M? or more?
Diagnostic Chart with Trouble Code > DTC B1835 SHORT IN CURTAIN AIRBAG LH SQUIB CIRCUIT">Go to Step 4.
Replace the airbag rear harness along with body harness.
4.CHECK AIRBAG CONTROL MODULE.
1) Connect all connectors.
2) Clear the memory. Clear Memory Mode">
3) Perform the Inspection Mode. Inspection Mode">
4) Read the DTC. (Current malfunction) Read Diagnostic Trouble Code (DTC)">
Is DTC B1835 displayed?
Replace the airbag control module. Airbag Control Module">
Diagnostic Chart with Trouble Code > DTC B1835 SHORT IN CURTAIN AIRBAG LH SQUIB CIRCUIT">Go to Step 5.
5.CHECK FOR ANY OTHER DTC ON DISPLAY.
Is any other DTC displayed?
Check DTC using “List of Diagnostic Trouble Code (DTC)”. List of Diagnostic Trouble Code (DTC)">
Finish the diagnosis.
 Dtc b1833 short in curtain shield airbag rh squib circuit (to +b)
AIRBAG SYSTEM (DIAGNOSTICS) > Diagnostic Chart with Trouble CodeDTC B1833 SHORT IN CURTAIN SHIELD AIRBAG RH SQUIB CIRCUIT (TO +B)Diagnosis start condition:Ignition voltage is 10 V to 16 V.DTC detec ...
 Dtc b1836 open in curtain airbag lh squib circuit
AIRBAG SYSTEM (DIAGNOSTICS) > Diagnostic Chart with Trouble CodeDTC B1836 OPEN IN CURTAIN AIRBAG LH SQUIB CIRCUITDiagnosis start condition:Ignition voltage is 10 V to 16 V.DTC detecting condition:& ...
Other materials:
Inspection
SEATS > Seat Heater SystemINSPECTION1. WIRING DIAGRAMRefer to “Seat Heater System” in the wiring diagram. Seat Heater System > WIRING DIAGRAM">2. DIAGNOSTIC CHARTSymptomsRepair orderSeat heater does not operate.1. Check the fuse. Seat Heater System > INSPECTION"&g ...
Dtc u0416 invalid data received from vehicle dynamics control module
Blind Spot Detection/Rear Cross Traffic Alert (DIAGNOSTICS) > Diagnostic Procedure with Diagnostic Trouble Code (DTC)DTC U0416 INVALID DATA RECEIVED FROM VEHICLE DYNAMICS CONTROL MODULEReceived error data from VDC CM.NOTE:Perform the diagnosis for LAN system. Basic Diagnostic Procedure > PROC ...
By contacts list
On the phone (menu) screen, select the
"Contacts" key to open the phone number
list screen.
You can make a call by selecting an item
in the list (up to five phone numbers are
listed).
If there is no contact data, a message is
displayed to indicate that there is no contact data.
Conta ...
