Subaru Crosstrek Service Manual: Disassembly
REAR SUSPENSION > Rear Shock Absorber
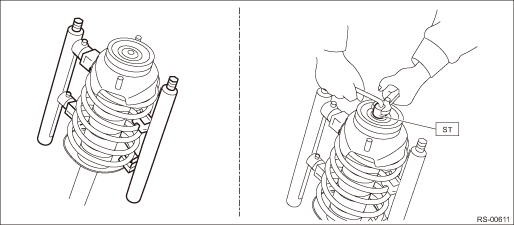
DISASSEMBLY
1. Using a coil spring compressor, compress the coil spring.
2. Using a hexagon wrench to prevent the shock absorber piston rod from turning, remove the self-locking nut with ST.
CAUTION:
When installing the coil spring compressor to the coil spring, follow the operation manual accompanied with the coil spring compressor during operation.
Preparation tool:
ST: STRUT MOUNT SOCKET (20399FG000)
NOTE:
The installing position of coil spring compressor varies depending on the coil spring shape and winding number.
3. Remove the rubber seat - shock UPR and shock mount - rear from the shock absorber COMPL - rear.
4. Gradually decrease the compression pressure of compressor, and remove the coil spring - rear.
5. Remove the helper - rear and the dust cover - rear shock.
 Removal
REAR SUSPENSION > Rear Shock AbsorberREMOVAL1. CROSSTREK MODEL1. Disconnect the ground cable from battery. NOTE">2. Lift up the vehicle, and then remove the rear wheels.3. Remove the senso ...
 Disposal
REAR SUSPENSION > Rear Shock AbsorberDISPOSALCAUTION:• Before discarding the strut COMPL and the shock absorber COMPL, be sure to wear goggles to protect eyes from gas, oil and cutting powder ...
Other materials:
Dtc u0423 invalid data received from instrument panel cluster control module
EyeSight (DIAGNOSTICS) > Diagnostic Procedure with Diagnostic Trouble Code (DTC)DTC U0423 INVALID DATA RECEIVED FROM INSTRUMENT PANEL CLUSTER CONTROL MODULEFailure counter diagnosis of combination meterNOTE:Perform the diagnosis for LAN system. Basic Diagnostic Procedure > PROCEDURE"> ...
Installation
SECURITY AND LOCKS > Keyless Access CMINSTALLATIONCAUTION:• When the control module related to immobilizer has been replaced, be sure to perform the registration of immobilizer system. For detailed operation procedure, refer to “Type D” described in “REGISTRATION MANUAL FO ...
Dtc p2119 throttle actuator "a" control throttle body range/performance
ENGINE (DIAGNOSTICS)(H4DO) > Diagnostic Procedure with Diagnostic Trouble Code (DTC)DTC P2119 THROTTLE ACTUATOR "A" CONTROL THROTTLE BODY RANGE/PERFORMANCENOTE:For the diagnostic procedure, refer to DTC P2101. Diagnostic Procedure with Diagnostic Trouble Code (DTC) > DTC P2101 THROT ...
