
Subaru Crosstrek Service Manual: Disassembly
POWER ASSISTED SYSTEM (POWER STEERING) > Electric Power Steering Gearbox
DISASSEMBLY
CAUTION:
• Nut for fixing the rack is on the driver’s side only. When removing the tie-rod on the passenger’s side, turn over the boot - steering gearbox on the driver’s side, and fix the rack during operation.
• When fixing the steering gearbox assembly in a vise, apply a wooden piece on the flange portion.
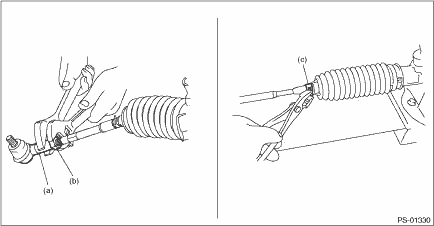
1. Remove the tie-rod end (a) and lock nut (b) from the steering gearbox assembly.
2. Remove the clip - boot tie-rod (c) located outside the boot - steering gearbox using the pliers, and then slide the boot - steering gearbox to the tie-rod end side.
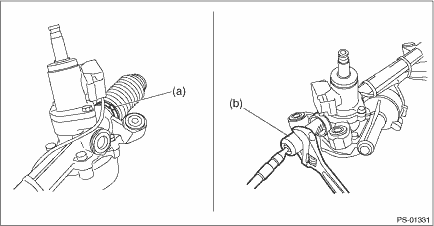
3. Remove the tie-rod (b) from the gearbox assembly.
(1) Using a flat tip screwdriver, remove the band - boot (a) from the boot - steering gearbox.
NOTE:
Replace the boot - steering gearbox or the band - boot (a) if there is damage, cracks or deterioration.
(2) Remove the tie-rod (b).
 Assembly
POWER ASSISTED SYSTEM (POWER STEERING) > Electric Power Steering GearboxASSEMBLY1. Install the tie-rod into rack.Tightening torque:90 N·m (9.18 kgf-m, 66.4 ft-lb)NOTE:Check the mating face o ...
 Inspection
POWER ASSISTED SYSTEM (POWER STEERING) > Electric Power Steering GearboxINSPECTION1. UNIT INSPECTIONCheck components for wear, damage or other faults. Adjust or replace if necessary.2. LIMITMake a ...
Other materials:
Dtc c2123 transmitter 3 no data
TIRE PRESSURE MONITORING SYSTEM (DIAGNOSTICS) > Diagnostic Procedure with Diagnostic Trouble Code (DTC)DTC C2123 TRANSMITTER 3 NO DATANOTE:Refer to DTC C2124 for diagnostic procedure. Diagnostic Procedure with Diagnostic Trouble Code (DTC) > DTC C2124 TRANSMITTER 4 NO DATA"> ...
Removal
EXTERIOR/INTERIOR TRIM > Upper Inner TrimREMOVALCAUTION:• Before handling the airbag system components, refer to “CAUTION” of “General Description” in “AIRBAG SYSTEM”. General Description > CAUTION">• Airbag system satellite safing senso ...
Low tire pressure warning light (U.S.-spec. models)
When
the ignition switch is turned to the
"ON" position, the low tire pressure warning
light will illuminate for approximately 2
seconds to check that the tire pressure
monitoring system (TPMS) is functioning
properly. If there is no problem and all tires
are properly inflated, the light w ...
