Subaru Crosstrek Owners Manual: Air filtration system
Your vehicle's air conditioning system is equipped with an air filtration system.
Replace the air filter element according to the replacement schedule found in the "Warranty and Maintenance Booklet". This schedule should be followed to maintain the filter's dust collection ability. Under extremely dusty conditions, the filter should be replaced more frequently. Have your filter checked or replaced by your SUBARU dealer. For replacement, use only a genuine SUBARU air filter kit.
CAUTION
Contact your SUBARU dealer if the following occurs, even if it is not yet time to change the filter:
- Reduction of the airflow through the vents.
- Windshield gets easily fogged or misted.
NOTE
The filter can influence the air conditioning, heating and defroster performance if not properly maintained.
Replacing an air filter
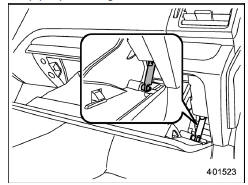
- Remove the glove box.
NOTE
We recommend that you take measures to protect the center console with masking tape first, so that you avoid scratching the center console with the glove box.
- Open the glove box.
- Remove the damper shaft from the glove box.
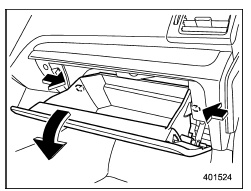
- Push in the stoppers located on both sides of the glove box and then pull down the glove box as far as it will go.

- Pull out the glove box horizontally and remove the hinge portion. When doing this, be careful not to damage the hinge.
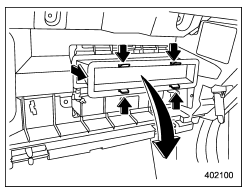
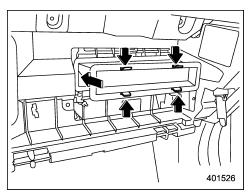
2. Remove the air filter according to the following procedure in order to prevent dust on the air cleaner from falling to the inside of its housing.
(1) Push in the four stoppers to unlock, and then slowly pull out the air filter 4 in (10 cm) from the housing.
(2) Completely pull out the air filter by gently tilting the front side of the air filter downward.
3. Replace the air filter element with a new one.
CAUTION
The arrow mark on the filter must point UP.
4. Reinstall the glove box, and connect the damper shaft.
5. Close the glove box.
 Cooling and dehumidifying in high humidity and low temperature weather
conditions
Cooling and dehumidifying in high humidity and low temperature weather
conditions
Under certain weather conditions (high
relative humidity, low temperatures, etc.) a
small amount of water vapor emission
from the air outlets may be noticed. This
condition is normal and does not ...
 Audio
Audio
...
Other materials:
Dtc p1532 battery charging system
ENGINE (DIAGNOSTICS)(H4DO) > Diagnostic Procedure with Diagnostic Trouble Code (DTC)DTC P1532 BATTERY CHARGING SYSTEMDTC detecting condition:Immediately at fault recognitionCAUTION:After servicing or replacing faulty parts, perform Clear Memory Mode Clear Memory Mode > OPERATION">, an ...
Removal
HVAC SYSTEM (HEATER, VENTILATOR AND A/C) > Air Mix Door ActuatorREMOVAL1. LHCAUTION:Before handling the airbag system components, refer to “CAUTION” of “General Description” in “AIRBAG SYSTEM”. General Description > CAUTION">1. Disconnect the ground ...
Caution
IGNITION(H4DO) > General DescriptionCAUTION• Prior to starting work, pay special attention to the following:1. Always wear work clothes, a work cap, and protective shoes. Additionally, wear a helmet, protective goggles, etc. if necessary.2. Protect the vehicle using a seat cover, fender cov ...
