
Subaru Crosstrek Service Manual: Disassembly
MANUAL TRANSMISSION AND DIFFERENTIAL(5MT) > Main Shaft Assembly
DISASSEMBLY
1. Put vinyl tape around main shaft spline to protect the oil seal from damage. Then pull out the oil seal and needle bearing by hand.
2. Remove the lock nut and lock washer.
NOTE:
Flatten the lock nut tab before removing the lock nut.
| ST1 498937000 | TRANSMISSION HOLDER |
| ST2 499987003 | SOCKET WRENCH (35) |
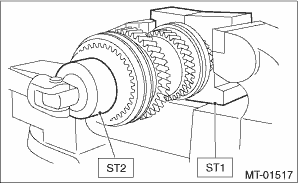
3. Remove the 5th hub & sleeve No. 2, baulk lever, 5th baulk ring, and 5th drive gear & needle bearing.
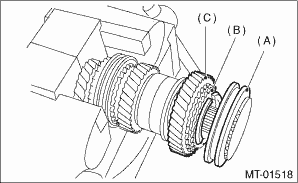
(A) | 5th hub & sleeve No. 2 |
(B) | 5th baulk ring |
(C) | 5th drive gear |
4. Using ST1 and ST2, remove the rest of the parts.
NOTE:
• When replacing the sleeve & hub, replace them as a set.
• Do not disassemble the sleeve & hub; the engaging point is pre-determined.
• If it is necessary to disassemble, mark the engaging points on the splines beforehand.
| ST1 899864100 | REMOVER |
| ST2 899714110 | REMOVER |
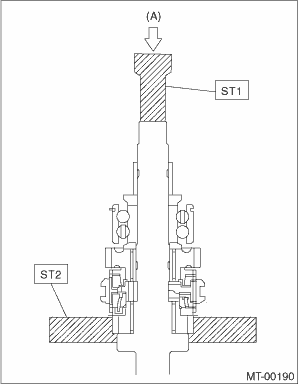
(A) | Press |
 Assembly
MANUAL TRANSMISSION AND DIFFERENTIAL(5MT) > Main Shaft AssemblyASSEMBLY1. When the sleeve & hub assemblies have been disassembled, reassemble by aligning the alignment marks.NOTE:Position the o ...
 Inspection
MANUAL TRANSMISSION AND DIFFERENTIAL(5MT) > Main Shaft AssemblyINSPECTIONDisassembled parts should be washed with cleaning solvent first, then inspected carefully.1. BearingReplace the bearings in ...
Other materials:
Inspection
SECURITY AND LOCKS > Access KeyINSPECTION1. ACCESS KEY BATTERYCheck the access key battery voltage.Preparation tool:Circuit testerNOTE:Complete the measurement within 5 seconds because the battery discharges during measurement.Battery terminalInspection conditionsStandard(+) — (−)Connect ...
Removal
GLASS/WINDOWS/MIRRORS > Remote Control Mirror SwitchREMOVAL1. Disconnect the ground cable from battery and wait for at least 60 seconds before starting work. NOTE">2. Remove the trim panel - front door. Door Trim > REMOVAL">3. Remove the panel - power window main switch. Pow ...
Assembly
MANUAL TRANSMISSION AND DIFFERENTIAL(5MT) > Drive Pinion Shaft AssemblyASSEMBLY1. Install the sleeve and the gear and hub assembly by matching the alignment marks.NOTE:• Make sure that there is no large clearance at both sides of the 1st-2nd shifting insert after assembly.(A)1st-2nd shiftin ...
