Subaru Crosstrek Owners Manual: Birthday setting
1. Perform the preparation steps according to "Preparation for date setting" 3- 56.
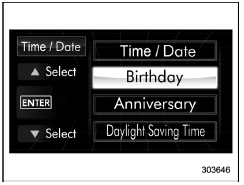
2. Operate the "
 " or "
 " switch to
select the "Birthday" item. Then push the
" switch to
select the "Birthday" item. Then push the
 button.
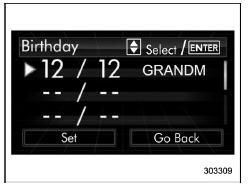
3. Select an entry in the list to set by
operating the " " or "
 " switch. Then
push the
" switch. Then
push the
 button.

4. The selected item will be shown. Push
the
 button to set the selected item.
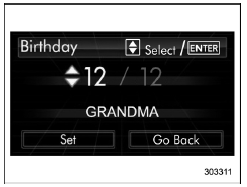
5. Select numbers by operating the " "
or "
"
or " " switch. Then push the
 button.
6. After entering the date by repeating step 5, you can enter the name.

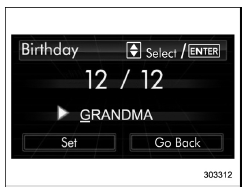
7. Select characters by operating the
"
 " or "
 "
switch. Then push the
button.
"
switch. Then push the
button.
- You can select characters of the English alphabet (upper case characters and lower case characters are available), eleven symbols or blank spaces.
- The word being edited will be displayed with an underline.
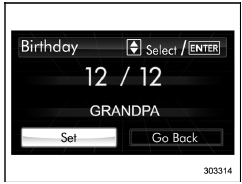
8. After entering the name by repeating
step 7, select "Set" by operating the " "
switch and confirm the setting by pushing
the
"
switch and confirm the setting by pushing
the button.
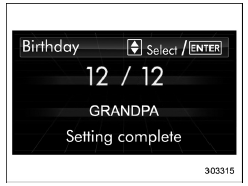
9. The system will notify you that the setting is complete.
If a birthday is approaching, the following screen will be displayed accompanied by a beep when the ignition switch has been turned to the "ON" position. This function can be set to on or off. For details, refer to "Bypass screen setting"
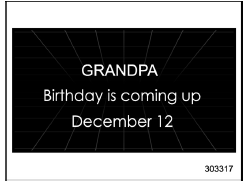
From 1 to 7 days prior to the birthday
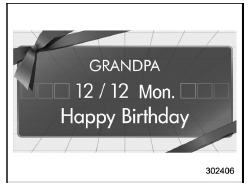
On a birthday (displayed in red)
NOTE
If "_ _" is selected for either the "Month" or "Day" item instead of numbers, the birthday notification will be deactivated.
 Current date and time setting
1. Perform the preparation steps according
to "Preparation for date setting" 3-
56.
2. Operate the "
" or "
" switch to
select the "Time/Date" item. Then push
the
button.
...
 Anniversary setting
1. Perform the preparation steps according
to "Preparation for date setting" 3-
56.
2. Operate the "
" or "
" switch to
select the "Anniversary" item. Then push
the
button.
3. ...
Other materials:
Basic diagnostic procedure Procedure
TELEMATICS SYSTEM (DIAGNOSTICS) > Basic Diagnostic ProcedurePROCEDURESTEPCHECKYESNO1.PERFORM CUSTOMER INTERVIEW.Using the Check List for Interview, ask the customer the condition of how the trouble occurred. Check List for Interview > CHECK">Did you interview the customer? Basic Diagn ...
Key lock-in prevention function
The Subaru Ascent is equipped with a key lock-in prevention system designed to
prevent accidental locking of the keys inside the vehicle.
Under the following conditions, the Subaru Ascent doors will not lock when the
door lock switch is pressed while a front door remains open:
The key is st ...
Climate control panel, audio panel, instrument panel, console panel, and
switches
Use a soft, damp cloth to clean the climate
control panel, audio equipment, instrument
panel, center console, combination
meter panel, and switches.
CAUTION
Do not use organic solvents such
as paint thinners or fuel, or
strong cleaning agents that contain
those solvents. Doing so
cou ...
