Subaru Crosstrek Owners Manual: Current date and time setting
1. Perform the preparation steps according to "Preparation for date setting" 3- 56.
2. Operate the " " or "
 " switch to
select the "Time/Date" item. Then push
the
" switch to
select the "Time/Date" item. Then push
the
 button.
3. Select the item to set by operating the
"
 " or "
 " switch. Then push the
button.
" switch. Then push the
button.
4. Select a number by operating the "
"
or "
" switch. Then push the button.
When "12 h" is selected, the clock will be set to a 12-hour display. When "24 h" is selected, the clock will be set to a 24-hour display.
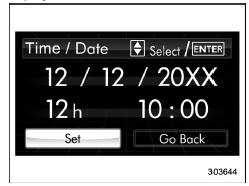
5. After entering the date and time, select
"Set" by operating the "
 " switch and
confirm the setting by pushing the
" switch and
confirm the setting by pushing the
 button.
6. The system will notify you that the setting is complete.
 Preparation for date setting
Turn the ignition switch to the "ON"
position.
Push and hold the button to show
the selection screen.
After the selection screen is displayed,
operate the "
"
or "
...
 Birthday setting
1. Perform the preparation steps according
to "Preparation for date setting" 3-
56.
2. Operate the "
" or "
" switch to
select the "Birthday" item. Then push the
button.
3. S ...
Other materials:
Replacement
SECURITY AND LOCKS > Access KeyREPLACEMENT1. ACCESS KEY REGISTRATIONNOTE:• A maximum of seven access keys can be registered for each individual vehicle.• When replacing or adding an access key, new registration of the access key is necessary.• When the access key has been newly ...
Wiring diagram
LIGHTING SYSTEM > Front Fog Light SystemWIRING DIAGRAMRefer to “Front Fog Light System” in the wiring diagram.• Model without SRF: Front Fog Light System > WIRING DIAGRAM">• Model with SRF: Front Fog Light System > WIRING DIAGRAM"> ...
Inspection
TELEMATICS SYSTEM (DIAGNOSTICS) > Subaru Select MonitorINSPECTION1. COMMUNICATION FOR INITIALIZING IMPOSSIBLEWhen communication with DCM is impossibleDetecting condition:• Defective harness connector• Power supply circuit malfunction• Defective DCM• Defective CAN communica ...
