
Subaru Ascent 2018-2026 Owner's Manual: Trailer hitch (dealer option)
WARNING
- Never exceed the maximum towing capacity specified for the Subaru Ascent
trailer hitch. Overloading the hitch system can lead to loss of vehicle control,
mechanical failure, and serious accidents with potential injuries.
The permissible trailer weight for the Subaru Ascent may vary depending on driving conditions, terrain, and equipment configuration.
For detailed towing limits and recommendations, always refer to the "Trailer towing" section.
- When towing loads exceeding 1,000 lbs (453 kg), trailer brakes are mandatory. Ensure the trailer is equipped with properly rated safety chains capable of supporting its maximum gross weight. Failure to use safety chains can result in a hazardous situation if the trailer disconnects from the Subaru Ascent.
- Before towing, always confirm that the hitch pin and safety pin are securely
locked in place.
If the ball mount detaches from the hitch receiver, the trailer may separate from the Subaru Ascent, creating a serious road hazard.
- Although towing regulations differ by region, all safety standards require
that the following limits must never be exceeded by the Subaru Ascent:
- Maximum gross trailer weight
- Maximum tongue weight
- GVWR (Gross Vehicle Weight Rating)
- GAWR (Gross Axle Weight Rating)
- Failure to follow proper towing procedures may compromise safety, void insurance coverage, and violate applicable road and traffic regulations.
- Only use the ball mount supplied with the Subaru Ascent hitch system. This hitch is designed as a weight-carrying type and must not be used with weight-distributing systems.
- If the trailer hitch is removed, the standard bumper beam must be reinstalled. Contact a SUBARU dealer if the original component is unavailable.
- Operating the Subaru Ascent without either the trailer hitch or the standard bumper beam installed may reduce safety performance and increase the risk of injury in the event of a collision.
- When a trailer hitch is installed on the Subaru Ascent, the rear towing hook cannot be used.
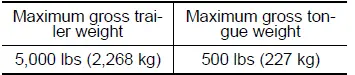
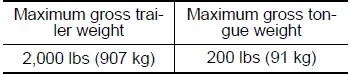
The maximum allowable trailer weight and tongue weight for the Subaru Ascent are shown in the following specifications.
Models equipped with an air-cooled continuously variable transmission (CVT) fluid cooler*1:
Models without an air-cooled continuously variable transmission (CVT) fluid cooler*2:
*1: Continuously variable transmission type TR690SXXXX (refer to "Vehicle identification"
to locate the model label).
*2: Continuously variable transmission type TR690GXXXX (refer to "Vehicle identification"
to locate the model label).
Connecting a trailer
When attaching a trailer to the Subaru Ascent, carefully align the hitch ball with the trailer coupler and ensure a secure and tight connection. Always double-check that all locking mechanisms are properly engaged before driving.
In addition, connect all electrical wiring for lighting and braking systems according to the trailer manufacturer’s instructions. Proper lighting and signaling are critical for safe towing with the Subaru Ascent.
Before setting off, perform a full inspection of the hitch assembly, safety chains, electrical connections, and trailer load distribution. Evenly balanced cargo within the trailer helps maintain stability and reduces stress on the Subaru Ascent drivetrain.
Additional note: The Subaru Ascent is engineered to handle towing tasks efficiently when used within specified limits. Safe towing requires careful preparation, proper equipment, and responsible driving habits to ensure stability, control, and long-term durability of both the vehicle and trailer system.
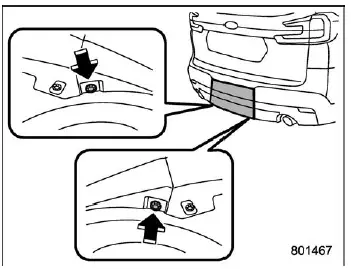
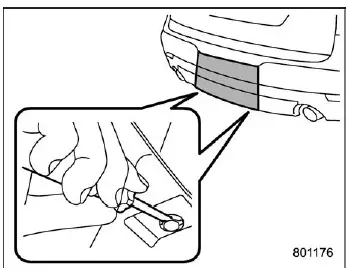
1. Carefully remove the two retaining clips located at the lower section of the cover on your Subaru Ascent.
NOTE
When inspecting from underneath the Subaru Ascent, you will find two clips positioned on each side beneath the cover. These clips secure the panel firmly in place.
Detach each clip individually, taking care not to damage the mounting points or surrounding components.
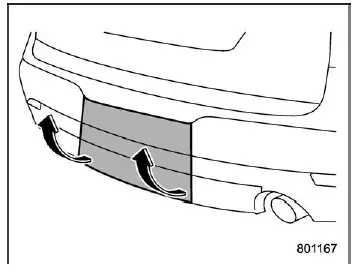
2. Remove the cover completely.
NOTE
Grip the lower portion of the cover near the triangle indicator "
 "
and gently pull outward to release it from its mounting position.
"
and gently pull outward to release it from its mounting position.
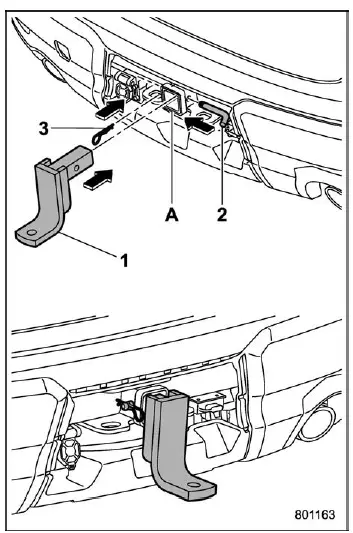
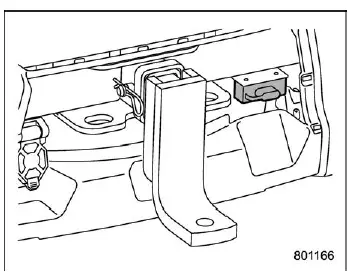
- Ball mount
- Hitch pin
- Safety clip
- Hitch receiver tube
3. Insert the ball mount securely into the hitch receiver tube of your Subaru Ascent.
4. Align the mounting holes and insert the hitch pin through the receiver tube so that it passes completely through the ball mount.
5. Lock the hitch pin in place by inserting the safety clip into the designated groove, ensuring it is firmly secured.
6. Verify the installation by pulling on the ball mount assembly to confirm that it is properly locked and cannot be removed from the hitch receiver.
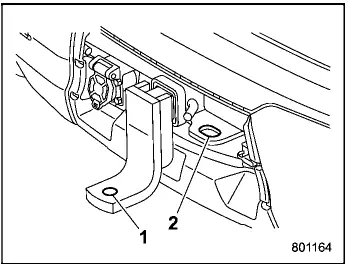
- Hitch ball installation point
- Hooks for safety chains
7. Install a suitable hitch ball onto the ball mount. Always use a hitch ball that matches both the ball mount specifications and your trailer requirements. Ensure that the hitch ball is tightly fastened to prevent loosening during towing with the Subaru Ascent.
8. Carefully couple your trailer to the hitch ball, ensuring a secure and stable connection.
9. Attach the trailer to the Subaru Ascent using safety chains rated for the trailer’s maximum gross weight. Cross the chains beneath the trailer tongue so that, in the event of disconnection, the tongue will be supported and prevented from striking the ground. Leave enough slack for turning, but ensure the chains do not drag on the road surface.
WARNING
Safety chains must only be attached to the designated safety chain hooks on the Subaru Ascent. Do not connect them to any other part of the vehicle.
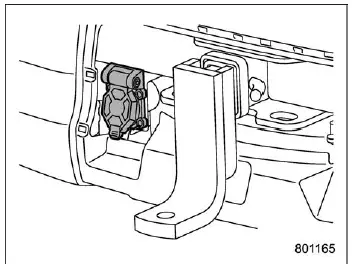
Hitch harness connector (7-pin type)
Hitch harness connector (4-pin type)
10. Connect the Subaru Ascent hitch wiring harness (either 4-pin or 7-pin) to the trailer’s electrical connector.
11. Test all trailer lighting functions, including brake lights, turn signals, and tail lights, to ensure proper operation before driving.
NOTE
Always disconnect the trailer wiring harness before launching or retrieving a watercraft to prevent electrical damage.
If not towing a trailer
- Remove the ball mount from the hitch receiver of the Subaru Ascent and reinstall the receiver cover or bumper cover to protect the mounting area.
- Install the protective dust cap over the 4-pin or 7-pin connector to prevent dirt, moisture, and corrosion.
- Periodically apply terminal grease to the connector contacts to maintain reliable electrical performance.
Additional note: Proper installation and регулярна перевірка всіх елементів зчіпного пристрою Subaru Ascent забезпечують безпечне буксирування та довговічність системи. Always double-check connections and load stability before every trip to ensure maximum safety on the road.
 Roof tent
WARNING
Installing a roof tent on the Subaru Ascent increases the overall weight positioned
above the vehicle’s center of gravity, which can negatively influence handling,
braking efficienc ...
 Trailer towing
The Subaru Ascent is primarily engineered as a passenger-focused vehicle, designed
to deliver comfort, safety, and everyday usability. However, when towing a trailer,
additional mechanical stress ...
Other materials:
Removal
INTAKE (INDUCTION)(H4DO) > Air Intake BootREMOVAL1. Remove the clip (A) from the air intake boot.2. Loosen the clamp (B) securing the air cleaner case (rear) to the air intake boot.3. Loosen the clamp (C) which secures the throttle body to the air intake boot.4. Disconnect the PCV hose and remove ...
Inspection
CLUTCH SYSTEM > Clutch SwitchINSPECTION1. CLUTCH START SWITCH1. Perform the following inspections. If the clutch start switch does not operate normally, adjust the switch, and check it again. Clutch Switch > ADJUSTMENT">• Make sure that engine does not start with clutch pedal no ...
Vehicle activation status screen
When the vehicle stops
1) Steering axle
When the vehicle is being driven regularly
1) Power train (illuminated in blue)
When the Vehicle Dynamics Control system is being activated: the tires
illuminate in yellow.
1) History of Vehicle Dynamics Control
system activation
When ...
