
Subaru Crosstrek Service Manual: Symbols in wiring diagrams
WIRING SYSTEM > Basic Diagnostic Procedure
SYMBOLS IN WIRING DIAGRAMS
A number of symbols are used in each wiring diagram to easily identify parts or circuits.
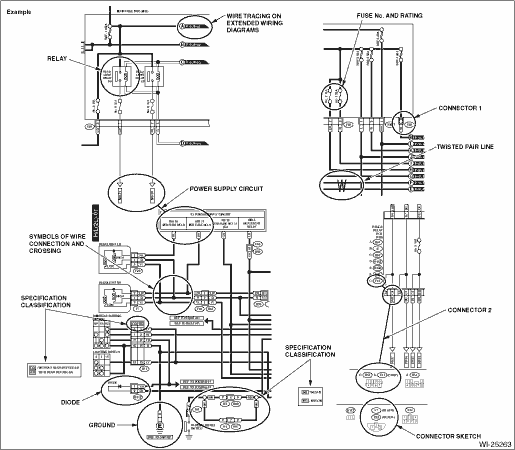
1. RELAY
A symbol used to indicate a relay.
2. CONNECTOR 1
The sketch of the connector indicates the one-pole types.
3. WIRING CONNECTION
Some wiring diagrams are indicated in foldouts for convenience. Wiring destinations are indicated where necessary by corresponding symbols. (When two pages are needed for clear indication)
4. FUSE NO. & RATING
The “FUSE No. & RATING” corresponds with that used in the fuse box (main fuse box, fuse and joint box).
5. CONNECTOR 2
• Each connector is indicated by a symbol.
• Each terminal number is indicated in the corresponding wiring diagram in an abbreviated form.
• For example, terminal number “G4” refers to No. 4 terminal of connector (G: F41) shown in the connector sketch.
6. CONNECTOR SKETCH
• Each connector sketch clearly identifies the shape and color of a connector as well as terminal locations. Non-colored connectors are indicated in natural color.
• When more than two types of connector number are indicated in a connector sketch, it means that the same type connectors are used.
7. GROUND
Each grounding point can be located easily by referring to the corresponding wiring harness.
8. DIODE
A symbol is used to indicate a diode.
9. WIRE TRACING ON EXTENDED WIRING DIAGRAMS
For a wiring diagram extending over at least two pages, a symbol (consisting of the same characters with arrows), facilitates wire tracing from one page to the next.
A ←> A, B ←> B
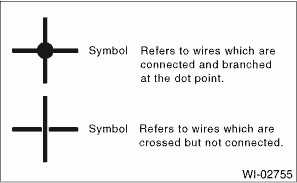
10. SYMBOLS OF WIRE CONNECTION AND CROSSING
11. POWER SUPPLY CIRCUIT
A symbol is used to indicate the power supply in each wiring diagram.
“MB − 5”, “MB − 6”, etc., which are used as power- supply symbols throughout the text, correspond with those shown in the “DC POWER SUPPLY CIRCUIT” in the wiring diagram.
Accordingly, using the “DC POWER SUPPLY CIRCUIT” and wiring diagrams permits service personnel to understand the entire electrical arrangement of a system.
12. CLASSIFICATION BY SPECIFICATION
When the wiring diagram differ according to vehicle specifications, the specification difference is described by using abbreviations.
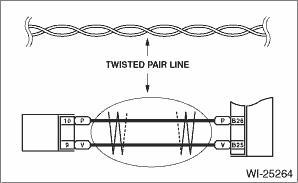
13. TWISTED PAIR LINE
The twisted pair line is indicated by a symbol in the wiring diagrams.
 How to read wiring diagrams
WIRING SYSTEM > Basic Diagnostic ProcedureHOW TO READ WIRING DIAGRAMS1. WIRING DIAGRAMThe wiring diagram of each system is illustrated so that you can understand the path through which the electric ...
 Abbreviation in wiring diagrams
WIRING SYSTEM > Basic Diagnostic ProcedureABBREVIATION IN WIRING DIAGRAMSAbbr.Full nameABSAnti-lock Brake SystemACCAccessoryA/CAir ConditionerASSYAssemblyATAutomatic TransmissionA/FAir/Fuel (air fu ...
Other materials:
Dtc b28a1 eyesight communication(ecm)
EyeSight (DIAGNOSTICS) > Diagnostic Procedure with Diagnostic Trouble Code (DTC)DTC B28A1 EyeSight COMMUNICATION(ECM)Detected when the engine control module (ECM) detects the malfunction of stereo camera, or when the stereo camera or ECM is assembled incorrectly.DTC DETECTING CONDITION:• De ...
Dtc u0428 invalid data received from steering angle sensor module
LAN SYSTEM (DIAGNOSTICS) > Diagnostic Procedure with Diagnostic Trouble Code (DTC)DTC U0428 INVALID DATA RECEIVED FROM STEERING ANGLE SENSOR MODULEDTC DETECTING CONDITION:Defective data was transmitted from steering angle sensor.TROUBLE SYMPTOM:VDC CM does not operate normally.STEPCHECKYESNO1.CHE ...
Dtc p0113 intake air temperature sensor 1 circuit high bank 1
ENGINE (DIAGNOSTICS)(H4DO) > Diagnostic Procedure with Diagnostic Trouble Code (DTC)DTC P0113 INTAKE AIR TEMPERATURE SENSOR 1 CIRCUIT HIGH BANK 1DTC detecting condition:Immediately at fault recognitionTrouble symptom:• Improper idling• Poor driving performanceCAUTION:After servicing o ...
