
Subaru Crosstrek Service Manual: Removal
AIRBAG SYSTEM > Airbag Control Module
REMOVAL
CAUTION:
• Before handling the airbag system components, refer to “CAUTION” of “General Description” in “AIRBAG SYSTEM”. General Description > CAUTION">
• Do not disassemble the airbag control module.
• If the airbag control module is deformed or if there is any trace of water on the module, replace the airbag control module with a new one.
• Do not drop the airbag control module.
• After removal, keep the airbag control module on a dry, clean surface away from moisture, heat and dust.
1. Turn the ignition switch to OFF.
2. Disconnect the ground cable from battery and wait for at least 60 seconds before starting work. NOTE">
NOTE:
On CVT models, shift the select lever into “N” before disconnecting the battery ground cable.
3. Remove the console box assembly and the cover - shift lever. Console Box > REMOVAL">
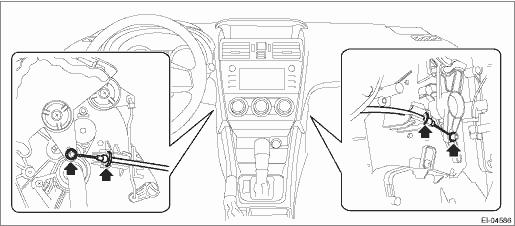
4. On manual A/C models, disconnect the control cables from both sides of the heater & cooling unit.
5. Remove the center grille assembly. Air Vent Grille > REMOVAL">
6. Remove the audio assembly or navigation assembly. Audio > REMOVAL">
7. Remove the airbag control module.
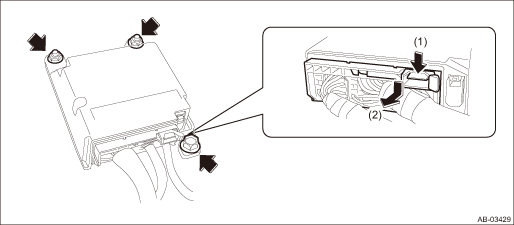
(1) Disconnect the connector from airbag control module. Airbag Connector > PROCEDURE">
(2) Remove the bolt and nuts and remove the airbag control module.
 Installation
AIRBAG SYSTEM > Airbag Control ModuleINSTALLATIONCAUTION:Do not reuse the bolt and nut.Always use new bolts and nuts for them.1. Before installation, inspect the following items and replace any fau ...

Other materials:
Dtc p0302 cylinder 2 misfire detected
ENGINE (DIAGNOSTICS)(H4DO) > Diagnostic Procedure with Diagnostic Trouble Code (DTC)DTC P0302 CYLINDER 2 MISFIRE DETECTEDNOTE:For the diagnostic procedure, refer to DTC P0304. Diagnostic Procedure with Diagnostic Trouble Code (DTC) > DTC P0304 CYLINDER 4 MISFIRE DETECTED">1. OUTLINE O ...
Adjustment
COOLING(H4DO) > Engine CoolantADJUSTMENT1. PROCEDURE TO ADJUST THE SUBARU SUPER COOLANT CONCENTRATIONCAUTION:Use the SUBARU Super Coolant with a 50 — 60% concentration in order to obtain maximum anti-freeze and anti-rust performance.To adjust the concentration of SUBARU Super Coolant according ...
Wiring diagram
LIGHTING SYSTEM > Stop Light SystemWIRING DIAGRAMRefer to “Stop Light System” in the wiring diagram.• Model without EyeSight: Stop Light System > WIRING DIAGRAM">• Model with EyeSight: Stop Light System > WIRING DIAGRAM"> ...
