Subaru Crosstrek Service Manual: Removal
FUEL INJECTION (FUEL SYSTEMS)(H4DO) > Fuel Sub Level Sensor
REMOVAL
WARNING:
Place “NO OPEN FLAMES” signs near the working area.
CAUTION:
• Be careful not to spill fuel.
• Catch the fuel from the tubes using a container or cloth.
• If the fuel gauge indicates that two thirds or more of the fuel is remaining, be sure to drain fuel before starting work to avoid the fuel to spill.
1. Release the fuel pressure. Fuel > PROCEDURE">
2. Drain fuel. Fuel > PROCEDURE">
3. Disconnect the ground cable from battery.
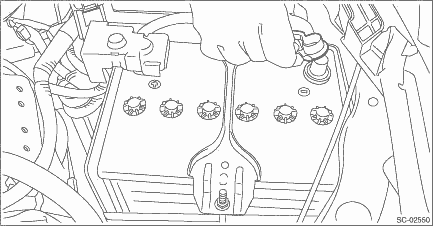
4. Remove the rear seat cushion. Rear Seat > REMOVAL">
5. Remove the service hole cover of fuel sub level sensor.

6. Disconnect connectors from the fuel sub level sensor, and move aside the service hole cover.

7. Disconnect the quick connector of the jet pump tube.
NOTE:
Disconnect the quick connector as shown in the figure.
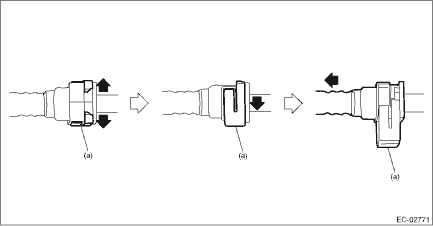
(a) | Slider |
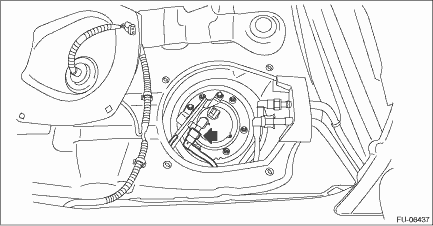
8. Remove the fuel sub level sensor protector, and remove the rubber cap (A) from nut.
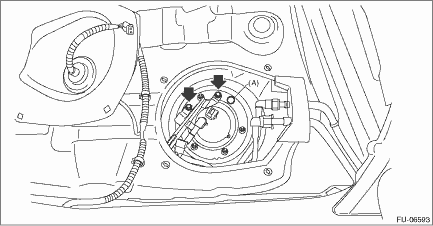
9. Remove the bolts and nuts which hold fuel sub level sensor protector and fuel sub level sensor upper plate to the fuel tank.

10. Remove the fuel sub level sensor from the fuel tank.
CAUTION:
Be careful not to let the arm and float of the fuel sub level sensor contact the fuel tank.
 Inspection
FUEL INJECTION (FUEL SYSTEMS)(H4DO) > Fuel Sub Level SensorINSPECTION1. Check that the fuel sub level sensor has no damage.2. Measure the fuel sub level sensor float position.(1)FULL(2)EMPTY(3)Datu ...
 Installation
FUEL INJECTION (FUEL SYSTEMS)(H4DO) > Fuel Sub Level SensorINSTALLATION1. Install the fuel sub level sensor to the fuel tank.(1) Make sure the sealing portion is free from fuel or foreign matter be ...
Other materials:
Installation
WIPER AND WASHER SYSTEMS > Rear WasherINSTALLATION1. Install each part in the reverse order of removal.Tightening torque:Light assembly - high-mounted: 4.5 N·m (0.46 kgf-m, 3.3 ft-lb)Roof spoiler assembly: 7.5 N·m (0.76 kgf-m, 5.5 ft-lb)2. Check the nozzle - rear washer position. R ...
Caution
REAR SUSPENSION > General DescriptionCAUTIONPlease clearly understand and adhere to the following general precautions. They must be strictly followed to avoid minor or serious injury to the person doing the work or people in the area.1. EACH PROCEDURE• Wear appropriate work clothing, includ ...
Braking tips
WARNING
Never rest your foot on the brake
pedal while driving. This can cause
dangerous overheating of the
brakes and needless wear on the
brake pads and linings.
When the brakes get wet
When driving in rain or after washing the
vehicle, the brakes may get wet. As a
result, brake stopping d ...
