Subaru Crosstrek Service Manual: Removal
FUEL INJECTION (FUEL SYSTEMS)(H4DO) > Fuel Delivery and Evaporation Lines
REMOVAL
WARNING:
Place “NO OPEN FLAMES” signs near the working area.
CAUTION:
Be careful not to spill fuel.
1. Release the fuel pressure. Fuel > PROCEDURE">
2. Open the fuel filler lid and remove the fuel filler cap.
NOTE:
This operation is required to release the inner pressure of the fuel tank.
3. Remove the floor mat. Floor Mat > REMOVAL">
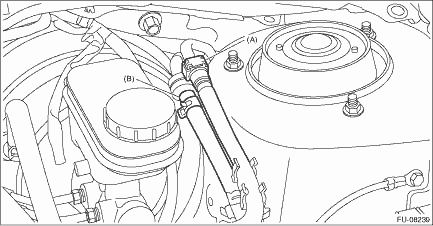
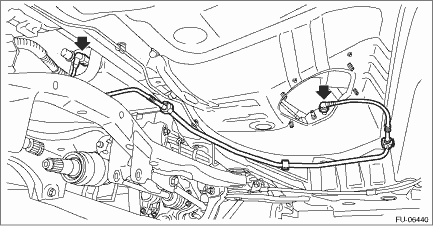
4. In the engine compartment, disconnect the fuel delivery tube (A) and evaporation hose (B).
CAUTION:
• Be careful not to spill fuel.
• Catch the fuel from the tubes using a container or cloth.
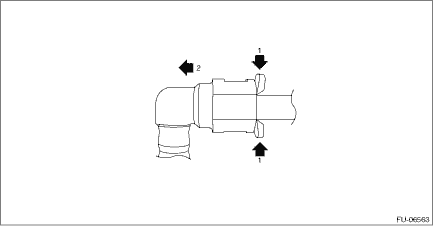
NOTE:
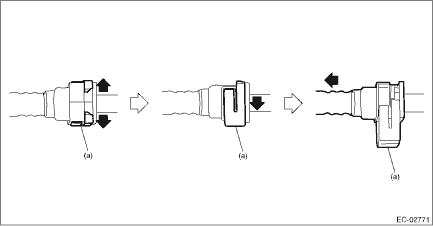
Disconnect the quick connector as shown in the figure.
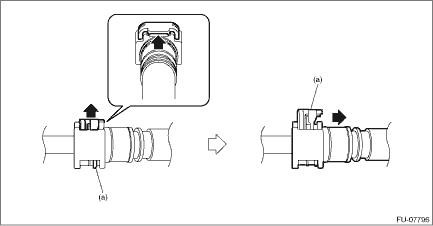
(a) | Slider |
5. Remove the fuel tank. Fuel Tank > REMOVAL">
6. Disconnect the quick connector, and remove the fuel delivery tube and jet pump tube from the fuel tank.
CAUTION:
• Be careful not to spill fuel.
• Catch the fuel from the tubes using a container or cloth.
NOTE:
Disconnect the quick connector as shown in the figure.
(a) | Slider |
7. Disconnect the quick connector and remove the purge pipe.
NOTE:
Disconnect the quick connector as shown in the figure.
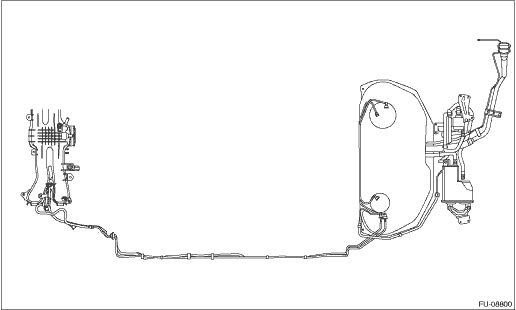
8. Remove the fuel pipe assembly from vehicle.
 Inspection
FUEL INJECTION (FUEL SYSTEMS)(H4DO) > Fuel Delivery and Evaporation LinesINSPECTION1. Check that the fuel pipe has no deformation, cracks or other damages.2. Check that the hose and tube have no cr ...
 Installation
FUEL INJECTION (FUEL SYSTEMS)(H4DO) > Fuel Delivery and Evaporation LinesINSTALLATIONInstall in the reverse order of removal while being careful of the following.NOTE:When connecting the fuel deliv ...
Other materials:
During driving
General precautions:
Drive carefully. Do not take unnecessary
risks by driving in dangerous areas or
over rough terrain.
Slow down and employ extra caution at
all times. When driving off-road, you will
not have the benefit of marked traffic
lanes, banked curves, traffic signs and
t ...
Component
SECURITY AND LOCKS > General DescriptionCOMPONENT1. DOOR LOCK ASSEMBLY(A)Front(B)Rear (1)Grommet - screw(9)Key lock - door (driver’s seat only)(17)Frame ASSY - rear door outer(2)Remote ASSY - door(10)Spacer - door handle outer B (3)Cap remote(11)Spacer - door handle outer ATightening ...
Installation
FUEL INJECTION (FUEL SYSTEMS)(H4DO) > Fuel Filler PipeINSTALLATION1. Open the fuel filler lid.2. Insert the fuel filler pipe assembly into the rubber saucer from inside of the rear fender.3. Install the fuel filler pipe assembly to the vehicle.Tightening torque:7.5 N·m (0.8 kgf-m, 5.5 ft-l ...
