Subaru Crosstrek Service Manual: Installation
FUEL INJECTION (FUEL SYSTEMS)(H4DO) > Fuel Delivery and Evaporation Lines
INSTALLATION
Install in the reverse order of removal while being careful of the following.
NOTE:
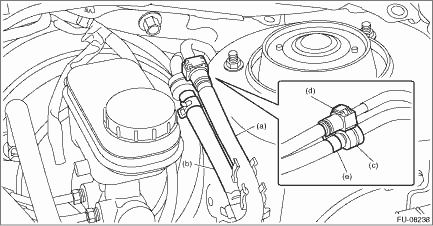
When connecting the fuel delivery tube (a) and evaporation hose (b), let the bushing (c) contact the quick connector (d) of fuel delivery tube to prevent the clip (e) from contacting the quick connector (d).
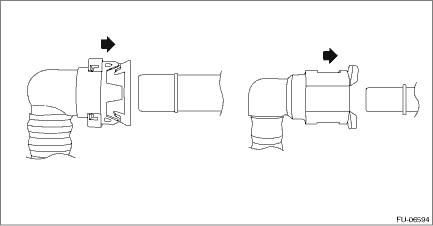
1. CONNECTING THE EVAPORATION LINE QUICK CONNECTOR
Connect the quick connector as shown in the figure.
CAUTION:
• Check that there is no damage or dust on the quick connector. If necessary, clean the seal surface of the pipe.
• Make sure that the quick connector is securely connected.
2. CONNECTING THE FUEL LINE QUICK CONNECTOR
Connect the quick connector as shown in the figure.
CAUTION:
• Check that there is no damage or dust on the quick connector. If necessary, clean the seal surface of the pipe.
• When connecting the quick connector, make sure to insert it all the way in before locking the slider.
• When it is difficult to lock the slider, check that the connector is fully inserted.
• After locking the slider, check again that the quick connector is securely connected.
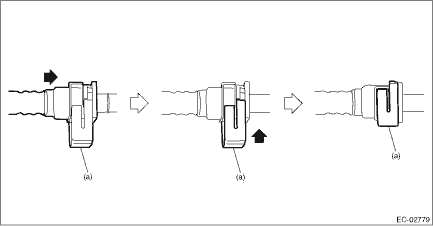
(a) | Slider |
3. EVAPORATION HOSE CONNECTION
Connect the evaporation hose by inserting it to the pipe until the hose reaches the spool or bump.
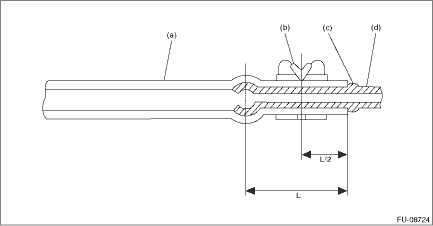
(a) | Hose | (c) | Spool or bump | (d) | Pipe |
(b) | Clip |
 Removal
FUEL INJECTION (FUEL SYSTEMS)(H4DO) > Fuel Delivery and Evaporation LinesREMOVALWARNING:Place “NO OPEN FLAMES” signs near the working area.CAUTION:Be careful not to spill fuel.1. Releas ...
 Fuel filler pipe
...
Other materials:
Removal
IGNITION(H4DO) > Spark PlugREMOVALSpark plug:Refer to “SPECIFICATION” for spark plug. General Description > SPECIFICATION">1. RH SIDE1. Disconnect the ground cable from battery. NOTE">2. Remove the air cleaner case. Air Cleaner Case > REMOVAL">3. Disco ...
Inspection
LAN SYSTEM (DIAGNOSTICS) > CAN Communication Circuit CheckINSPECTION1. GROUND SHORT INSPECTIONWiring diagram:CAN communication system CAN Communication System > WIRING DIAGRAM">• Without BSD/RCTA• With BSD/RCTANOTE:Main wiring harness or related lines may be shorted to gro ...
Inspection
SUNROOF/T-TOP/CONVERTIBLE TOP (SUNROOF) > Sunroof SwitchINSPECTION1. Check the resistance between connector terminals.Preparation tool:Circuit testerTerminal No.Inspection conditionsStandardConnector1 — 3OpenLess than 1 ?(b): Slide switch4 — 3CloseLess than 1 ?1 — 3Tilt upLess than 1 ?(a): ...
