Subaru Crosstrek Service Manual: Removal
EXTERIOR/INTERIOR TRIM > Roof Trim
REMOVAL
1. CROSSTREK MODEL
CAUTION:
• Before handling the airbag system components, refer to “CAUTION” of “General Description” in “AIRBAG SYSTEM”. General Description > CAUTION">
• Airbag system satellite safing sensor is located in the lower of the rear seat cushion center. Be careful not to apply strong impact to the sensor when working with the rear seat cushion removed.
1. Disconnect the ground cable from battery and wait for at least 60 seconds before starting work. NOTE">
2. Adjust the front seat position.
(1) Remove the headrest.
(2) Move the seat to the front-most position and tilt the backrest rearward.
3. Remove the rear seat cushion assembly and backrest assembly. Rear Seat > REMOVAL">
4. Release the clips and claws, then detach the left and right grille speaker side.
NOTE:
Remove the grille speaker side by using a plastic remover.
5. Remove the lower inner trim on the RH and LH sides. Lower Inner Trim > REMOVAL">
6. Remove the upper inner trim on the RH and LH sides. Upper Inner Trim > REMOVAL">
7. Remove the screws and clips, and remove the trim panel - rear quarter pillar UPR on the left and right sides.
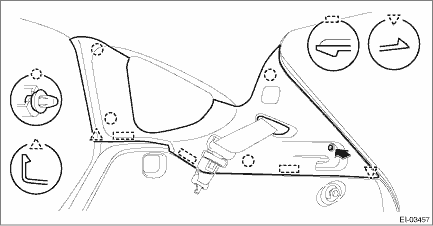
8. Remove the mat - rear floor CTR and the spacer - rear floor side.
9. Remove the clips, and remove the trim panel - rear skirt.
10. Remove the trim panel - rear apron.
(1) Remove the caps, and remove the bolts.
(2) Remove the screws.
(3) Disengage the clips, and remove the trim panel - rear apron.
NOTE:
For LH side, disconnect the connector of the luggage room light.
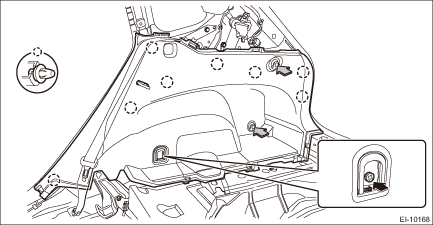
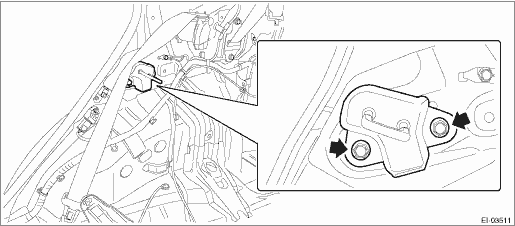
11. Remove the bolts, and remove the striker - backrest rear on the passenger’s side.
12. Remove the light assembly - map. (Models without EyeSight) Spot Map Light > REMOVAL">
13. Remove the stereo camera cover assembly. (Models with EyeSight) Stereo Camera > REMOVAL">
14. Remove the left and right sun visor assembly. Sun Visor > REMOVAL">
15. Remove the light assembly - room. Room Light > REMOVAL">
16. Remove all assist rails. Assist Grip > REMOVAL">
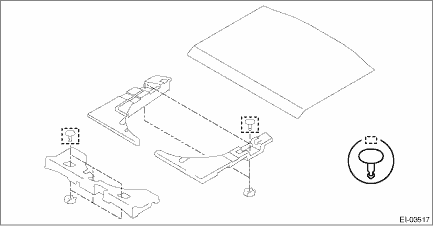
17. Remove the garnish - roof. (Model with sunroof)
18. Remove the trim panel - roof assembly.
(1) Remove the harness clamp of the cord assembly - antenna feeder and the cord - roof, and disconnect the connectors.
(2) Remove the clips and remove the touch fastener behind the room light.
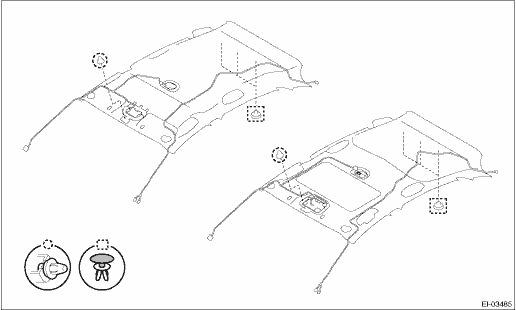
(3) Remove the weather strip - body side flange from the front/rear and left/right doors, and remove the trim panel - roof assembly.
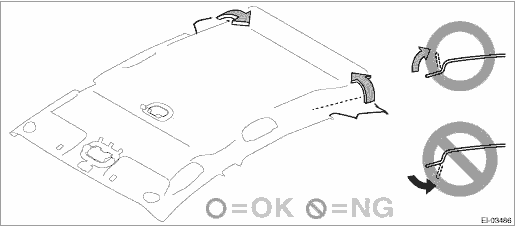
(4) Slightly bend the rear end of the trim panel - roof assembly along the character line, and take it out from the rear gate opening.
CAUTION:
Be careful of the bending direction. If the direction is wrong, the trim panel - roof assembly may be wrinkled.
 Installation
EXTERIOR/INTERIOR TRIM > Roof TrimINSTALLATIONCAUTION:• For installation of the stereo camera cover assembly, refer to “INSTALLATION”, “Stereo Camera” in the “Ey ...
 Side garnish
...
Other materials:
Inspection
GLASS/WINDOWS/MIRRORS > Power Window Control SwitchINSPECTION1. MAIN SWITCH• Driver’s seatCAUTION:Since the switch - power window main is controlled by CPU, do not check continuity for switch alone with the circuit tester. Performing continuity check with circuit tester can damage the ...
Installation
SECURITY AND LOCKS > Starter Cut RelayINSTALLATIONCAUTION:Before handling the airbag system components, refer to “CAUTION” of “General Description” in “AIRBAG SYSTEM”. General Description > CAUTION">Install each part in the reverse order of removal. ...
Wiring diagram
SECURITY AND LOCKS > Push Button Start SystemWIRING DIAGRAMFor wiring diagrams related to the push button start system (ignition change), refer to the following items.• Keyless access system: Keyless Access System > WIRING DIAGRAM">• Push button start system: Push Button ...
