Subaru Crosstrek Service Manual: Installation
EXTERIOR/INTERIOR TRIM > Roof Trim
INSTALLATION
CAUTION:
• For installation of the stereo camera cover assembly, refer to “INSTALLATION”, “Stereo Camera” in the “EyeSight” section and observe the precautions for installation. Stereo Camera > INSTALLATION">
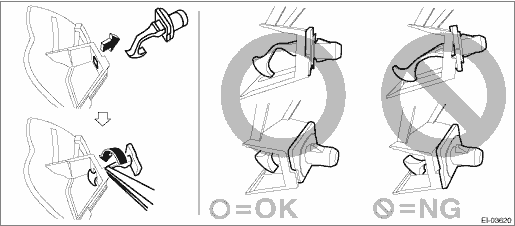
• When reusing the tether clip on the upper part of the trim panel - front pillar UPR, check that there is no damage to the tether clip. If the tether clip is damaged, always replace it with a new tether clip. If the tether clip is damaged, its holding force is reduced and the trim panel - front pillar UPR may come off.
• Do not reuse the tether clip removed from the upper part of the trim panel - front pillar UPR. Always replace with a new part.
• Do not reuse the upper clips of the trim panel - center pillar UPR. Once the clip is removed, its holding force is reduced. Be sure to replace it with a new clip.
• Before installing the trim panel - front pillar UPR, check the condition of protective non-woven fabric (white) of the curtain airbag. If it is damaged (airbag module cloth is exposed), replace the curtain airbag module assembly with a new part.
• Check the installation status of the tether clips and install the trim panel - front pillar UPR.
1. Attach the feeder cord and roof cord to the roof trim.
CAUTION:
Route each cord carefully. The cord may interfere, thus preventing normal deployment of the curtain airbag when necessary.
Tape:
Item number: 86359SC000/TAPE
NOTE:
Use the tape (service parts) by cutting into 80 mm ? 50 mm (3.2 in ? 2.0 in).
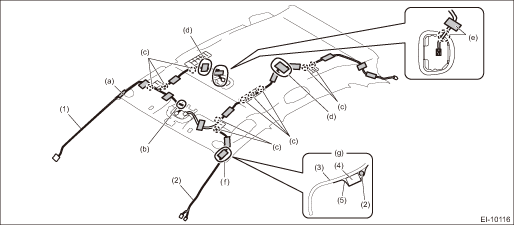
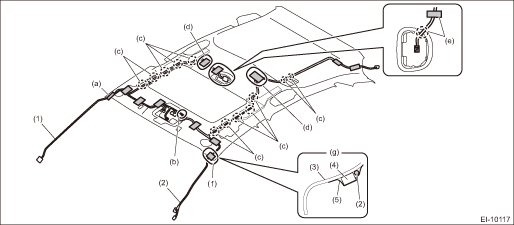
(1) | Roof cord | (3) | Trim panel - roof | (5) | Tape |
(2) | Feeder cord | (4) | Cushion | ||
(a) | Align the center of the marking (white tape) on the cord with the trim end, then secure using the tape. | (d) | Adjust the excess cord at (d) position and secure using the tape. | (g) | Route the cord along inside of the cushion (to the vehicle center) and secure using the tape. |
(b) | Align the marking (white tape) of the cord with the clamp to secure. | (e) | Secure the marking (white tape) of the cord using the tape so that the marking cannot be viewed from the passenger room. | ||
(c) | Secure the cord to the roof pad clamp. | (f) | Align the center of the marking (red tape) on the cord with the roof trim end, then secure using the tape. |
2. Attach the insulator along the mark-off line on the back of the roof trim.
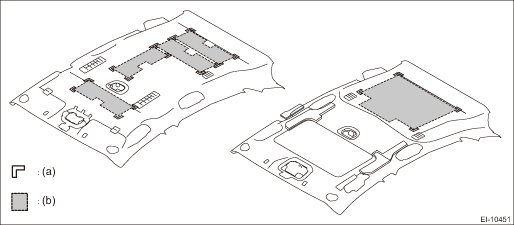
(a) | Mark-off line | (b) | Insulator |
3. Install each part in the reverse order of removal.
Tightening torque:
Console box assembly: 6.5 N·m (0.66 kgf-m, 4.8 ft-lb)
Rear seat backrest assembly: General Description > COMPONENT">
 Roof trim
...
 Removal
EXTERIOR/INTERIOR TRIM > Roof TrimREMOVAL1. CROSSTREK MODELCAUTION:• Before handling the airbag system components, refer to “CAUTION” of “General Description” in &ldqu ...
Other materials:
Dtc p0352 ignition coil "b" primary control circuit/open
ENGINE (DIAGNOSTICS)(H4DO) > Diagnostic Procedure with Diagnostic Trouble Code (DTC)DTC P0352 IGNITION COIL "B" PRIMARY CONTROL CIRCUIT/OPENNOTE:For the diagnostic procedure, refer to DTC P0351. Diagnostic Procedure with Diagnostic Trouble Code (DTC) > DTC P0351 IGNITION COIL " ...
License plate light
1. The license plate light must be pushed
inwards, then pulled out to be removed.
2. Turn the bulb socket counterclockwise
and pull out the socket.
3. Pull the bulb out of the socket.
4. Install a new bulb.
5. Reinstall the bulb socket and the
license plate light cover. ...
Installation
COOLING(H4DO) > RadiatorINSTALLATION1. Attach the radiator lower cushion to the radiator lower bracket.2. Install the radiator to vehicle.NOTE:Make pins on the lower side of radiator be fitted into the radiator lower cushions.3. Install the radiator upper brackets.Tightening torque:12 N·m ...
