
Subaru Crosstrek Owners Manual: Rear view camera
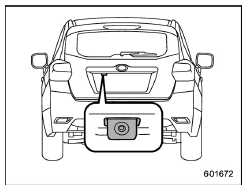
A rear view camera is attached to the rear gate. When the ignition switch is "ON" and the shift lever (MT models) or select lever (CVT models) is set to "R", the rear view camera automatically displays the rear view image behind the vehicle on one of the following displays.
- Navigation display (if equipped)
- Audio display (if equipped)
WARNING
- Since the rear view camera uses a wide-angle lens, the image on the monitor is different from the actual view in terms of distance
- Since the range of the image on the monitor is limited, you should always check the rear view and the surrounding area with your eyes and mirrors, and move backward at a slow speed. Moving backward only by checking the rear view image from the camera could cause an accident.
- Do not disassemble or modify the
camera, switch or wiring. If
smoke comes out or you smell
a strange odor, stop using the
rear view camera immediately.
Contact your SUBARU dealer for an inspection. Continued use may result in accident, fire or electric shock.
CAUTION
- If your vehicle is washed with a high-pressure washer, do not allow water to contact the camera directly. Entry of water in the camera lens may result in condensation, malfunction, fire or electric shock.
- Since the camera is a precision device, do not subject it to strong impacts. Otherwise, malfunction, fire or electric shock may occur.
- If mud or snow sticks to or is
frozen on the camera, you must
be very careful when removing it.
Otherwise, damage to the camera may cause a fire or electric shock. Pour water or lukewarm water over the camera to remove mud and ice, and wipe it with a soft, dry cloth.
- Do not put a flame close to the camera or wiring. Otherwise, damage or fire may occur.
- When replacing the fuse, be sure to use a fuse with the specified rating. Use of a fuse with a different rating may result in a malfunction.
- If the rear view camera is used for a long time while the engine is not operated, the battery may become completely discharged.
NOTE
- Do not wipe the camera with alcohol, benzine or paint thinner. Otherwise, discoloration may occur. To remove contamination, wipe the camera with a cloth moistened with a diluted neutral detergent and then wipe it with a soft, dry cloth.
- When waxing the vehicle, be careful not to apply the wax to the camera. If it comes in contact with the camera, moisten a clean cloth with a diluted neutral detergent to remove the wax.
- The camera lens has a hard coating to help prevent scratches. However, when washing the vehicle or cleaning the camera lens, be careful not to scratch the camera lens. Do not use a washing brush directly on the camera lens. The image quality of the rear view camera may deteriorate.
- Strong light shined on the camera lens may develop vertical lines around the light source. This is not a malfunction.
- Under fluorescent light, the display may flicker. However, this is not a malfunction.
- The image of the rear view camera may be slightly different from the actual color of the objects
 Cargo tie-down hooks (if equipped)
The cargo area is equipped with two or
four tie-down hooks so that cargo can be
secured with a cargo net or ropes.
When using the front tie-down hooks, turn
them down out of the storing rece ...
 How to use the rear view camera
When the shift lever/select lever is set to
"R", the rear view camera automatically
displays the rear view image from the
vehicle. When the lever is set to other
positions, the image before settin ...
Other materials:
Dtc b2a00 vin reading
TELEMATICS SYSTEM (DIAGNOSTICS) > Diagnostic Procedure with Diagnostic Trouble Code (DTC)DTC B2A00 VIN READINGDiagnosis start condition:When ignition switch is ON.DTC detecting condition:When ignition switch is ON, VIN information (CAN) sent from ECM cannot be read.Trouble symptom:• Telemat ...
Removal
AIRBAG SYSTEM > Roll ConnectorREMOVALCAUTION:Before handling the airbag system components, refer to “CAUTION” of “General Description” in “AIRBAG SYSTEM”. General Description > CAUTION">1. Position the front wheels straight ahead.2. Turn the ignitio ...
Disassembly
SEATS > Rear SeatDISASSEMBLY1. Remove the rear seat. Rear Seat > REMOVAL">2. Remove the headrest assembly - rear backrest.3. Remove the armrest assembly - rear center. (model with armrest assembly - rear center)(1) Remove the cover - armrest by pulling it in the direction of the arrow ...
