Subaru Crosstrek Owners Manual: Rear seatbelts (except rear center seatbelt)
1. Sit well back in the seat.
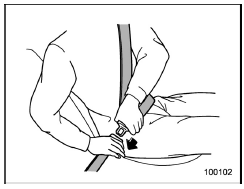
2. Pick up the tongue plate and pull the belt out slowly. Do not let it get twisted.
- If the belt stops before reaching the buckle, return the belt slightly and pull it out more slowly.
- If the belt still cannot be unlocked, let the belt retract slightly after giving it a strong pull, then pull it out slowly again.
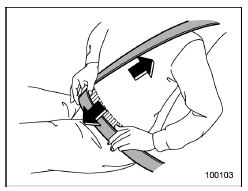
3. Insert the tongue plate into the buckle until you hear a click.
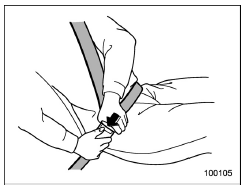
4. To make the lap part tight, pull up on the shoulder belt.
5. Place the lap belt as low as possible on your hips, not on your waist.
Unfastening the seatbelt
1. Push the button on the buckle.
2. Have the seatbelt retracted slowly to avoid the seatbelt being tangled or twisted.
Before closing the door, make sure that the belts are retracted properly to avoid catching the belt webbing in the door.
 Front seatbelts
1. Adjust the seat position according to
the following procedure.
Driver's seat: Adjust the seatback to the
upright position. Move the seat as far from
the steering wheel as practical while stil ...
 Rear center seatbelt
Center seatbelt tongue plate
Connector (tongue)
Connector (buckle)
Center seatbelt buckle
WARNING
Fastening the seatbelt with the webbing
twisted can increase the risk or
severi ...
Other materials:
Inspection
MECHANICAL(H4DO) > Cylinder HeadINSPECTION1. CYLINDER HEAD1. Visually inspect to make sure that there are no cracks, scratches or other damage.2. Use liquid penetrant tester on the important sections to check for fissures.3. Check that there are no marks of gas leaking or water leaking on gasket ...
Dtc b1628 side airbag sensor lh initialization error
AIRBAG SYSTEM (DIAGNOSTICS) > Diagnostic Chart with Trouble CodeDTC B1628 SIDE AIRBAG SENSOR LH INITIALIZATION ERRORDiagnosis start condition:Ignition voltage is 10 V to 16 V.DTC detecting condition:• Open or short circuit in harness of side sensor bus (LH)• Side airbag sensor (LH) an ...
Installation
WIPER AND WASHER SYSTEMS > Rear WasherINSTALLATION1. Install each part in the reverse order of removal.Tightening torque:Light assembly - high-mounted: 4.5 N·m (0.46 kgf-m, 3.3 ft-lb)Roof spoiler assembly: 7.5 N·m (0.76 kgf-m, 5.5 ft-lb)2. Check the nozzle - rear washer position. R ...
