Subaru Crosstrek Owners Manual: Rear combination lights
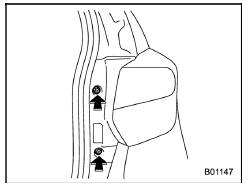
1. Using a Phillips screwdriver, remove the upper and lower screws that secure the rear combination light assembly.
2. Slide the rear combination light as- 11-38 sembly rearward and remove it from the vehicle.
- Rear side marker light
- Rear turn signal light
- Backup light
- Stop light/Tail light
3. Remove the bulb socket from the rear combination light assembly by turning it counterclockwise.
4. Pull the bulb out of the bulb socket and replace it with a new one.
5. Set the bulb socket into the rear combination light assembly and turn it clockwise until it locks.
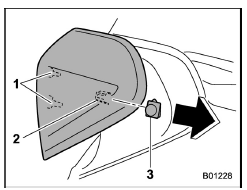
- Guide pins
- Catch
- Clip
6. Put the rear combination light assembly into place while aligning the 2 guide pins and a catch with the guide holes and a clip on the vehicle.
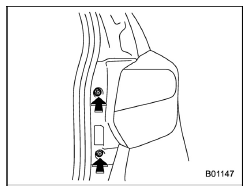
7. Tighten the upper and lower screws.
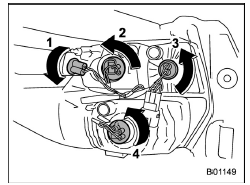
 Headlights (models without HID headlights)
CAUTION
Halogen headlight bulbs become
very hot while in use. If you touch
the bulb surface with bare hands or
greasy gloves, fingerprints or
grease on the bulb surface will
develop into hot spo ...
 License plate light
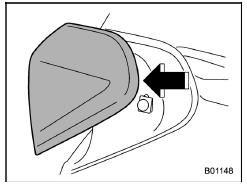
1. The license plate light must be pushed
inwards, then pulled out to be removed.
2. Turn the bulb socket counterclockwise
and pull out the socket.
3. Pull the bulb out of the socket.
4 ...
Other materials:
Dtc p0517 battery temperature sensor circuit high
ENGINE (DIAGNOSTICS)(H4DO) > Diagnostic Procedure with Diagnostic Trouble Code (DTC)DTC P0517 BATTERY TEMPERATURE SENSOR CIRCUIT HIGHDTC detecting condition:Immediately at fault recognitionCAUTION:After servicing or replacing faulty parts, perform Clear Memory Mode Clear Memory Mode > OPERATI ...
Interior lights
CAUTION
When exiting your Subaru Ascent, always ensure that all interior lights are
switched off to prevent unnecessary battery discharge and maintain proper vehicle
readiness.
Map lights
Door interlock switch
In the Subaru Ascent, the map lights provide convenient illumination for ...
Caution
COOLING(H4DO) > General DescriptionCAUTION• Prior to starting work, pay special attention to the following:1. Always wear work clothes, a work cap, and protective shoes. Additionally, wear a helmet, protective goggles, etc. if necessary.2. Protect the vehicle using a seat cover, fender cove ...
