Subaru Crosstrek Service Manual: Protector tape Installation
EXTERIOR BODY PANELS > Protector Tape
INSTALLATION
Apply the protector tape by the following steps.
1. REAR QUARTER PROTECTOR (MODELS WITHOUT SIDE GARNISH)
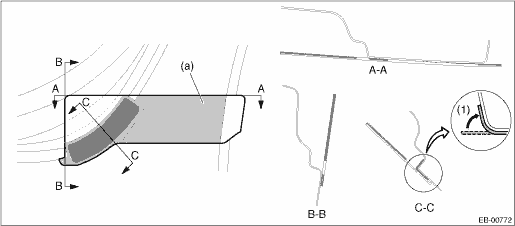
(1) | Apply the protector tape by aligning it to the rounded edge. |
1. Clean the area around applying position to remove any foreign objects on body.
2. Detach the backing paper from the temporary retention area (a) and apply the protector tape after positioning it correctly.
3. Detach the backing papers, and moisten the applying area and the backside of protector tape by spraying liquid (mild detergent solution at 3% concentration).
4. Apply the protector tape to the vehicle body.
CAUTION:
Remove the water or air bubbles out of the protector tape by using the plastic or rubber spatula.
5. Detach the application tape and temporary retention tape.
6. Bend the tack-in end and apply it as shown by (1) in the figure.
 Installation
EXTERIOR BODY PANELS > Rear Sealing CoverINSTALLATIONCAUTION:• If the sealing cover - rear door gets broken, replace it with a new part.• Apply a butyl tape evenly.• Attach the se ...

Other materials:
Location
EyeSight > Relay and FuseLOCATIONRelay & fuse boxFuse 10 A (stop light and brake switch, brake light relay)(A)Relay holderBrake light relay(B)NOTE:For other related fuses, refer to the wiring diagram. Power Supply Circuit"> ...
Battery drainage prevention function
If a door or the rear gate is not completely
closed, the interior lights will remain
illuminated as a result. However, several
lights are automatically turned off by the
battery drainage prevention function to
prevent the battery from discharging. The
following interior lights are affected by ...
Removal
STARTING/CHARGING SYSTEMS(H4DO) > StarterREMOVAL1. Disconnect the ground cable from battery. NOTE">2. Remove the clip (A) from the air intake boot.3. Loosen the clamp (B) securing the air cleaner case (rear) to the air intake boot.4. Loosen the clamp (C) which secures the throttle body t ...
