
Subaru Crosstrek Service Manual: Operation
CONTINUOUSLY VARIABLE TRANSMISSION (DIAGNOSTICS) > AT OIL TEMP Warning Light Display
OPERATION
The AT OIL TEMP light illuminates or blinks, when the ATF temperature is high and malfunction occurs in CVT.
• At normal condition
After turning the ignition switch to ON, illuminates for 2 seconds then goes off.
• When ATF temperature is high
AT OIL TEMP light illuminates when the ATF temperature is abnormally high with the ignition switch ON.
• When malfunction is detected
AT OIL TEMP light blinks at 2 Hz when the TCM detects the malfunction of CVT with the ignition switch ON. In this case, inspect using “Diagnostic Procedure with Diagnostic Trouble Code (DTC)”. Diagnostic Procedure with Diagnostic Trouble Code (DTC)">
• When AT learning is not finished
AT OIL TEMP light repeats “Blinking at 4 Hz > Turning OFF” every two seconds, when the AT learning is not completed with the ignition switch ON. In this case, perform the “Learning”. (During AT learning, the light blinks at 2 Hz or illuminates.) Learning Control">
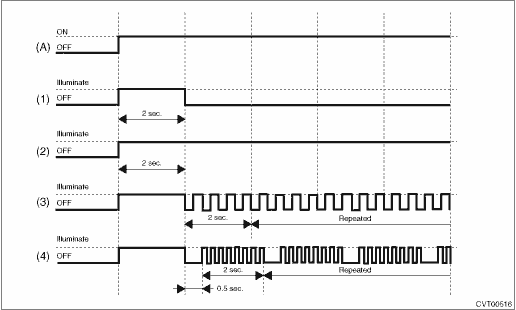
(A) | Ignition switch condition | ||||
(1) | At normal condition | (3) | When malfunction is detected | (4) | When AT learning is not finished |
(2) | When ATF temperature is high |
If the AT OIL TEMP light does not illuminate, or illumination patterns are not as above, check the AT OIL TEMP light circuit. AT OIL TEMP Warning Light Display > INSPECTION">
 Inspection
CONTINUOUSLY VARIABLE TRANSMISSION (DIAGNOSTICS) > AT OIL TEMP Warning Light DisplayINSPECTIONDIAGNOSIS:• CAN communication is lost with the combination meter.• Combination meter malfun ...

Other materials:
Trailer lights
CAUTION
Direct splicing or other improper
connection of trailer lights may
damage your vehicle's electrical
system and cause a malfunction of
your vehicle's lighting system.
Connection of trailer lights to your vehicle's
electrical system requires modifications
to the vehicle's lighting circ ...
Inspection
DRIVE SHAFT SYSTEM > Front Drive ShaftINSPECTIONCheck the removed parts for damage, wear, corrosion etc. If faulty, repair or replace.• PTJ (pillow tripod joint)Check for seizure, corrosion, damage, wear and excessive play.• EBJ (high-efficiency compact ball fixed joint)Check for seiz ...
Installation
POWER ASSISTED SYSTEM (POWER STEERING) > Universal JointINSTALLATION1. Before installation, check the universal joint assembly - steering. Universal Joint > INSPECTION">2. Adjust the tilt position of the column assembly - steering to the neutral position and lock the tilt lever.3. Ali ...
