Subaru Crosstrek Service Manual: Installation
FRONT SUSPENSION > Front Stabilizer
INSTALLATION
1. Before installation, inspect the following items and replace any faulty part with a new one.
• Check the bushing - stabilizer for abnormal cracks, fatigue or damage.
• Check the stabilizer link for damage.
2. Install each part in the reverse order of removal.
CAUTION:
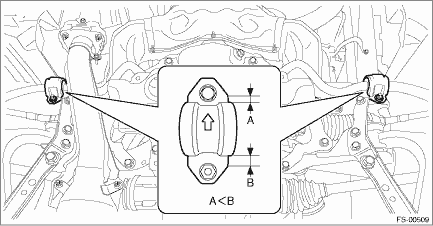
• Install the clamp - stabilizer bushing with the arrow mark facing the front of the vehicle.
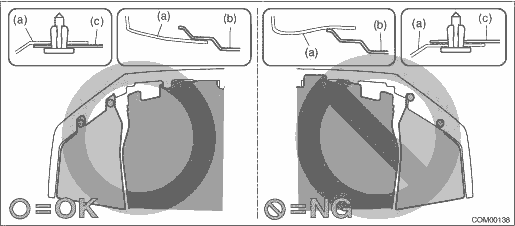
• Install so that the front end of the under cover (b) comes inside the bumper face - front (a), and the front end of the mud guard (c) comes outside the bumper face - front (a).
Tightening torque:
Clamp - stabilizer: 25 N·m (2.55 kgf-m, 18.4 ft-lb)
Stabilizer link: 60 N·m (6.12 kgf-m, 44.3 ft-lb)
Support plate - crossmember: 60 N·m (6.12 kgf-m, 44.3 ft-lb)
Under cover - front: 18 N·m (1.84 kgf-m, 13.3 ft-lb)
3. Install the front wheels.
Tightening torque:
Except for C4 model: 120 N·m (12.24 kgf-m, 88.5 ft-lb)
C4 model: 100 N·m (10.20 kgf-m, 73.8 ft-lb)
 Front stabilizer
...
 Removal
FRONT SUSPENSION > Front StabilizerREMOVAL1. Lift up the vehicle, and then remove the left and right front wheels.2. Remove the under cover - front. Front Under Cover > REMOVAL">3. Remo ...
Other materials:
Bulkhead wiring harness (in compartment) Location
WIRING SYSTEM > Bulkhead Wiring Harness (In Compartment)LOCATIONConnectorConnecting toNo.PoleColorAreaNo.DescriptionB274B-4 Blower Resistor (manual A/C)B308BlackC-5 Front door cord RHB3110GrayC-1AB1Airbag wiring harnessB328B-2 Turn signal and hazard unitB4016BlackC-1 Data link connectorB412C-2 Po ...
Rear seat reminder
The Subaru Ascent is equipped with a rear seat reminder system designed to help
drivers check for passengers or items left in the rear seats before exiting the
vehicle.
This feature is activated when the rear doors of the Subaru Ascent are opened
and closed prior to driving.
When the ignitio ...
Assembly
BRAKE > Master CylinderASSEMBLYCAUTION:When replacing the reservoir tank, adhere the label to the position shown in the figure. (C5 model)Preparation items:C5 modelPart No.: Label (25080GA010)(a)Label(b)Brake booster 1. Install the seal to the cylinder body assembly.2. Install the reservoir tank ...
