Subaru Crosstrek Service Manual: Inspection
WIPER AND WASHER SYSTEMS > Washer Tank and Motor
INSPECTION
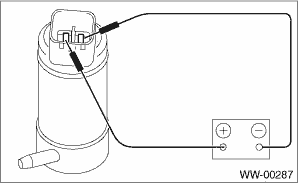
1. WASHER PUMP
Apply battery voltage to the connector terminal of the motor pump assembly - washer, and make sure that the motor operates.
2. WASHER FLUID LEVEL SENSOR
1. Check the connection status of washer fluid level sensor connector.
2. Does the low washer fluid warning light illuminate after draining the washer fluid? And does the low washer fluid warning light go off after refilling the washer fluid?
• Yes > Normal operation.
• No > Perform step 3.
3. Using a tester, measure the voltage of the washer fluid level sensor connector.
(1) Is the voltage approx. 8.5 V or more?
• Yes > Perform step 4.
• No > Check harness, meter and integrated unit, and replace if necessary.
4. Does the meter indicator illuminate if you short the washer fluid level sensor connector?
• Yes > Perform step 5.
• No > Check meter and integrated unit, and replace if necessary.
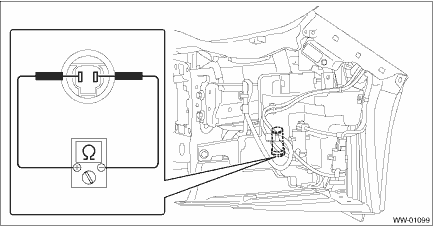
5. Using a tester, measure the resistance of the washer fluid level sensor.
(1) Turn over the mud guard.
(2) Measure the resistance of the washer fluid level sensor.
Amount of washer fluid in the tank | Standard |
No remaining quantity (ON) | Less than 10 ? |
There is remaining quantity (OFF) | 1 M? or more |
(3) Is the resistance within the standard?
• Yes > Normal operation.
• No > Replace the washer fluid level sensor along with the washer tank.

 Removal
WIPER AND WASHER SYSTEMS > Washer Tank and MotorREMOVAL1. WASHER TANK1. Open the hood COMPL - front.2. Disconnect the ground cable from battery. NOTE">3. Remove the bumper face - front. F ...
Other materials:
Removal
EyeSight > Stereo CameraREMOVALCAUTION:• When the stereo camera or windshield glass has been replaced, removed or installed, always perform the adjustment and inspection of the camera. (When the stereo camera has been replaced with a new part, the camera remains in a failed state until adju ...
Installation
FUEL INJECTION (FUEL SYSTEMS)(H4DO) > Rear Oxygen SensorINSTALLATIONCAUTION:If lubricant is spilt over the exhaust pipe, wipe it off with cloth to avoid emission of smoke or causing a fire.1. Before installing rear oxygen sensor, apply the anti-seize compound only to the threaded portion of rear ...
Defogger and deicer
Rear window defogger
Outside mirror defogger (if equipped)
Windshield wiper deicer (if equipped)
The Subaru Ascent is equipped with an integrated defogger and deicer system designed
to maintain clear visibility in cold, wet, or frosty conditions. This system operates
only when the ...
